×
- Hello
- Login or Register
- Quick Links
- Live Chat
- Track Order
- Parts Availability
- RMA
- Help Center
- Contact Us
- Shop for
- Audi Parts
My Garage
My Account
Cart
Genuine Audi A4 Cylinder Head
Head- Select Vehicle by Model
- Select Vehicle by VIN
Select Vehicle by Model
orMake
Model
Year
Select Vehicle by VIN
For the most accurate results, select vehicle by your VIN (Vehicle Identification Number).
19 Cylinder Heads found

Audi A4 Cylinder Head Part Number: 06K-103-264-E
$1630.29 MSRP: $1957.13You Save: $326.84 (17%)Ships in 1-2 Business Days
Audi A4 Cylinder Head Part Number: 06H-103-064-N
$1654.09 MSRP: $1985.70You Save: $331.61 (17%)Ships in 1-2 Business Days
Audi A4 Cylinder Head Part Number: 06H-103-063-L
$1933.20 MSRP: $2166.05You Save: $232.85 (11%)Ships in 1-2 Business Days
Audi A4 Cylinder Head Part Number: 078-103-351-B
$1090.04 MSRP: $1409.23You Save: $319.19 (23%)Ships in 1-2 Business Days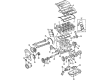
Audi A4 Cylinder Head Part Number: 058-103-351-E
$1907.57 MSRP: $2290.00You Save: $382.43 (17%)Ships in 1-2 Business Days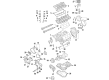
Audi A4 Cylinder Head Part Number: 06E-103-067-K
$2118.20 MSRP: $2542.86You Save: $424.66 (17%)Ships in 1-2 Business DaysAudi A4 Cylinder Head Part Number: 06E-103-903-X
$1569.12 MSRP: $1868.57You Save: $299.45 (17%)Ships in 1-2 Business DaysAudi A4 Cylinder Head Part Number: 06E-103-067-AL
$2271.71 MSRP: $2727.14You Save: $455.43 (17%)Ships in 1-2 Business DaysAudi A4 Cylinder Head Part Number: 06E-103-068-K
$2330.02 MSRP: $2797.14You Save: $467.12 (17%)Ships in 1-2 Business DaysAudi A4 Cylinder Head Part Number: 06E-103-068-AL
$2448.41 MSRP: $2939.28You Save: $490.87 (17%)Ships in 1-2 Business Days
Audi A4 Cylinder Head Part Number: 06C-103-067-PX
$2374.75 MSRP: $2835.71You Save: $460.96 (17%)Ships in 1-2 Business DaysAudi A4 Cylinder Head Part Number: 06C-103-068-MX
$2374.75 MSRP: $2835.71You Save: $460.96 (17%)Ships in 1-2 Business Days
Audi A4 Cylinder Head Part Number: 06C-103-067-QX
$3867.01 MSRP: $4627.14You Save: $760.13 (17%)Ships in 1-2 Business DaysAudi A4 Cylinder Head Part Number: 06C-103-068-QX
$3913.42 MSRP: $4682.86You Save: $769.44 (17%)Ships in 1-2 Business Days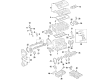
Audi A4 Cylinder Head Part Number: 06F-103-265-BX
$1567.99 MSRP: $1882.34You Save: $314.35 (17%)Ships in 1-2 Business DaysAudi A4 Cylinder Head Part Number: 06E-103-904-X
$1270.43 MSRP: $1510.00You Save: $239.57 (16%)Ships in 1-2 Business DaysAudi A4 Cylinder Head Part Number: 06E-103-067-KX
$1275.19 MSRP: $1515.71You Save: $240.52 (16%)Ships in 1-2 Business DaysAudi A4 Cylinder Head Part Number: 06E-103-068-KX
$1364.44 MSRP: $1622.86You Save: $258.42 (16%)Ships in 1-2 Business Days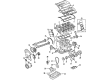
Audi A4 Cylinder Head Part Number: 06A-103-275-X
Audi A4 Cylinder Head
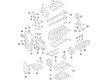
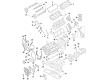
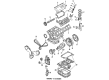
The Audi A4 Cylinder Head tops the Audi engine block by sealing the combustion chambers in coordination with air flow, spark, and cooling, making it essential to power and efficiency. This hard cast, normally aluminum, accommodates Audi intake and exhaust valves, spark plugs, fuel injectors, and coolant galleries, and has strong mounting points for the Audi manifolds so that the engine can breathe and release heat at the right time. The early side valve engines applied a simple Cylinder Head design that had the plugs alone, but the later overhead models had internal passages and rocker gear, and current models of the successful A4 all feature an overhead cam unit with the cam within the Cylinder Head to better control the valves and higher revs. In the Audi engine the component never tends to crack unless it is neglected during oil service, but the thin head gasket of the component does wear naturally, and once that seal is broken the engine can lose oil, coolant, and compression in minutes, and very expensive damage can be caused. The leak-prone head gasket is the thin gasket between the block and Cylinder Head, and therefore it requires quick intervention, and the cost of fixing it is always much cheaper than changing the entire block. Since the Audi engine places the valves and cam within the head, labor involved in repairs is also intense and this is the reason why it costs a lot once there is major damage that has been done, which is why the drivers should take care of the temperature, fluid levels, and service intervals.
Choose original equipment manufacturer Cylinder Head for great performance and strong durability. They use Audi's official craftsmanship and high-grade materials, and meet strict quality standards. Are you looking for quality Cylinder Head at a good price? Come to our online store. We carry a wide range of genuine parts for your Audi A4 and the prices are competitive. Each part comes with the manufacturer's warranty. You can install with confidence and get steady results. Over time, you'll save money and avoid hassle. Keep your maintenance simple and protect your vehicle with OEM parts. Get the quality your A4 needs now.
Audi A4 Cylinder Head Parts and Q&A
- Q: What precautions should be taken when performing the procedure to remove and reinstall the cylinder head on Audi A4?A:It should be done with care because doing it can invoke a trouble code, and one would have to visit a dealer service department or a repair shop with the relevant scan tool to synchronize the cam sensor(s) and remove the trouble code. The Exhaust Manifold can be detached to enable the removal of the cylinder head, which is a complex work by the home-based mechanic as it involves special tools and equipment. In the case of the 3.0L engine, the first thing is to release fuel system pressure and remove the negative battery cable, and empty engine coolant. Disassemble front exhaust pipe, the Valve Cover(s) and lastly the Intake Manifold, and the Timing Belt and rear timing belt covers, but be sure to remove the bolts that hold the Camshaft adjuster housing. Take out the coolant pipe on the front of the cylinder heads (and, in removing, right hand, the secondary air injection pipes and combination valve). Disconnect all electrical connectors, and all the coolant hoses and mark them to be replaced. Slacken the cylinder head bolts one after another, and as each one is needed more, the old one must be thrown away and a new one installed. Then make sure nothing is attached and then pull off the head of the block taking aid where needed because it is very heavy. Take the heads to a machine shop connected with automobiles and remove the gasket to identify them and get them overhauled or inspected. To install, make sure that the mating surfaces are clean, and scraper away the gasket and carbon deposits, and care should be taken not to damage the aluminum alloy. Close the holes of water, oil, and bolts on the block of the cylinder to stop contamination. Look at the mating surfaces and look at straight-edge to examine for warpage. Wipe off the holes in the cylinder head bolts, make sure crankshaft is in the TDC position and camshafts are in position. Put the new head gasket on the block and make sure it is positioned properly and the cylinder head goes over it, and make sure the gasket is seating. Install new cylinder head bolt and tighten them in a sequence in order of the set torque and angle with an angle-measuring gauge with precision. Install, reverse order of removal Reinstall timing belt tensioner and camshaft sprockets, adjust timing belt, and then install in the same order as they came off. Lastly, replace the engine oil and filter, refill and bleed the cooling system and service the engine by running it to identify any leakage. In case of the 3.2L engine, this is a complicated task that requires special equipment, thus it is best to leave this process to a professional car repair shop.
- Q: What precautions should be taken on the Cylinder Head to avoid setting a trouble code on Audi A4?A:This operation will lead to the setting of a trouble code that will need to be removed by taking the vehicle to a dealers service department or any other repair shop with the necessary scan tool to adjust the cam sensor and clear the trouble code. It should be noted that the Exhaust Manifold may be left in place when removing the cylinder head of 1.8L engines only. Start by unplugging the cable of the negative terminal of the battery, emptying the engine coolant and setting the engine to TDC. Disassemble the intake manifold and the Timing Belt, and the back timing belt cover. To 1.8L engines, dismount the turbocharger on the exhaust manifold, to 2.0L engines, unmount the exhaust manifold/turbocharger assembly. The next step is to take off the Valve Cover, disconnect all electrical connectors and the heater hose at the elbow at the back of the cylinder head, which are to be labeled to help make the installation process easier. Loose the cylinder head bolts progressively (one half-turn at a time) until all the bolts are loosened enough to be removed by hand and the old bolts discarded as new ones are required on reassembling. Make sure that nothing is attached to the cylinder head, then carefully remove it out of the cylinder block, with the help of someone if it is too heavy. Should resistance be met, take pains to lift the cylinder head up at a casting projection. Take out the gasket at the top of the block to identify it. Prior to re-fitment of the cylinder head, ensure that, it has been checked by an engine machine shop concerning important dimensions. Before fitting, make sure that the mating surfaces of the cylinder head and cylinder block are thoroughly cleaned, and use hard plastic or wood scraper to scrape all the evidence of gasket and carbons off, but avoid damaging the aluminum alloy. Close the holes of water, oil and the bolts in the cylinder block using adhesive tape and paper. Test the mating surfaces, and are nicked or scratched, and remove any slight scratches by abrasive paper. In case it is suspected that the cylinder head gasket surface has warped, then check with a straight-edge to confirm the presence of a distortion, and be careful not to be able to force a 0.004-inch feeler gauge between the straightedge and the gasket surface of the head. Drain the holes in the cylinder head bolts with an appropriate tap which must be clean and dry. To avoid hitting the valve heads with piston crowns, prior to the installation of the cylinder head, set the crankshaft to other than TDC in No. 1 cylinder. When the cylinder head has been resurfaced, make sure that the valve sets are also reworked the same. Saw off the heads of two old cylinder head bolts to serve as alignment dowels in installation but cut a hole on one end to be able to remove it easily. Install the alignment dowels in the cylinder block and install the new head gasket making sure that the part number and manufacturer marking of TOP are face up. Install the cylinder head in the middle of the cylinder block with the help of someone, paying attention to the fact that the head gasket should be firmly seated. Install the cylinder head bolts by hand tight, which must be new bolts as the old ones are stretch-type bolts. Unscrew the custom made alignment dowels and fit the other two bolts manually. Screw the cylinder head bolts four turns to the required torque and angle of rotation with the aid of an angle-measuring gauge. Reboot the engine by turning the crankshaft clockwise by 90-degrees so that the engine is at TDC with the alignment mark on the crankshaft pulley pointing to the mark on the front cover. Install timing belt tensioner and camshaft sprocker, in case it is removed, adjust timing belt and install in the reverse order of removal. Lastly, change the engine oil and filter, fill up the cooling system, start engine and check leaks.
Related Audi A4 Parts
 Audi A4 Fuel Pump
 Audi A4 Belt Tensioner
 Audi A4 Camshaft
 Audi A4 Exhaust Clamp
 Audi A4 Ignition Switch
 Audi A4 Instrument Cluster
 Audi A4 Oil Drain Plug
 Audi A4 Sway Bar
 Audi A4 Parking Brake Cable
 Audi A4 Axle Support Bushings
 Audi A4 Cooling Fan Clutch
 Audi A4 Throttle Body Mounting Gasket
Browse by Year
2020 Cylinder Head 2019 Cylinder Head 2018 Cylinder Head 2017 Cylinder Head 2016 Cylinder Head 2015 Cylinder Head 2014 Cylinder Head 2013 Cylinder Head 2012 Cylinder Head 2011 Cylinder Head 2010 Cylinder Head 2009 Cylinder Head 2008 Cylinder Head 2007 Cylinder Head 2006 Cylinder Head 2005 Cylinder Head 2004 Cylinder Head 2003 Cylinder Head 2002 Cylinder Head 1999 Cylinder Head 1998 Cylinder Head 1997 Cylinder Head 1996 Cylinder Head