×
- Hello
- Login or Register
- Quick Links
- Live Chat
- Track Order
- Parts Availability
- RMA
- Help Center
- Contact Us
- Shop for
- Audi Parts
My Garage
My Account
Cart
Genuine Audi A4 Camshaft
Cam- Select Vehicle by Model
- Select Vehicle by VIN
Select Vehicle by Model
orMake
Model
Year
Select Vehicle by VIN
For the most accurate results, select vehicle by your VIN (Vehicle Identification Number).
23 Camshafts found

Audi A4 Camshaft Part Number: 06F-109-102-E
$306.41 MSRP: $429.15You Save: $122.74 (29%)Ships in 1-2 Business Days


Audi A4 Camshaft Part Number: 078-109-021-A
$321.30 MSRP: $450.00You Save: $128.70 (29%)Ships in 1-2 Business Days
Audi A4 Camshaft Part Number: 058-109-021-M
$681.26 MSRP: $880.76You Save: $199.50 (23%)Ships in 1-2 Business Days

Audi A4 Camshaft Part Number: 06L-109-022-AK
$687.21 MSRP: $888.45You Save: $201.24 (23%)Ships in 1-2 Business Days

Audi A4 Camshaft Part Number: 06E-109-102-AL
$1068.01 MSRP: $1380.76You Save: $312.75 (23%)Ships in 1-2 Business Days

Audi A4 Camshaft Part Number: 06E-109-102-AK
$1213.79 MSRP: $1457.13You Save: $243.34 (17%)Ships in 1-2 Business Days

Audi A4 Camshaft Part Number: 06H-109-021-K
$1079.91 MSRP: $1396.14You Save: $316.23 (23%)Ships in 1-2 Business DaysAudi A4 Camshaft Part Number: 06F-109-101-J
$324.26 MSRP: $454.15You Save: $129.89 (29%)Ships in 1-2 Business Days
Audi A4 Camshaft Part Number: 078-109-022-A
$388.59 MSRP: $544.25You Save: $155.66 (29%)Ships in 1-2 Business DaysAudi A4 Camshaft Part Number: 06K-109-021-H
$612.84 MSRP: $792.29You Save: $179.45 (23%)Ships in 1-2 Business Days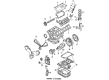
Audi A4 Camshaft Part Number: 078-109-101-S
$655.12 MSRP: $846.95You Save: $191.83 (23%)Ships in 1-2 Business Days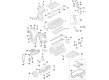
Audi A4 Camshaft Part Number: 06K-109-022-BS
$662.83 MSRP: $856.92You Save: $194.09 (23%)Ships in 1-2 Business DaysAudi A4 Camshaft Part Number: 06K-109-021-N
$789.55 MSRP: $1020.75You Save: $231.20 (23%)Ships in 1-2 Business DaysAudi A4 Camshaft Part Number: 06C-109-021-F
$827.05 MSRP: $1069.23You Save: $242.18 (23%)Ships in 1-2 Business DaysAudi A4 Camshaft Part Number: 06C-109-022-G
$836.57 MSRP: $1081.54You Save: $244.97 (23%)Ships in 1-2 Business DaysAudi A4 Camshaft Part Number: 06C-109-021-G
$837.76 MSRP: $1083.08You Save: $245.32 (23%)Ships in 1-2 Business DaysAudi A4 Camshaft Part Number: 078-109-102-AK
$856.80 MSRP: $1107.69You Save: $250.89 (23%)Ships in 1-2 Business DaysAudi A4 Camshaft Part Number: 06C-109-022-F
$997.22 MSRP: $1289.23You Save: $292.01 (23%)Ships in 1-2 Business DaysAudi A4 Camshaft Part Number: 06L-109-021-S
$1068.01 MSRP: $1380.76You Save: $312.75 (23%)Ships in 1-2 Business DaysAudi A4 Camshaft Part Number: 06H-109-022-BJ
$1076.95 MSRP: $1392.29You Save: $315.34 (23%)Ships in 1-2 Business Days
| Page 1 of 2 |Next >
1-20 of 23 Results
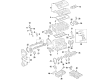
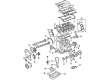
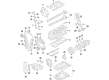
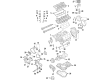
Audi A4 Camshaft
The Audi A4 Camshaft controls the correct timing of the intake and exhaust valves to provide smooth power and clean emissions. The cam is fabricated out of hard cast iron or billet steel and lined with heart-shaped lobes that push on lifters, rockers, or buckets and is connected to the crank by a timing belt or chain to ensure it rotates at half the crank speed in the four-stroke design to maintain perfect synchronization between the movement of the piston and valves. Some Audi sedans applied a single overhead cam setup, which uses a single shaft to position the two heads over each other, whereas later A4 generations switched to a double overhead cam design with the two intake and exhaust shafts separated, reducing the weight of the valvetrain and enabling finer variable valve timing to be applied to optimise high-rev power without compromising low-end torque. In contemporary Audi turbocharged models, the unit incorporates sophisticated cam phasers to alter the position of the lobes on the fly to assist the engine in pulling well throughout the rev range. No matter the style, the Camshaft has to endure continuous contact with valve gear, and old lobes or frozen journals may lead to pops, backfiring, or a dead miss as the valves will not open wide enough. Frequent oil changes keep the level of friction low, which safeguards this important Camshaft and allows Audi drivers to experience a civilized idle and long-lasting reliability. The Camshaft keeps the performance identity of every Audi gasoline engine through its ability to facilitate the intake, compression, power, and exhaust strokes.
Choose original equipment manufacturer Camshaft for great performance and strong durability. They use Audi's official craftsmanship and high-grade materials, and meet strict quality standards. Are you looking for quality Camshaft at a good price? Come to our online store. We carry a wide range of genuine parts for your Audi A4 and the prices are competitive. Each part comes with the manufacturer's warranty. You can install with confidence and get steady results. Over time, you'll save money and avoid hassle. Keep your maintenance simple and protect your vehicle with OEM parts. Get the quality your A4 needs now.
Audi A4 Camshaft Parts and Q&A
- Q: What precautions should be taken when working on the Camshaft and Valve Lifter to avoid setting a trouble code on Audi A4?A:This procedure can trigger a set trouble code; this can only be cleared by visiting a dealer service department or a repair shop that has the required scan tool that is capable of aligning the cam sensor. The camshafts and lifters must be carefully inspected before fitting and camshaft endplay must be inspected before removal. Even though hydraulic lifters are self-adjusting and do not need periodic servicing, there is a process of verifying hydraulic lifters that are excessively noisy. In the case of the 1.8L engine, firstly, take out the engine cover, Valve Cover, Timing Belt, camshaft sprocket, secondary air combination valve, and camshaft position sensor. Indicate the camshaft drive chain position against the sprockets and rear bearing cap with 16 rollers between marks. Tension the camshaft drive chain with either a special tool or a homemade tool. Identify the position of the camshaft bearing caps, loosen and remove the bearing cap nuts in a particular sequence, and remove the camshaft adjuster, and the two camshafts together with the adjustable. Take the lifters out of the Cylinder Head, and in order. In the case of the 2.0L engine, the steps include that of the cylinder head, the camshaft position sensor, clamp down on the camshafts using a locking tool, compress the camshaft drive chain tensioner, and unscrew the camshaft adjuster and guide frame. Check the bearings surfaces of the camshafts, camshaft journal and bearing clearances, check the camshaft runout, and camshaft endplay. Compare camshaft lobes and determine wear of lifters. Installation of the 1.8L engine includes lubricating the hydraulic lifters, fitting them into their bores, cleaning mating surfaces, aligning the marks of the drive chain, and fitting the camshafts in place. Fit the drive chain tensioner, bearings caps and camshaft oil seals and place the camshaft sprocker and timing belt. Clean and grease the camshafts and bearing surfaces, install the camshafts, guide frame, and camshaft adjuster and check the alignment of the timing belt of the 2.0L engine. The rest of the installation process is the same but in the reverse order of removal making sure that both TDC marks align once the engine has been rotated through two complete revolutions.
- Q: What precautions should be taken when performing this procedure to avoid triggering a trouble code and ensure proper installation of the camshaft and valve lifter on Audi A4?A:It is recommended to exercise caution because, when this procedure is performed it may enter a trouble code and thus the visit to a dealer service department or a repair shop that has the correct scan tool to align the cam sensor(s) and clear the trouble code is needed. There is a need to carefully inspect the camshafts and lifters during pre-installation, and to ensure that the endplay of camshafts is checked before removal. Valve / rain noise during cold start is normal on all V6 models, but it is the constant noise after a warm start that may necessitate the removal of the intake manifold and replacement of the oil check valves. On the 3.0L V6 engine, one should start with the removal of the engine and the Valve Covers followed by inspecting the lifters with the help of a feeler gauge. Next step is to remove Timing Belt, camshaft adjusters and rear timing belt cover, snapping harness off the camshaft adjuster solenoid housing and removing bolts on the solenoid housing. Relax the guide frame bolts, insert M6 bolts and use them to push the guide frame upwards and label the camshafts to identify them and then remove them together with the lifters, keeping them in their places. Clean and check the camshaft wear, then check the lobe height replacement of the camshaft may be required. Install the guide frame temporarily to check the endplay on the camshaft and to check the lobes. To install it, lubricate the lifters and camshaft, fit the camshafts, clean the mating surfaces, add a sealant and fit the guide frame, making sure that it is aligned with a special instrument. Install the locking tools and then assemble in the same sequence in reverse using new O-rings, and camshaft oil seals. Lastly, turn the crankshaft and ensure there is no interference and also get new lifters to bleed down at least 30 minutes before starting the vehicle. The 3.2L engine service is a labor intensive engine that needs special equipment and is only conducted by a qualified facility.

Related Audi A4 Parts
 Audi A4 Belt Tensioner
 Audi A4 Engine Cover
 Audi A4 Timing Cover Gasket
 Audi A4 Crankshaft Pulley
 Audi A4 Crankshaft Timing Gear
 Audi A4 Differential Cover Gasket
 Audi A4 Oil Pump Rotor Set
 Audi A4 Spool Valve
 Audi A4 Timing Chain Guide
 Audi A4 Valve Lifter
 Audi A4 Valve Spring Retainer Keeper
 Audi A4 Variable Timing Solenoid
Browse by Year
2020 Camshaft 2019 Camshaft 2018 Camshaft 2017 Camshaft 2016 Camshaft 2015 Camshaft 2014 Camshaft 2013 Camshaft 2012 Camshaft 2011 Camshaft 2010 Camshaft 2009 Camshaft 2008 Camshaft 2007 Camshaft 2006 Camshaft 2005 Camshaft 2004 Camshaft 2003 Camshaft 2002 Camshaft 2001 Camshaft 2000 Camshaft 1999 Camshaft 1998 Camshaft 1997 Camshaft 1996 Camshaft