×
- Hello
- Login or Register
- Quick Links
- Live Chat
- Track Order
- Parts Availability
- RMA
- Help Center
- Contact Us
- Shop for
- Audi Parts
My Garage
My Account
Cart
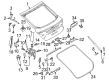
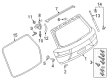
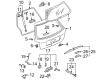
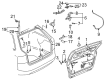
Genuine Audi Liftgates
- Select Vehicle by Model
- Select Vehicle by VIN
Select Vehicle by Model
orMake
Model
Year
Select Vehicle by VIN
For the most accurate results, select vehicle by your VIN (Vehicle Identification Number).
41 Liftgates found


Audi Lift Gate Part Number: 89A-827-025
$2093.44 MSRP: $2931.99You Save: $838.55 (29%)Ships in 1-2 Business DaysProduct Specifications- Other Name: Lid


Audi Lift Gate Part Number: 8N8-827-023-D
$1019.83 MSRP: $1428.34You Save: $408.51 (29%)Ships in 1-2 Business DaysProduct Specifications- Other Name: Lid
- Replaces: 8N8-827-023

Audi Lift Gate Part Number: 8N8-827-023-C
$1107.89 MSRP: $1551.67You Save: $443.78 (29%)Ships in 1-2 Business DaysProduct Specifications- Other Name: Lid


Audi Lift Gate Part Number: 8W9-827-025-C
$1219.98 MSRP: $1708.65You Save: $488.67 (29%)Ships in 1-2 Business DaysProduct Specifications- Other Name: Lid


Audi Lift Gate Part Number: 8W9-827-025-D
$1229.50 MSRP: $1721.98You Save: $492.48 (29%)Ships in 1-2 Business DaysProduct Specifications- Other Name: Lid
- Replaces: 8W9-827-025-B, 8W9-827-025


Audi Lift Gate Part Number: 8K9-827-023
$1328.74 MSRP: $1860.98You Save: $532.24 (29%)Ships in 1-2 Business DaysProduct Specifications- Other Name: Lid

Audi Lift Gate Part Number: 8R0-827-023-C
$1828.90 MSRP: $2561.48You Save: $732.58 (29%)Ships in 1-2 Business DaysProduct Specifications- Other Name: Lid

Audi Lift Gate Part Number: 4G8-827-025-B
$2139.01 MSRP: $2995.81You Save: $856.80 (29%)Ships in 1-2 Business DaysProduct Specifications- Other Name: Lid
- Replaces: 4G8-827-025-A

Audi LID Part Number: 4M0-827-025-F
$2574.55 MSRP: $3605.82You Save: $1031.27 (29%)Ships in 1-2 Business DaysProduct Specifications- Other Name: Lift Gate
- Replaces: 4M0-827-025-E

Audi Lift Gate Part Number: 8D9-827-023-AA
$621.89 MSRP: $871.00You Save: $249.11 (29%)Ships in 1-2 Business DaysProduct Specifications- Other Name: Lid
- Replaces: 8D9-827-023-T

Audi Lift Gate Part Number: 8E9-827-023-C
$716.38 MSRP: $1003.34You Save: $286.96 (29%)Ships in 1-2 Business DaysProduct Specifications- Other Name: Lid

Audi Lift Gate Part Number: 8E9-827-023-Q
$784.21 MSRP: $1098.33You Save: $314.12 (29%)Ships in 1-2 Business DaysProduct Specifications- Other Name: Lid
- Replaces: 8E9-827-023-J
Audi Lift Gate Part Number: 8E9-827-023-G
$861.56 MSRP: $1206.67You Save: $345.11 (29%)Ships in 1-2 Business DaysProduct Specifications- Other Name: Lid

Audi Lift Gate Part Number: 4B9-827-023-J
$923.44 MSRP: $1293.34You Save: $369.90 (29%)Ships in 1-2 Business DaysProduct Specifications- Other Name: Lid
- Replaces: 4B9-827-023-H, 4B9-827-023-E
Audi Lift Gate Part Number: 8E9-827-023-S
$946.04 MSRP: $1324.98You Save: $378.94 (29%)Ships in 1-2 Business DaysProduct Specifications- Other Name: Lid
- Replaces: 8E9-827-023-N

Audi Lift Gate Part Number: 8P4-827-023-J
$1161.44 MSRP: $1626.66You Save: $465.22 (29%)Ships in 1-2 Business DaysProduct Specifications- Other Name: Lid
- Replaces: 8P4-827-023-A, 8P4-827-023-E
Audi Lift Gate Part Number: 8P4-827-023-L
$1207.60 MSRP: $1691.32You Save: $483.72 (29%)Ships in 1-2 Business DaysProduct Specifications- Other Name: Lid
- Replaces: 8P4-827-023-C, 8P4-827-023-G

Audi Lift Gate Part Number: 4F9-827-023-N
$1293.64 MSRP: $1811.82You Save: $518.18 (29%)Ships in 1-2 Business DaysProduct Specifications- Other Name: Lid
- Replaces: 4F9-827-023-K

Audi Lift Gate Part Number: 8S8-827-025-A
$1325.53 MSRP: $1856.49You Save: $530.96 (29%)Ships in 1-2 Business DaysProduct Specifications- Other Name: Lid

Audi Lift Gate Part Number: 8U0-827-025-B
$1392.29 MSRP: $1949.99You Save: $557.70 (29%)Ships in 1-2 Business DaysProduct Specifications- Other Name: Lid
| Page 1 of 3 |Next >
1-20 of 41 Results
Audi Liftgates
Audi Liftgates make loading groceries, sports gear, or luggage a simple matter as the rear panel swings up wide and stays put with little effort, leaving your hands to do the important stuff. Audi began in 1909 and has become an icon of German performance, with sedans and SUVs combining sharp handling with common sense luxury. From the first water-cooled engines to the famous Quattro all-wheel drive, Audi has been on a quest for innovation to make drivers feel confident on those wet or snowy roads. Digital services such as the Virtual Cockpit place maps and gauges at the tip of your eyes, and matrix headlights slash through the dark so every night excursion is safer. The electric e-tron family is indicative of Audi embracing the future with a cleaner way to drive, and its road-tested self-driving prototypes are a hint of even bigger leaps forward. While the cars are impressive, it is also their practicality that matters, and that is where the Liftgates excel through the range. These Liftgates serve as the protective door for the cargo bay, which can pivot upwards to reveal a low, wide opening without taking up space from passengers. Gas struts or power motors hold the panel in the air so even younger siblings can load backpacks without straining. Strong seals keep dust and rain outside, and the rigid metal skin protects against bumps in busy parking lots. By combining the attributes of strength, weather resistance, and easy operation, Audi gives its drivers Liftgates that match the brand's reputation for smart, user-friendly engineering.
Stick with genuine OEM Liftgates when you need quality that holds up. Audi crafts these parts to hit strict factory specs for every single unit. They also run each part through rigorous checks during production to maintain high quality. You can find exact Audi Liftgates you need in our huge stock at AudiPartsGiant.com. You'll love our low, economical prices too. Every OEM part carries a real manufacturer's warranty, so you can buy with confidence. Returns aren't a headache here because our policy is simple. Plus, our speedy delivery gets orders out fast. Shop today and buy with total peace of mind.
Audi Liftgates Parts and Q&A
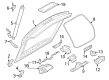
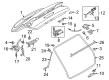
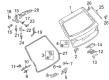
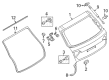
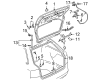
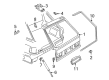
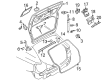
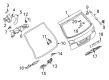
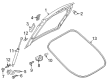
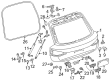
- Q: How should the rear liftgates be removed and installed safely on Audi A4?A:The liftgate is heavy and somewhat awkward to remove and install, so at least two people should perform this procedure. Begin by opening the liftgate and removing the trim panel/grab handle fasteners located at the center of the lower edge. Next, take out the fasteners on both the left and right sides, then carefully pry the lower section of the trim panel from the liftgate, using just enough force to overcome the spring clips, and unclip the upper section from the rear window opening. Disconnect the wiring from the liftgate components, noting the routing and attachment locations of the wires. Mark the relationship between the liftgate and its hinges with a marker. With assistance to support the liftgate, use a small screwdriver to lift the retaining springs at both ends of the support strut, then pry or pull the strut from the ball stud to detach it. Carefully pry off the hinge covers and remove them, then take out the liftgate-to-hinge fasteners and lift the liftgate clear of the vehicle. For installation, reverse the removal steps, ensuring the liftgate is correctly aligned before fully tightening the hinge bolts. The latch assembly can be adjusted up-and-down after loosening the nuts, and the closed position of the liftgate can be modified by altering the positions of the rubber liftgate stops at the top of the opening. Unclip the plastic cover from the liftgate stop and adjust the center screw in or out as necessary.

Related Audi Parts
 Audi Bumper
 Audi Hood Latch
 Audi Center Console
 Audi Door Lock
 Audi Door Lock Cylinder
 Audi Mirror Cover
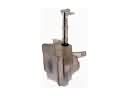 Audi Windshield Washer Fluid Reservoir
 Audi Wiper Arm
 Audi Wiper Blade
 Audi Body Mount Hole Plug
 Audi Door Latch Cable
 Audi Side View Mirrors
Browse by Model
100 Liftgates 200 Quattro Liftgates 5000 Liftgates 5000 Quattro Liftgates A3 Liftgates A3 Quattro Liftgates A3 Sportback e-tron Liftgates A4 allroad Liftgates A4 Liftgates A4 Quattro Liftgates A5 Sportback Liftgates A6 allroad Liftgates A6 Liftgates A6 Quattro Liftgates A7 Quattro Liftgates A7 Sportback Liftgates allroad Liftgates Allroad Quattro Liftgates Coupe Quattro Liftgates e-tron Quattro Liftgates e-tron S Liftgates e-tron S Sportback Liftgates e-tron Sportback Liftgates Q3 Liftgates Q3 Quattro Liftgates Q4 e-tron Liftgates Q4 e-tron Sportback Liftgates Q5 Liftgates Q5 PHEV Liftgates Q5 Sportback Liftgates Q6 e-tron Liftgates Q7 Liftgates Q8 e-tron Liftgates Q8 e-tron Sportback Liftgates Q8 Liftgates RS Q8 Liftgates RS5 Sportback Liftgates RS6 Avant Liftgates RS7 Liftgates RS7 Sportback Liftgates S3 Liftgates S4 Liftgates S5 Sportback Liftgates S6 Liftgates S7 Liftgates S7 Sportback Liftgates SQ5 Liftgates SQ5 Sportback Liftgates SQ6 e-tron Liftgates SQ7 Liftgates SQ8 e-tron Liftgates SQ8 e-tron Sportback Liftgates SQ8 Liftgates TT Liftgates TT Quattro Liftgates TT RS Quattro Liftgates TTS Quattro Liftgates