×
- Hello
- Login or Register
- Quick Links
- Live Chat
- Track Order
- Parts Availability
- RMA
- Help Center
- Contact Us
- Shop for
- Audi Parts
My Garage
My Account
Cart
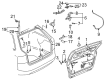
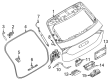
Genuine Audi Door Lock
Power Door Lock Actuator- Select Vehicle by Model
- Select Vehicle by VIN
Select Vehicle by Model
orMake
Model
Year
Select Vehicle by VIN
For the most accurate results, select vehicle by your VIN (Vehicle Identification Number).
178 Door Locks found


Audi Lock Actuator Part Number: 8X1-837-016-C
$282.03 MSRP: $394.99You Save: $112.96 (29%)Ships in 1-2 Business DaysProduct Specifications- Other Name: Latch; Lock
- Position: Passenger Side
- Replaces: 8X1-837-016-A


Audi Lock Actuator Part Number: 8J1-837-015-F
$310.59 MSRP: $434.99You Save: $124.40 (29%)Ships in 1-2 Business DaysProduct Specifications- Other Name: Latch; Lock
- Position: Driver Side
- Replaces: 8J1-837-015-D


Audi Lock Actuator Part Number: 8J1-837-016-F
$481.95 MSRP: $675.01You Save: $193.06 (29%)Ships in 1-2 Business DaysProduct Specifications- Other Name: Latch; Lock
- Position: Passenger Side
- Replaces: 8J1-837-016-D


Audi Lock Actuator Part Number: 83A-839-016-B
$100.07 MSRP: $140.15You Save: $40.08 (29%)Ships in 1-2 Business DaysProduct Specifications- Other Name: Latch; Lock
- Position: Passenger Side
- Replaces: 83A-839-016


Audi Lock Actuator Part Number: 4K1-837-016-J
$100.82 MSRP: $141.20You Save: $40.38 (29%)Ships in 1-2 Business DaysProduct Specifications- Other Name: Latch; Lock
- Position: Passenger Side


Audi Lock Actuator Part Number: 4K1-837-016-L
$129.72 MSRP: $181.68You Save: $51.96 (29%)Ships in 1-2 Business DaysProduct Specifications- Other Name: Latch; Lock
- Position: Passenger Side


Audi Lock Actuator Part Number: 4K1-837-015-L
$129.72 MSRP: $181.67You Save: $51.95 (29%)Ships in 1-2 Business DaysProduct Specifications- Other Name: Latch; Lock
- Position: Driver Side


Audi Lock Part Number: 4K0-827-503
$132.09 MSRP: $185.00You Save: $52.91 (29%)Ships in 1-2 Business DaysProduct Specifications- Other Name: Latch


Audi Lock Assembly Part Number: 4G0-839-016-D
$298.69 MSRP: $418.33You Save: $119.64 (29%)Ships in 1-2 Business DaysProduct Specifications- Other Name: Latch; Lock
- Position: Passenger Side


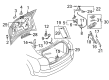
Audi Trunk Lock Part Number: 8E5-827-505-B
$141.61 MSRP: $198.33You Save: $56.72 (29%)Ships in 1-2 Business DaysProduct Specifications- Other Name: Latch; Lock


Audi Lock Part Number: 8L0-827-505-F
$103.53 MSRP: $145.00You Save: $41.47 (29%)Ships in 1-2 Business DaysProduct Specifications- Other Name: Latch


Audi Lock Actuator Part Number: 4K0-839-015-Q
$107.22 MSRP: $150.17You Save: $42.95 (29%)Ships in 1-2 Business DaysProduct Specifications- Other Name: Latch; Lock, Lock Assembly
- Position: Driver Side


Audi Lock Part Number: 8D1-837-015-F
$245.14 MSRP: $343.33You Save: $98.19 (29%)Ships in 1-2 Business DaysProduct Specifications- Other Name: Door Lock
- Position: Driver Side


Audi Lock Actuator Part Number: 4K1-837-015-J
$100.82 MSRP: $141.20You Save: $40.38 (29%)Ships in 1-2 Business DaysProduct Specifications- Other Name: Latch; Lock
- Position: Driver Side

Audi Lock Actuator Part Number: 8K0-839-016-G
$502.18 MSRP: $703.32You Save: $201.14 (29%)Ships in 1-2 Business DaysProduct Specifications- Other Name: Latch; Lock
- Position: Passenger Side
- Replaces: 8K0-839-016-D
Audi Lock Actuator Part Number: 8K0-839-015-G
$511.70 MSRP: $716.66You Save: $204.96 (29%)Ships in 1-2 Business DaysProduct Specifications- Other Name: Latch; Lock
- Position: Driver Side
- Replaces: 8K0-839-015-D

Audi Lock Actuator Part Number: 4F5-827-505-D
$107.09 MSRP: $149.99You Save: $42.90 (29%)Ships in 1-2 Business DaysProduct Specifications- Other Name: Latch; Lock, Trunk Lock
- Replaces: 4F5-827-505-C

Audi Lock Assembly Part Number: 4B9-827-505-N
$193.97 MSRP: $271.67You Save: $77.70 (29%)Ships in 1-2 Business DaysProduct Specifications- Other Name: Lock; Actuator
- Position: Passenger Side
- Replaces: 4B9-827-505-M, 4B9-827-505-G, 4B9-827-505-H, 4B9-827-505-J

Audi LATCH Part Number: 11A-827-506-A
$61.87 MSRP: $86.65You Save: $24.78 (29%)Ships in 1-2 Business DaysAudi Lock Actuator Part Number: 83A-839-015-B
$100.07 MSRP: $140.15You Save: $40.08 (29%)Ships in 1-2 Business DaysProduct Specifications- Other Name: Latch; Lock
- Position: Driver Side
- Replaces: 83A-839-015
| Page 1 of 9 |Next >
1-20 of 178 Results
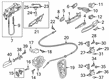
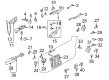
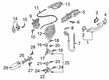
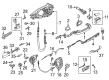
Audi Door Lock
Audi Door Lock offers immediate reliable security for the cabins while also presenting a high-quality image of the company's sleek technology and leaves no trip to worry about. Audi, founded in 1909, built its reputation on precision German engineering, brisk performance and innovations such as Quattro all-wheel drive, which allow drivers to tackle the rain or snow with confidence. Audi is also pushing the boundaries of digital technology, equipping cars with Virtual Cockpit displays and matrix headlights that turn night into day, and the e-tron range shows the brand is serious about electric mobility. Testing self-driving prototypes on public roads, Audi demonstrates a forward-thinking attitude that values the safety and convenience of all behind the wheel. Matching that vision, the Door Lock system has gone from simple rods made of metal to intricate electric actuators that enable all doors to lock and unlock with the tap of a finger. Modern units combine remote keyless entry, so a little fob transmits a coded radio pulse that commands each Door Lock in a split second with the lights flashing to indicate status. Automatic locking at set speeds provides another level of security without the need for additional effort, while simple mechanical latches are still underneath to ensure durability. Overall, the Audi Door Lock is a small but important example of how thoughtful technology makes the lives of the entire Audi line more comfortable on a daily basis.
Stick with genuine OEM Door Lock when you need quality that holds up. Audi crafts these parts to hit strict factory specs for every single unit. They also run each part through rigorous checks during production to maintain high quality. You can find exact Audi Door Lock you need in our huge stock at AudiPartsGiant.com. You'll love our low, economical prices too. Every OEM part carries a real manufacturer's warranty, so you can buy with confidence. Returns aren't a headache here because our policy is simple. Plus, our speedy delivery gets orders out fast. Shop today and buy with total peace of mind.
Audi Door Lock Parts and Q&A
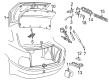
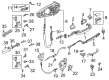
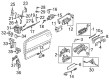
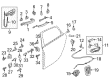
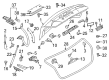
- Q: How should you lubricate the Door Hinge, Door Lock, Hood Hinge, Hood Latch and Hood Release Cable for Petrol engines on Audi A3?A:Apply to the hinges of the bonnet, doors, and tailgate light general-purpose oil, and also lubricate all the latches, locks, and lock strikers. In the process, test the security and functioning of all the locks, and make adjustments as required. Also, variously grease the bonnet release mechanism and cable with an appropriate grease.
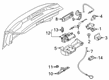
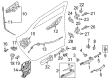
- Q: How to remove and install the door lock and door lock cylinder from a door on Audi A4?A:To remove the latch, start by taking off the door trim panel and watershield, then remove the window glass regulator from the door. Disconnect the electrical harness connector at the door lock, followed by disconnecting the operating rod from the door handle and unclipping it from the lock assembly, noting the rod's location. Next, remove the two fasteners and withdraw the lock unit along with its base plate from the door, then disconnect the operating cable housing from the lock unit. Unhook the interior handle operation cable from the lock unit by rotating the cable end 90 degrees and unclipping it. For installation, reverse the removal steps. To access the lock cylinder, open the driver's door and remove the lock cylinder cover cap, then turn the Torx bolt counterclockwise until it stops to release the lock cylinder. Remove the lock cylinder from the outside door handle, and for installation, reverse the removal steps. For the outside handle, fully close the window and remove the door trim panel and watershield, then take out the window glass regulator. Disconnect the operating rod from the lower clip, rotate it, and remove it from the outside handle clip. Rotate the locking element to release it from the rear of the handle and lock cylinder, then insert a screwdriver through the door plate into the release slider and slide it towards the latch end. Remove the handle and trim from the outer surface of the door, and if necessary, detach the door handle trim using a small flat-bladed screwdriver by pushing the release tab. For installation, reverse the removal steps.


Related Audi Parts
 Audi Emblem
 Audi Spoiler
 Audi Hood Latch
 Audi Tachometer
 Audi Window Motor
 Audi Wiper Blade
 Audi Door Latch Cable
 Audi Door Screws
 Audi Lift Support
 Audi Shift Linkage Boot
 Audi Side View Mirrors
 Audi Wiper Pivot
Browse by Model
100 Door Lock 100 Quattro Door Lock 200 Door Lock 200 Quattro Door Lock 4000 Door Lock 4000 Quattro Door Lock 5000 Door Lock 5000 Quattro Door Lock 80 Door Lock 80 Quattro Door Lock 90 Door Lock 90 Quattro Door Lock A3 Door Lock A3 Quattro Door Lock A3 Sportback e-tron Door Lock A4 allroad Door Lock A4 Door Lock A4 Quattro Door Lock A5 Door Lock A5 Quattro Door Lock A5 Sportback Door Lock A6 allroad Door Lock A6 Door Lock A6 Quattro Door Lock A7 Quattro Door Lock A7 Sportback Door Lock A8 Door Lock A8 Quattro Door Lock allroad Door Lock Allroad Quattro Door Lock Cabriolet Door Lock Coupe Door Lock Coupe Quattro Door Lock e-tron GT Door Lock e-tron Quattro Door Lock e-tron S Door Lock e-tron S Sportback Door Lock e-tron Sportback Door Lock Q3 Door Lock Q3 Quattro Door Lock Q4 e-tron Door Lock Q4 e-tron Sportback Door Lock Q5 Door Lock Q5 PHEV Door Lock Q5 Sportback Door Lock Q6 e-tron Door Lock Q7 Door Lock Q8 Door Lock Q8 e-tron Door Lock Q8 e-tron Sportback Door Lock Quattro Door Lock R8 Door Lock RS e-tron GT Door Lock RS Q8 Door Lock RS3 Door Lock RS4 Door Lock RS5 Door Lock RS5 Sportback Door Lock RS6 Avant Door Lock RS7 Door Lock RS7 Sportback Door Lock S3 Door Lock S4 Door Lock S5 Door Lock S5 Sportback Door Lock S6 Door Lock S7 Door Lock S7 Sportback Door Lock S8 Door Lock SQ5 Door Lock SQ5 Sportback Door Lock SQ6 e-tron Door Lock SQ7 Door Lock SQ8 Door Lock SQ8 e-tron Door Lock SQ8 e-tron Sportback Door Lock TT Door Lock TT Quattro Door Lock TT RS Quattro Door Lock TTS Quattro Door Lock V8 Quattro Door Lock