×
- Hello
- Login or Register
- Quick Links
- Live Chat
- Track Order
- Parts Availability
- RMA
- Help Center
- Contact Us
- Shop for
- Audi Parts
My Garage
My Account
Cart
Genuine Audi 100 Crankshaft
Crank Shaft- Select Vehicle by Model
- Select Vehicle by VIN
Select Vehicle by Model
orMake
Model
Year
Select Vehicle by VIN
For the most accurate results, select vehicle by your VIN (Vehicle Identification Number).
2 Crankshafts found


Audi 100 Crankshaft Part Number: 078-105-101-AB
$1775.96 MSRP: $2132.00You Save: $356.04 (17%)Ships in 1-2 Business Days
Audi 100 Crankshaft Part Number: 034-105-101-S
$1079.03 MSRP: $1395.00You Save: $315.97 (23%)Ships in 1-2 Business Days
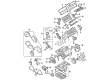
Audi 100 Crankshaft
Choose original equipment manufacturer Crankshaft for great performance and strong durability. They use Audi's official craftsmanship and high-grade materials, and meet strict quality standards. Are you looking for quality Crankshaft at a good price? Come to our online store. We carry a wide range of genuine parts for your Audi 100 and the prices are competitive. Each part comes with the manufacturer's warranty. You can install with confidence and get steady results. Over time, you'll save money and avoid hassle. Keep your maintenance simple and protect your vehicle with OEM parts. Get the quality your 100 needs now.
Audi 100 Crankshaft Parts and Q&A
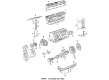
- Q: What is the process of crankshaft refitting in engine reassembly after an overhaul on Audi 100?A:The first step in engine reassembling has been done following an engine overhaul, which assumes that crankshaft, cylinder block/crankcase and bearings are washed, checked and repaired or replaced. By removing, the oil jets should be installed back and their mounting bolts attached to the required torque. The cylinder block must be put on a clean level surface with the crankcase upside, and the inner parts of the main bearing caps and crankcase wiped clean. The new bearing shells should have the rear surface clean and set on the bearing saddles in the crankcase taking care not to force the orientation lugs into the recesses and not to force the oil holes into their places. Thrust bearings must be installed on both sides of the correct bearing saddle and attached with minimum amount of grease and positioned properly with the oil grooves oriented outwards. The crankshaft may then be gently rolled into the crankcase after the last bearing shells clean-up and crankshaft journals have been completed. The circulation of lubricants should be checked by a check which involves the use of Plastigauge to determine the distance between the bearing shells and journals. A piece of Plastigauge must be cut and placed on each journal and then the lower half main bearing shells attached to the main bearing caps, with a good fit of locating lugs. The release agent that is silicone may be placed on the front face of the bearing shells and then the caps then placed in their respective positions. The tightening of bolts on the center bearing cap should be carried out gradually and the width of the crushed Plastigauge be measured to ascertain running clearance, and compare it with specifications. In case of proper clearances, the Plastigauge remains are supposed to be removed meticulously. The crankshaft is then removed and the bearer surfaces wiped down and the bearing shells in the crankcase then pleasantively covered with clean engine oil. The crankshaft is then depressed into place and thus lubricates the lower bearing shells in the main bearing caps and installs thrust washers. Main bearing caps should be attached in proper sequence and manner with the bolts being hand screwed and then tightened to the required torque and angles in an outward direction to the center. Crankshaft: should be turned freely and endfloat must be inspected to be within the specification. Lastly, pistons and connecting rods are reattached or replaced to the crankshaft, the crankshaft rear oil seal housing, front oil seal and 4-cylinder engine front oil seal and housing, oil pump and pick-up tube, baffle plate and sump, flywheel and clutch or driveplate, crankshaft sprocket and timing belt are reattached or replaced.
- Q: What steps should be taken if no work is to be done on the crankshaft during engine disassembly on Audi 100?A:In case no work is required on the Pistons and connecting rods, the cylinder head and pistons need not be removed, and it is highly advisable to use an engine stand; push the pistons up the bores to ensure that the connecting rods are cleared of the crankpins. Start by leaving the timing belt and crankshaft sprocker alone, and then the bits of the clutch, and the flywheel or driveplate, the sump, the baffle plate, the oil pump and pick-up tube. The next step is to take off the rear crankshaft oil seal and housing, and in 4-cylinder engines, the front oil seal and housing. Be able to disconnect the connecting rods and pistons with the crankshaft. When the cylinder block was turned upside down, measure the crankshaft endfloat, positioning a DTI gauge parallel to the crankshaft axis, forcing the crankshaft to the ends of travel, and taking a reading of the gauge. In the event that a dial gauge is not available, measure the distance between the crankpin web and the main bearing thrustwasher by feeler blades. Mark the location of the identification marks of the manufacturer on the main bearing caps and then loosen the main bearing cap bolts by loosening them slowly until they can be removed, with a soft faced mallet to loosen them on the crankcase. There is no rush in removing the crankshaft, keeping the upper main bearing shells in place, and removing the upper main bearing shells, tapped to their caps. Take out the thrustwasher bearings in the bearing saddles and observe the notches on the bearing caps and crankcase which do not allow the shell bearings to fit incorrectly. Clean crankshaft with solvent and dry and rinse oil holes to make sure it is clear. Check the main bearing journals and crankpin journals, looking either for wear, cracking, or scoring, and check (with a micrometer) the diameter of each journal to ensure an even wear or tapering. Inspect the oil seal journals to see that they have not been damaged to leak, measure the crankshaft runout on the main bearings with a DTI gauge carefully to prevent damaging journals and oil seal surfaces. A runout of about 0.03 mm is just an approximate and when more than that is reached, then it is time to check on the renewal of crankshaft.

Related Audi 100 Parts
 Audi 100 A/C Idler Pulley
 Audi 100 Cam Gear
 Audi 100 Camshaft Seal
 Audi 100 Crankshaft Pulley
 Audi 100 Cylinder Head
 Audi 100 Cylinder Head Gasket
 Audi 100 Oil Pump Gasket
 Audi 100 Piston
 Audi 100 Timing Cover
 Audi 100 Timing Cover Gasket
 Audi 100 Valve Spring Retainer
 Audi 100 Valve Spring Retainer Keeper