×
- Hello
- Login or Register
- Quick Links
- Live Chat
- Track Order
- Parts Availability
- RMA
- Help Center
- Contact Us
- Shop for
- Audi Parts
My Garage
My Account
Cart
Genuine Audi A4 Crankshaft Seal
- Select Vehicle by Model
- Select Vehicle by VIN
Select Vehicle by Model
orMake
Model
Year
Select Vehicle by VIN
For the most accurate results, select vehicle by your VIN (Vehicle Identification Number).
5 Crankshaft Seals found


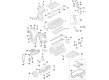
Audi A4 Timing Cover Seal Part Number: 06L-103-085-B
$20.49 MSRP: $32.78You Save: $12.29 (38%)Ships in 1-2 Business Days
Audi A4 Front Crank Seal Part Number: 038-103-085-E
$28.11 MSRP: $44.98You Save: $16.87 (38%)Ships in 1-2 Business Days

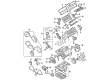
Audi A4 Rear Main Seal Retainer Part Number: 06K-103-171-P
$229.66 MSRP: $321.65You Save: $91.99 (29%)Ships in 1-2 Business Days
Audi A4 Rear Main Seal Retainer Part Number: 079-103-051-F
$63.07 MSRP: $88.33You Save: $25.26 (29%)Ships in 1-2 Business Days
Audi A4 Rear Main Seal Retainer Part Number: 068-198-171
$128.51 MSRP: $179.98You Save: $51.47 (29%)Ships in 1-2 Business Days
Audi A4 Crankshaft Seal
Choose original equipment manufacturer Crankshaft Seal for great performance and strong durability. They use Audi's official craftsmanship and high-grade materials, and meet strict quality standards. Are you looking for quality Crankshaft Seal at a good price? Come to our online store. We carry a wide range of genuine parts for your Audi A4 and the prices are competitive. Each part comes with the manufacturer's warranty. You can install with confidence and get steady results. Over time, you'll save money and avoid hassle. Keep your maintenance simple and protect your vehicle with OEM parts. Get the quality your A4 needs now.
Audi A4 Crankshaft Seal Parts and Q&A
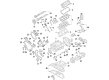
- Q: How to replace the front Crankshaft Seal on Audi A4?A:For a 3.0L engine, remove the Timing Belt and crankshaft sprocket; if only the seal is being replaced, no further disassembly is needed, but the upper Oil Pan must be removed, and the oil pump drive chain tensioner needs to be retracted to access the sealing flange. In 3.2L engines, remove the crankshaft pulley and the water pump pulley; the seal can be replaced either with the sealing flange in place or removed. Carefully note how far the seal is recessed in the bore, then pry it out of the front cover using a screwdriver or seal removal tool, ensuring not to scratch the housing bore or damage the crankshaft. Clean the bore in the housing without applying oil to the outer diameter of the seal. Use a seal driver or a socket slightly smaller than the seal's outside diameter to drive the new seal into place with a hammer, ensuring it is installed squarely and to the same depth as the original; if a socket is unavailable, a short section of large diameter pipe can be used. If the sealing flange was removed, ensure the mating surfaces are clean and use a hard plastic or wood scraper to eliminate any gasket material. Apply a new gasket and a 3/16-inch bead of RTV sealant to the front of the block where the oil pan and engine block meet; for 3.2L engines, apply a 1/16-inch RTV bead on the engine side of the front sealing flange and install the flange within five minutes of applying the sealant, using specific Audi tools for alignment. Tighten the bolts in several steps to the specified torque, then reinstall the crankshaft sprocket and timing belt for 3.0L engines, and finally, run the engine to check for oil leaks at the front seal.
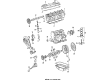
- Q: What steps are involved in removing and replacing the rear Crankshaft Seal and housing on Audi A4?A:This procedure requires the removal of the transaxle along with the Flywheel/driveplate out of the vehicle and then removal of the sheet metals in between the block and the flywheel which is the intermediate plate. The crankshaft seal and housing that are replaceable as a unit can be changed without having to remove the Oil Pan. The step to start with is the removal of the mounting bolts of the crankshaft seal housing and the removal of the housing off the engine. When replacing a crankshaft seal and housing, it is important to remember to clean the mating surface of the cover, plate between the walls, cylinder block, and oil pan rail with a hard plastic or wood scraper to remove all the gasket material and yet not to damage the aluminum alloy of the rear housing. The cylinder block must be refitted with a new gasket and in cases where the vehicle had a solid oil pan gasket that was not damaged when removing it, a 1/8-inch (3 mm) bead of RTV sealant must be laid around the corners where the oil pan gasket is joined up to the engine block. Also, apply a 1/8-inch (3 mm) bead of RTV sealant on the surface of the oil pan sealing on the rear flange of the crankshaft seal housing, but not to the oil pan itself, so that the sealant will not be forced inward during installation. The crankshaft seal housing should then be fitted on top of the dowels on the engine with the lubrication applied on the lip of the seal previously to ensure that the seal is easily installed and will not start dry and damage the seal and cause future leak of oil. Install the crankshaft seal housing bolts evenly in several steps to the desired torque, following the recommendations provided by the sealant manufacturer regarding the curing time and letting the sealant cure before adding the oil. The other procedures are the reversal of the removal process.


Related Audi A4 Parts
 Audi A4 Oil Pump
 Audi A4 Camshaft
 Audi A4 Engine Cover
 Audi A4 Oil Pan Gasket
 Audi A4 Cam Gear
 Audi A4 Camshaft Seal
 Audi A4 Crankshaft Gear
 Audi A4 Oil Filter Gasket
 Audi A4 Oil Pump Gasket
 Audi A4 Transmission Oil Cooler
 Audi A4 Valve Spring Retainer
 Audi A4 Variable Timing Sprocket
Browse by Year
2020 Crankshaft Seal 2019 Crankshaft Seal 2018 Crankshaft Seal 2017 Crankshaft Seal 2016 Crankshaft Seal 2015 Crankshaft Seal 2014 Crankshaft Seal 2013 Crankshaft Seal 2012 Crankshaft Seal 2011 Crankshaft Seal 2010 Crankshaft Seal 2009 Crankshaft Seal 2007 Crankshaft Seal 2006 Crankshaft Seal 2005 Crankshaft Seal 2004 Crankshaft Seal 2003 Crankshaft Seal 2002 Crankshaft Seal 2001 Crankshaft Seal 2000 Crankshaft Seal 1999 Crankshaft Seal 1998 Crankshaft Seal 1996 Crankshaft Seal