×
- Hello
- Login or Register
- Quick Links
- Live Chat
- Track Order
- Parts Availability
- RMA
- Help Center
- Contact Us
- Shop for
- Audi Parts
My Garage
My Account
Cart
Genuine Audi 100 Hood Release Cable
Hood Cable- Select Vehicle by Model
- Select Vehicle by VIN
Select Vehicle by Model
orMake
Model
Year
Select Vehicle by VIN
For the most accurate results, select vehicle by your VIN (Vehicle Identification Number).
1 Hood Release Cable found


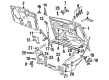
Audi 100 Release Handle Part Number: 443-823-531-A
$86.87 MSRP: $121.67You Save: $34.80 (29%)Ships in 1-2 Business Days
Audi 100 Hood Release Cable
Choose original equipment manufacturer Hood Release Cable for great performance and strong durability. They use Audi's official craftsmanship and high-grade materials, and meet strict quality standards. Are you looking for quality Hood Release Cable at a good price? Come to our online store. We carry a wide range of genuine parts for your Audi 100 and the prices are competitive. Each part comes with the manufacturer's warranty. You can install with confidence and get steady results. Over time, you'll save money and avoid hassle. Keep your maintenance simple and protect your vehicle with OEM parts. Get the quality your 100 needs now.
Audi 100 Hood Release Cable Parts and Q&A
- Q: How to remove and refit the Hood Release Cable on Audi 100?A:In order to remove the hood release cable, start with working inside the engine compartment to either disconnect the adjustment clip to the cable end connector or loosen the screw of the clamp to slide the adjustment fitting off the inner cable. Disconnect the locating sleeve to the hook of the lock and slide off the cable. Unclip the cable guides of the hood locking platform with care and part with the locating sleeve of the other locking hook. In case the guides were broken during extraction, replacement ones are to be employed. Then loosen the hook of the inner cable with the two locking hooks and slip off the second locating sleeve. Attach a piece of string to the end of the hood release cable and start to pull backwards along the hood release cable, disengaging it from all the clips and ties that it requires, then wash the cable outer grommet off the bulkhead. Internally release the vehicle, the storage compartment panel on the driver side of the facia, the screws securing the handle on the hood release handle, and the handle itself by removing it out of the trim panel. Lift the inner grommet off the bulkhead and take out the handle and cable assembly into the passenger engine compartment and leave the string there to be refitted. To refit, make sure that the inner grommet is in place on the cable and then pull the cable through the passenger compartment to the engine compartment with the use of the string. As soon as the cable is passed, loosen the knot, take the string out. Attach the hood release handle to the trim panel and re-attach the retaining screws firmly. Install the inner grommet in the bulkhead, re-install the storage compartment, and head back to the engine compartment. Connect the outer grommet to the cable and install in the bulkhead making sure the cable is properly installed and clipped. Install the first locating sleeve on the cable by using the larger end of the locating sleeve most inner in the cable and slide the cable into the two locking hooks and make sure that the locating sleeve is connected to the first locking hook when the cable guides are clipped in the hood locking platform. Push the second locating sleeve on the cable with the smaller end inner and attach the adjustment clamp or clip where needed making sure that both locating sleeves are properly in the locking hooks. Install the cable by inserting all the freeplay without leave and make sure that the locking hooks are engaged into their stops prior to screwing the adjustment screw tight or installing the adjustment clip into the final open groove on the cable end connector. Last, make sure the locking hooks slide with ease and smoothness to their stations when the release handle is posed, grease the hooks and hood pins with multi-purpose grease, and close the hood.

Related Audi 100 Parts
 Audi 100 Body Mount Hole Plug
 Audi 100 Door Latch Cable
 Audi 100 Fuel Filler Housing
 Audi 100 Hood
 Audi 100 Hood Hinge
 Audi 100 Hood Latch
 Audi 100 Interior Light Bulb
 Audi 100 Lift Support
 Audi 100 Seat Switch
 Audi 100 Trunk Lid Latch
 Audi 100 Weather Strip
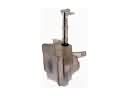 Audi 100 Windshield Washer Fluid Reservoir