×
- Hello
- Login or Register
- Quick Links
- Live Chat
- Track Order
- Parts Availability
- RMA
- Help Center
- Contact Us
- Shop for
- Audi Parts
My Garage
My Account
Cart
Genuine Audi 100 Engine Mount
Engine Motor Mount- Select Vehicle by Model
- Select Vehicle by VIN
Select Vehicle by Model
orMake
Model
Year
Select Vehicle by VIN
For the most accurate results, select vehicle by your VIN (Vehicle Identification Number).
16 Engine Mounts found

Audi 100 Insulator Part Number: 811-199-339-B
$13.21 MSRP: $21.14You Save: $7.93 (38%)Ships in 1-2 Business Days
Audi 100 Front Support Cushion Part Number: 8D0-199-339-P
$17.36 MSRP: $27.78You Save: $10.42 (38%)Ships in 1-2 Business Days

Audi 100 Engine Bracket Part Number: 8E0-199-352-N
$136.84 MSRP: $191.66You Save: $54.82 (29%)Ships in 1-2 Business Days
Audi 100 Mount Part Number: 4A0-199-339
$20.63 MSRP: $33.00You Save: $12.37 (38%)Ships in 1-2 Business DaysAudi 100 Mount Part Number: 4A0-199-339-A
$24.38 MSRP: $39.00You Save: $14.62 (38%)Ships in 1-2 Business Days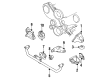
Audi 100 Stop Part Number: 4A0-199-335-A
$33.75 MSRP: $54.00You Save: $20.25 (38%)Ships in 1-2 Business Days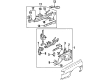
Audi 100 Engine Bracket Part Number: 443-803-029
$78.54 MSRP: $110.00You Save: $31.46 (29%)Ships in 1-2 Business Days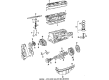
Audi 100 Engine Bracket Part Number: 035-199-307-E
$89.68 MSRP: $125.60You Save: $35.92 (29%)Ships in 1-2 Business DaysAudi 100 Engine Bracket Part Number: 443-803-030
$111.28 MSRP: $155.85You Save: $44.57 (29%)Ships in 1-2 Business Days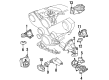
Audi 100 Engine Support Part Number: 4A0-199-307-M
$149.94 MSRP: $210.00You Save: $60.06 (29%)Ships in 1-2 Business DaysAudi 100 Motor Mount Part Number: 443-199-382
$153.51 MSRP: $215.00You Save: $61.49 (29%)Ships in 1-2 Business DaysAudi 100 Engine Bracket Part Number: 431-199-307-J
$157.44 MSRP: $220.50You Save: $63.06 (29%)Ships in 1-2 Business DaysAudi 100 Engine Bracket Part Number: 443-199-312-E
$299.40 MSRP: $419.33You Save: $119.93 (29%)Ships in 1-2 Business DaysAudi 100 Engine Bracket Part Number: 4A0-199-351-B
$351.29 MSRP: $492.00You Save: $140.71 (29%)Ships in 1-2 Business DaysAudi 100 Engine Bracket Part Number: 4A0-199-352-A
$351.29 MSRP: $492.00You Save: $140.71 (29%)Ships in 1-2 Business DaysAudi 100 Engine Support Part Number: 8A0-199-308-G
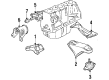
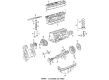
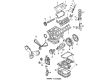
Audi 100 Engine Mount
Choose original equipment manufacturer Engine Mount for great performance and strong durability. They use Audi's official craftsmanship and high-grade materials, and meet strict quality standards. Are you looking for quality Engine Mount at a good price? Come to our online store. We carry a wide range of genuine parts for your Audi 100 and the prices are competitive. Each part comes with the manufacturer's warranty. You can install with confidence and get steady results. Over time, you'll save money and avoid hassle. Keep your maintenance simple and protect your vehicle with OEM parts. Get the quality your 100 needs now.
Audi 100 Engine Mount Parts and Q&A
- Q: How to inspect and replace the engine mount and torque arms for 4-cylinder petrol engines on Audi 100?A:In order to check the car, it is necessary to lift the front up and place it on axle stands safely then take away the undershield. Inspect the mounting rubbers, cracks, hardening, or detachment of the metal, and change them in case of any damage. Make sure that fasteners are tight, they are appropriately tightened with a torque wrench when possible. Determine the condition of the mounting by pushing it outward with a large screwdriver or a crowbar to determine free play; an assistant may be required to move the engine/transmission whilst the mounting is monitored with regards to excessive wear. In the case of detected excessive free play, ensure that the fasteners are double-checked first, and then change all worn parts. In the case of the front torque arm, use the hand brake, jack-up the front and place it in axle supports. Unscrew the bolts holding the front of the cylinder block with the torque arm and rubber mounting and remove the bracket attached to the front front valance. Reassemble the new arm and bracket of the torque in reverse. With the right or left-hand engine mounted, repeat the process by using the hand brake, jack up the front and then place on axle supports. Place the engine on the hoist and support its weight, undo the mounting nuts, lift the engine and remove the mounting in the engine bracket and subframe. Lastly, install the new mounting through an inversion of the un-mounting steps.


