×
- Hello
- Login or Register
- Quick Links
- Live Chat
- Track Order
- Parts Availability
- RMA
- Help Center
- Contact Us
- Shop for
- Audi Parts
My Garage
My Account
Cart
Genuine Audi 100 Fuel Pump
Gas Pump- Select Vehicle by Model
- Select Vehicle by VIN
Select Vehicle by Model
orMake
Model
Year
Select Vehicle by VIN
For the most accurate results, select vehicle by your VIN (Vehicle Identification Number).
2 Fuel Pumps found

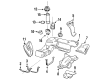
Audi 100 Fuel Pump Part Number: 8A0-906-091-G
$215.39 MSRP: $301.67You Save: $86.28 (29%)Ships in 1-2 Business Days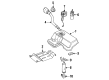
Audi 100 Fuel Pump Part Number: 443-906-087-BE
$292.74 MSRP: $410.00You Save: $117.26 (29%)Ships in 1-2 Business Days
Audi 100 Fuel Pump
The Audi 100 Fuel Pump supplies gasoline from the tank to the engine so that the car can start well and operate efficiently. Early Audi models that applied carburetors were powered by a camshaft-operated mechanical Fuel Pump attached to the engine block. This diaphragm-style unit employs a lever riding an eccentric to force fuel at about six to fifteen psi, just sufficient to keep the float bowl filled without flooding it. With electronic injection replacing carburetors on subsequent models, Audi fitted an electric Fuel Pump submerged in the tank and coupled with the sending unit, which also reports the amount of gas left to the dash gauge. Immersion has the advantage of keeping the motor cool, permitting pressures of forty to sixty psi, and reducing fire hazard by separating the pump and hot engine elements. The two types of pumps have the same task but are placed in different positions, have different operating pressures, and differ in control; the mechanical type acts only with the rotation of the camshaft, and the electric type has a relay that can cut off the current when a collision occurs. When an Audi engine is cranking but does not start, one can listen for the Fuel Pump, check voltage at the connector, and check flow or pressure to locate the problem. It is easy to find out what kind of pump your Audi 100 has, mechanical or electric, which helps you perform the proper pressure tests and ensures years of reliable fuel supply.
Choose original equipment manufacturer Fuel Pump for great performance and strong durability. They use Audi's official craftsmanship and high-grade materials, and meet strict quality standards. Are you looking for quality Fuel Pump at a good price? Come to our online store. We carry a wide range of genuine parts for your Audi 100 and the prices are competitive. Each part comes with the manufacturer's warranty. You can install with confidence and get steady results. Over time, you'll save money and avoid hassle. Keep your maintenance simple and protect your vehicle with OEM parts. Get the quality your 100 needs now.
Audi 100 Fuel Pump Parts and Q&A
- Q: What precautions should be observed before working on the fuel pump in the fuel system for Diesel engines on Audi 100?A:Wear required precautions before handling any fuel system component. The initial setting of the injection pump will need a suitable dial gauge and an adapter. Start by removing battery negative lead and place it out of the terminal. Disassemble the engine: remove the plastic lid on the top, unclip and unscrew the upper outer timing cover and remove the camshaft cover. Install a camshaft locking bar until the engine is set to No 1 TDC position, and then detach the fuel inlet and return hose connections to the injection pump, placing note of the union bolt that has non-return valve on the return line. Find and remove the wiring connections on the fuel injection pump, then unscrew the union nuts that hold the fuel pipes to the injectors and the fuel injection pump and pull them out as a complete set without bending up the pipes. Cover the open pipes and ports to avoid ingress of dust, unscrew the sprocket nut, remove the tensioner on the timing belt and hold the sprocket stationary. Take the sprocket out of the injection pump shaft with an appropriate puller, and remove the nut and sprocket, and retrieve the Woodruff key. When needed draw the location of injection pump in reference to the mounting bracket, unscrew the front bolts holding the injection pump and remove the injection pump out of the mounting bracket. To fit back, find the injection pump in the mounting bracket, screw back the rear mounting bolt and screw it to the required level. Position the injection pump to the slotted holes, rotate and install the front mounting bolts and re-fit it. Install the Woodruff key, install the sprocket and nut, tighten the nut to the required torque with the sprocket being held in place. Place the TDC pin holes and insert the pin to obtain the sprocket locked in place, and re-fit the timing belt and tensioner. Make sure the TDC timing marks fall in place, unlock the locking bar and pin, unscrew the timing plug of the injection pump, and screw a dial gauge with an appropriate adapter. Preload the dial gauge to 2 mm and rotate the engine against the anticlockwise direction until the needle comes to a stop, reset the dial gauge to 1 mm preload and align the TDC mark on the flywheel with the timing aperture. Confirm the dial gauge reading with the start of injection which should be 0.7 -0.02 mm and adjust accordingly by loosening the pump mounting bolts and rotating the pump. Install the bolts to the required torque, loosen the dial gauge, replace and tighten the timing plug, reconnect and tighten the fuel pipes and the wiring connections, and be sure that the fuel inlet and the control hose are fixed with new sealing washers. Install the camshaft cover and upper outer timing cover again, reconnect battery negative lead and use a hand operated vacuum pump to bleed the injection pump until the fuel is clear of bubbles. Turn on the engine and inspect the fuel leakage, and then have the injection timing inspected and dynamically adjusted by a dealer. Once they have been adjusted, loosen and tighten the fuel pipe union nuts to release stress. With other types of engines, the same steps apply when removing, refitting or adjusting them and one should ensure to note down positions and alignments where needed and the process should be finished by reattaching all parts and ensuring leakages.


