×
- Hello
- Login or Register
- Quick Links
- Live Chat
- Track Order
- Parts Availability
- RMA
- Help Center
- Contact Us
- Shop for
- Audi Parts
My Garage
My Account
Cart
Genuine Audi Clutch Release Bearing
Release Bearing- Select Vehicle by Model
- Select Vehicle by VIN
Select Vehicle by Model
orMake
Model
Year
Select Vehicle by VIN
For the most accurate results, select vehicle by your VIN (Vehicle Identification Number).
6 Clutch Release Bearings found


Audi Release Bearing Part Number: 01E-141-165-D
$138.03 MSRP: $193.32You Save: $55.29 (29%)Ships in 1-2 Business DaysProduct Specifications- Other Name: Bearing
- Replaces: 01E-141-165, 0B1-141-165, 01E-141-165-B, 012-141-165-E

Audi Release Bearing Part Number: 0CS-141-671-C
$168.98 MSRP: $236.67You Save: $67.69 (29%)Ships in 1-2 Business DaysProduct Specifications- Other Name: Bearing


Audi Release Bearing Part Number: 0B4-198-165-A
$253.47 MSRP: $355.00You Save: $101.53 (29%)Ships in 1-2 Business DaysProduct Specifications- Other Name: Bearing
- Replaces: 0B1-141-165-G


Audi Release Bearing Part Number: 0B4-198-165
$285.60 MSRP: $400.00You Save: $114.40 (29%)Ships in 1-2 Business DaysProduct Specifications- Other Name: Bearing

Audi Release Bearing Part Number: 086-141-671-M
$1540.32 MSRP: $1849.14You Save: $308.82 (17%)Ships in 1-2 Business DaysProduct Specifications- Other Name: Bearing
- Replaces: 086-141-671-K, 086-141-671-E
Audi Release Bearing Part Number: 086-141-671-L
$1664.20 MSRP: $1997.85You Save: $333.65 (17%)Ships in 1-2 Business DaysProduct Specifications- Other Name: Bearing
- Replaces: 086-141-671-D
Audi Clutch Release Bearing
Audi Clutch Release Bearing is responsible for delivering smooth gear changes by converting the pedal pressure into precise axial motion that cleanly separates the engine from the gearbox to prevent grind and keep drives refined. Audi began in 1909 and continued to grow with innovation such as water-cooled motors, the famous Quattro all-wheel drive to increase grip on rain-soaked or snowy roads, and crisp Virtual Cockpit screens to put data in clear view. The brand also rolls out e-tron electric models and tests self-driving technology, demonstrating a commitment to its future mobility while still having the sporty character of its sedans and SUVs. People admire Audi for combining luxury and sharp performance to make daily traveling interesting and comfortable. The Clutch Release Bearing is consistent with that philosophy. Positioned between the pressure plate and transmission shaft, the Clutch Release Bearing is constantly spinning but resists heavy axial force, making every shift light and accurate. Its low-friction design reduces pedal effort, noise, and protects the gears from excess wear, which provides for the long-term reliability that is valued across the entire Audi lineup. By taking care of forward-to-back loads instead of radial loads, the Clutch Release Bearing protects the smoothness that has become an Audi trademark, ensuring that every model benefits from crisp, quiet, and durable shifting.
Stick with genuine OEM Clutch Release Bearing when you need quality that holds up. Audi crafts these parts to hit strict factory specs for every single unit. They also run each part through rigorous checks during production to maintain high quality. You can find exact Audi Clutch Release Bearing you need in our huge stock at AudiPartsGiant.com. You'll love our low, economical prices too. Every OEM part carries a real manufacturer's warranty, so you can buy with confidence. Returns aren't a headache here because our policy is simple. Plus, our speedy delivery gets orders out fast. Shop today and buy with total peace of mind.
Audi Clutch Release Bearing Parts and Q&A
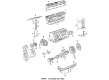
- Q: How to remove and install the Clutch Release Bearing on the transaxle on Audi A4?A:To remove the transaxle, first take out the leaf spring mounting bolt at the end of the clutch release lever and remove the spring. Next, push the detent spring back at the pivot end to release the lever by pushing it through the hole, which will allow you to withdraw the lever along with the release bearing from the guide sleeve. Use a screwdriver to depress the tabs and separate the bearing from the lever by prying inward on the plastic tabs retaining the bearing. After that, remove the plastic pivot from the ballstud, as the release lever locates on the plastic pivot. For inspection, hold the bearing by the outer race and rotate the inner race while applying pressure; if it doesn't turn smoothly or is noisy, replace it. Wipe the bearing with a clean rag and check for damage, wear, and cracks, avoiding immersion in solvent since it is sealed for life. Also, inspect the release lever for any cracks and bends. For installation, start by lubricating the ballstud and plastic pivot with a little copper grease, and apply some grease on the release bearing surface that contacts the diaphragm spring fingers and the release lever, as well as on the guide sleeve. Install the spring onto the release lever, ensuring the plastic pivot is in place on the ballstud, then position the lever and bearing, pressing the release lever onto the ballstud until the spring holds it in position. Finally, install the transaxle.

Related Audi Parts
 Audi Clutch Master Cylinder
 Audi Clutch Slave Cylinder
 Audi Flywheel
 Audi Torque Converter
 Audi Clutch Disc
 Audi Clutch Fork
 Audi Clutch Master Repair Kit
 Audi Clutch Slave Repair Kit
 Audi Flywheel Ring Gear
 Audi Pilot Bearing
 Audi Pressure Plate
 Audi Transmission Assembly
Browse by Model
100 Clutch Release Bearing 100 Quattro Clutch Release Bearing 200 Clutch Release Bearing 200 Quattro Clutch Release Bearing 80 Clutch Release Bearing 80 Quattro Clutch Release Bearing 90 Clutch Release Bearing 90 Quattro Clutch Release Bearing A4 Clutch Release Bearing A4 Quattro Clutch Release Bearing A5 Clutch Release Bearing A5 Quattro Clutch Release Bearing A5 Sportback Clutch Release Bearing A6 Clutch Release Bearing A6 Quattro Clutch Release Bearing Allroad Quattro Clutch Release Bearing Coupe Quattro Clutch Release Bearing R8 Clutch Release Bearing RS4 Clutch Release Bearing S4 Clutch Release Bearing S5 Clutch Release Bearing S6 Clutch Release Bearing V8 Quattro Clutch Release Bearing