×
- Hello
- Login or Register
- Quick Links
- Live Chat
- Track Order
- Parts Availability
- RMA
- Help Center
- Contact Us
- Shop for
- Audi Parts
My Garage
My Account
Cart
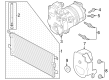
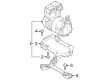
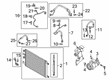
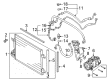
Genuine Audi A/C Compressor
Air Conditioning Compressor- Select Vehicle by Model
- Select Vehicle by VIN
Select Vehicle by Model
orMake
Model
Year
Select Vehicle by VIN
For the most accurate results, select vehicle by your VIN (Vehicle Identification Number).
98 A/C Compressors found


Audi Compressor Assembly Part Number: 7P0-820-803-M
$987.69 MSRP: $1276.91You Save: $289.22 (23%)Ships in 1-2 Business DaysProduct Specifications- Other Name: Compressor
- Replaces: 7L6-820-803-P, 7L6-820-803-S, 7P0-820-803-E


Audi Compressor Assembly Part Number: 1EA-820-808-H
$498.93 MSRP: $698.78You Save: $199.85 (29%)Ships in 1-2 Business DaysProduct Specifications- Other Name: Compressor
- Replaces: 1EA-820-808-E, 1EA-820-808-C, 1EA-816-551-E, 1EA-820-808-D, 1EA-820-808-B


Audi Compressor Assembly Part Number: 4G0-260-805-A
$1477.98 MSRP: $1910.77You Save: $432.79 (23%)Ships in 1-2 Business DaysProduct Specifications- Other Name: Compressor


Audi Compressor Assembly Part Number: 8W0-816-803-J
$586.35 MSRP: $758.05You Save: $171.70 (23%)Ships in 1-2 Business DaysProduct Specifications- Other Name: Compressor


Audi Compressor Part Number: 4G0-816-797-D
$663.41 MSRP: $857.68You Save: $194.27 (23%)Ships in 1-2 Business DaysProduct Specifications- Replaces: 4G0-816-797-B, 4G0-816-797-C


Audi Compressor Part Number: 5Q0-816-803-D
$681.26 MSRP: $880.75You Save: $199.49 (23%)Ships in 1-2 Business Days


Audi Compressor Part Number: 8E0-260-805-AJ
$686.63 MSRP: $887.69You Save: $201.06 (23%)Ships in 1-2 Business Days
Audi Compressor Assembly Part Number: 4E0-260-805-AS
$1142.39 MSRP: $1476.91You Save: $334.52 (23%)Ships in 1-2 Business DaysProduct Specifications- Other Name: Compressor
- Replaces: 4E0-260-805-AM, 4E0-260-805-Q
Audi Compressor Assembly Part Number: 4M0-820-803-M
$1625.54 MSRP: $2101.53You Save: $475.99 (23%)Ships in 1-2 Business DaysProduct Specifications- Other Name: Compressor
- Replaces: 4M0-820-803-B, 4M0-820-803-K

Audi Compressor Part Number: 80A-816-797-F
$1172.14 MSRP: $1515.37You Save: $343.23 (23%)Ships in 1-2 Business DaysProduct Specifications- Replaced by: 80A-816-797-G
- Replaces: 80A-816-797-C, 80A-816-797-E, 80A-816-797-D


Audi Compressor Assembly Part Number: 4M0-820-803
$1190.00 MSRP: $1538.46You Save: $348.46 (23%)Ships in 1-2 Business DaysProduct Specifications- Other Name: Compressor
- Replaces: 8T0-260-805-N, 8T0-260-805-E, 8W5-820-803-A

Audi Compressor Part Number: 1EA-820-807-C
$399.15 MSRP: $559.04You Save: $159.89 (29%)Ships in 1-2 Business DaysProduct Specifications- Replaces: 1EA-820-807-B, 1EA-816-797-F, 1EA-816-797-E, 1EA-820-807-D

Audi COMPRESSOR Part Number: 8S0-816-803-A
$387.80 MSRP: $501.35You Save: $113.55 (23%)Ships in 1-2 Business DaysAudi Compressor Part Number: 5Q0-816-803-H
$769.82 MSRP: $995.25You Save: $225.43 (23%)Ships in 1-2 Business DaysProduct Specifications- Replaces: 5Q0-816-803-F

Audi Compressor Part Number: 1K0-820-808-G
$580.11 MSRP: $749.98You Save: $169.87 (23%)Ships in 1-2 Business DaysProduct Specifications- Replaces: 1K0-820-808-E, 1K0-820-808-C

Audi Compressor Part Number: 1K0-820-808-F
$630.69 MSRP: $815.38You Save: $184.69 (23%)Ships in 1-2 Business DaysProduct Specifications- Replaces: 1K0-820-808-DX, 1K0-820-803-Q, 1K0-820-808-D, 1K0-820-808-FX, 1K0-820-859-F, 1K0-820-803-S, 1K0-820-803-G, 1K0-820-808-B, 1K0-820-808-BX, 1K0-820-859-Q, 1K0-820-859-QX

Audi Compressor Part Number: 8E0-260-805-AF
$666.40 MSRP: $861.54You Save: $195.14 (23%)Ships in 1-2 Business Days
Audi Compressor Part Number: 8D0-260-805-E
$676.81 MSRP: $875.00You Save: $198.19 (23%)Ships in 1-2 Business Days
Audi COMPRESSOR Part Number: 95C-816-797-C
$683.87 MSRP: $884.12You Save: $200.25 (23%)Ships in 1-2 Business Days
Audi Compressor Part Number: 1J0-820-805
$693.16 MSRP: $896.14You Save: $202.98 (23%)Ships in 1-2 Business Days
| Page 1 of 5 |Next >
1-20 of 98 Results
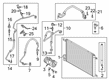
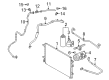
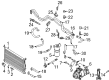
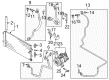
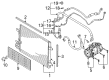
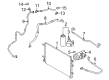
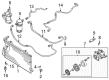
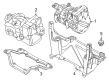
Audi A/C Compressor
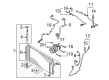
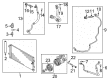
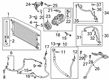
Audi A/C Compressor is responsible for keeping cabin temperatures pleasant by squeezing refrigerant into a high-pressure gas, beginning the cooling cycle and providing every ride with refreshing comfort. The A/C Compressor takes vapor in, compresses it, and sends the heated gas to the condenser, which starts the entire process that cools down the air before it gets to passengers, and the sturdy belt drive allows the compressor to spin easily at any engine speed. Modern Audi cooling units run cleaner R134a refrigerant and synthetic oil for better efficiency and greener performance, but it should be noted that earlier they applied R12 and mineral oil, but the general job of the A/C Compressor remains the same, transforming refrigerant so heat leaves the cabin. Strong materials and precise valves help the A/C Compressor resist wear, meaning that daily commutes, high-speed road trips, and stop-and-go traffic are all staying cool. Beyond climate control, Audi has an edge on sleek sedans, versatile SUVs, and cutting-edge e-tron electrics that exhibit the brand's drive toward a sustainable future. Since 1909, Audi has combined performance and innovation, initially in the form of water-cooled engines, then later in the form of legendary Quattro all-wheel drive, which grips slick roads with ease. Drivers also love Virtual Cockpit displays that bring maps and gauges in sharp digital form, as well as adaptive matrix headlights that carve through darkness. Testing of self-driving prototypes proves Audi continues to set the standard with its combination of comfort, technology, and sporty character in all vehicles.
Stick with genuine OEM A/C Compressor when you need quality that holds up. Audi crafts these parts to hit strict factory specs for every single unit. They also run each part through rigorous checks during production to maintain high quality. You can find exact Audi A/C Compressor you need in our huge stock at AudiPartsGiant.com. You'll love our low, economical prices too. Every OEM part carries a real manufacturer's warranty, so you can buy with confidence. Returns aren't a headache here because our policy is simple. Plus, our speedy delivery gets orders out fast. Shop today and buy with total peace of mind.
Audi A/C Compressor Parts and Q&A
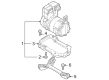
- Q: What steps should be followed when replacing the A/C Compressor in an air conditioning system on Audi A4?A:Whenever the A/C Compressor is replaced due to internal damage, the orifice tube should also be replaced, and the accumulator should be replaced whenever the A/C Compressor is replaced. Begin by discharging the air conditioning system. Raise the vehicle and support it securely on jackstands. Remove the splash shield from below the engine if equipped. Remove the drivebelt. Clean the A/C Compressor thoroughly around the refrigerant line fittings. Disconnect the electrical connector from the A/C Compressor, then disconnect the suction and discharge lines from the compressor. Plug the open fittings to prevent the entry of dirt and moisture, and discard the seals between the plates and compressor. Remove the compressor mounting bolts, detach the A/C Compressor from the mounting bracket, and take it out of the engine compartment. If installing a new A/C Compressor, pour the oil from the old compressor into a graduated container and add that exact amount of new refrigerant oil to the new A/C Compressor, following any included directions. Some replacement A/C Compressors may come with refrigerant oil; follow the directions regarding draining excess oil prior to installation. Ensure the oil used is compatible with R-134a refrigerant systems. Installation is the reverse of removal; when installing the line fitting bolt to the A/C Compressor, use new seals lubricated with clean refrigerant oil and tighten the bolt securely. Finally, have the system evacuated, recharged, and leak tested by the shop that discharged it.
- Q: How to connect and service a refrigerant recovery, recycling, or recharging unit to an A/C Compressor on Audi A6?A:To put the lock carrier in service position, connect a centrifuge approved refrigerant recovery and recycling an recharging unit to the A/C system and discharge system. Remove the oil filter, raise and securely support the car, and remove the engine lower cover. Take off the engine accessory belt and mark the orientation of the belt for reuse purpose. Positioned on the compressor's side, unfasten the regulator valve mounting bolts from the compressor, and securely fasten the regulator valve to the side. Remove the compressor from the engine bracket, and during installation, place one washer on each bolt and ensure the bushings are properly seated. Confirm refrigerant lines are in position and, before cranking the engine, turn compressor by hand about 10 revolutions to lubricate internal parts. Start with climate control deactivate, settle it on idle till it stabilize and switch the A/C activate After allowing the A/C to idle for a minimum of 10 minutes. Lastly, check the alignment of the accessory belt.


Related Audi Parts
 Audi A/C Condenser
 Audi Ambient Temperature Sensor
 Audi Evaporator
 Audi Heater Hose
 Audi A/C Accumulator
 Audi A/C Compressor Cut-Out Switches
 Audi A/C Expansion Valve
 Audi A/C Hose
 Audi A/C Idler Pulley
 Audi A/C System Valve Core
 Audi Air Temperature Sensor
 Audi HVAC Pressure Switch
Browse by Model
100 A/C Compressor 100 Quattro A/C Compressor 200 A/C Compressor 200 Quattro A/C Compressor 4000 A/C Compressor 4000 Quattro A/C Compressor 5000 A/C Compressor 5000 Quattro A/C Compressor 80 A/C Compressor 80 Quattro A/C Compressor 90 A/C Compressor 90 Quattro A/C Compressor A3 A/C Compressor A3 Quattro A/C Compressor A3 Sportback e-tron A/C Compressor A4 A/C Compressor A4 allroad A/C Compressor A4 Quattro A/C Compressor A5 A/C Compressor A5 Quattro A/C Compressor A5 Sportback A/C Compressor A6 A/C Compressor A6 allroad A/C Compressor A6 Quattro A/C Compressor A7 Quattro A/C Compressor A7 Sportback A/C Compressor A8 A/C Compressor A8 Quattro A/C Compressor allroad A/C Compressor Allroad Quattro A/C Compressor Cabriolet A/C Compressor Coupe A/C Compressor Coupe Quattro A/C Compressor e-tron GT A/C Compressor e-tron Quattro A/C Compressor e-tron S A/C Compressor e-tron S Sportback A/C Compressor e-tron Sportback A/C Compressor Q3 A/C Compressor Q3 Quattro A/C Compressor Q4 e-tron A/C Compressor Q4 e-tron Sportback A/C Compressor Q5 A/C Compressor Q5 PHEV A/C Compressor Q5 Sportback A/C Compressor Q6 e-tron A/C Compressor Q7 A/C Compressor Q8 A/C Compressor Q8 e-tron A/C Compressor Q8 e-tron Sportback A/C Compressor Quattro A/C Compressor R8 A/C Compressor RS e-tron GT A/C Compressor RS Q8 A/C Compressor RS3 A/C Compressor RS4 A/C Compressor RS5 A/C Compressor RS5 Sportback A/C Compressor RS6 Avant A/C Compressor RS7 A/C Compressor RS7 Sportback A/C Compressor S3 A/C Compressor S4 A/C Compressor S5 A/C Compressor S5 Sportback A/C Compressor S6 A/C Compressor S7 A/C Compressor S7 Sportback A/C Compressor S8 A/C Compressor SQ5 A/C Compressor SQ5 Sportback A/C Compressor SQ6 e-tron A/C Compressor SQ7 A/C Compressor SQ8 A/C Compressor SQ8 e-tron A/C Compressor SQ8 e-tron Sportback A/C Compressor TT A/C Compressor TT Quattro A/C Compressor TT RS Quattro A/C Compressor TTS Quattro A/C Compressor V8 Quattro A/C Compressor