×
- Hello
- Login or Register
- Quick Links
- Live Chat
- Track Order
- Parts Availability
- RMA
- Help Center
- Contact Us
- Shop for
- Audi Parts
My Garage
My Account
Cart
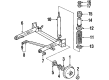
Genuine Audi 4000 Shock Absorber
Suspension Shock Absorber- Select Vehicle by Model
- Select Vehicle by VIN
Select Vehicle by Model
orMake
Model
Year
Select Vehicle by VIN
For the most accurate results, select vehicle by your VIN (Vehicle Identification Number).
4 Shock Absorbers found

Audi 4000 Shock Absorber Part Number: 811-513-031-L
$94.18 MSRP: $131.90You Save: $37.72 (29%)Ships in 1-2 Business Days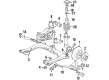
Audi 4000 Shock Absorber Part Number: 893-513-031-G
$133.52 MSRP: $187.00You Save: $53.48 (29%)Ships in 1-2 Business Days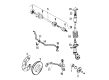
Audi 4000 Shock Absorber Part Number: 893-413-503-AA
$175.64 MSRP: $246.00You Save: $70.36 (29%)Ships in 1-2 Business Days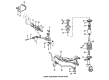
Audi 4000 Shock Absorber Part Number: 855-413-503-C
$202.78 MSRP: $284.00You Save: $81.22 (29%)Ships in 1-2 Business Days
Audi 4000 Shock Absorber
Choose original equipment manufacturer Shock Absorber for great performance and strong durability. They use Audi's official craftsmanship and high-grade materials, and meet strict quality standards. Are you looking for quality Shock Absorber at a good price? Come to our online store. We carry a wide range of genuine parts for your Audi 4000 and the prices are competitive. Each part comes with the manufacturer's warranty. You can install with confidence and get steady results. Over time, you'll save money and avoid hassle. Keep your maintenance simple and protect your vehicle with OEM parts. Get the quality your 4000 needs now.
Audi 4000 Shock Absorber Parts and Q&A
- Q: How to remove and replace the rear shock absorbers and coil springs on Audi 4000?A:Open the boot top and remove the trim around the fuel tank. Unscrew the nut over the top of the shock absorber piston rod and take off the dished washer and rubber bearing on the upper mounting of the rear suspension strut. Lift the rear part of the car using a trolley jack below the rear axle and place an axle stand below the undercarriage, but with the front wheels chocked. Slack the rear axle until the coil spring is not in tension, then unscrew and remove the lower mounting bolt of the shock absorber enabling the shock absorber to be removed out of the car together with the coil spring and damping ring. The damping ring, coil spring and bump stop components and spring retainer of the shock absorber should be removed extending to the point where the retainer should be located in case the shock absorber is to be reused. Both shock absorbers should not be released in the rear axle at the same time so as not to tear the rear brake hydraulic hoses. Wash everything and check it regarding wear and damage, and Coil Springs are usually color-coded and therefore new springs should correspond with their color-coding. When the shock absorber is vertical, push the piston rod up and down on its full-stroke to ensure that it is free of any irregularity and that its resistance is smooth; the presence of irregularity, lack of resistance or undue flow of fluid is an indication that the shock absorber is due to be changed. The new shock absorbers should be tested by pushing them up and down to empty trapped air before being installed, since they can require a number of complete strokes to cleanse the air in the system in case they are put on their sides. Refitting must be made in the same sequence as removal and the spring retainer fitted sequentially in its correct place, the upper rubber bearings dusted with talcum powder and then refitted. Install the chip by tightening the shock absorber lower mounting bolt to the required amount of torque until the car weight is on the suspension.


