×
- Hello
- Login or Register
- Quick Links
- Live Chat
- Track Order
- Parts Availability
- RMA
- Help Center
- Contact Us
- Shop for
- Audi Parts
My Garage
My Account
Cart
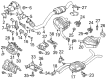
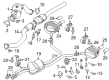
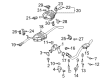
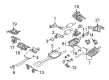
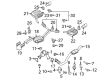
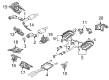
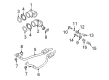
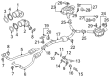
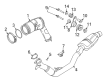
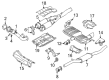
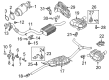
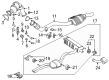
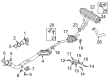
Genuine Audi Catalytic Converter
Cat. Converter- Select Vehicle by Model
- Select Vehicle by VIN
Select Vehicle by Model
orMake
Model
Year
Select Vehicle by VIN
For the most accurate results, select vehicle by your VIN (Vehicle Identification Number).
282 Catalytic Converters found


Audi Catalytic Converter Part Number: 4H0-254-250-RX
$2893.31 MSRP: $3455.71You Save: $562.40 (17%)Ships in 1-2 Business DaysProduct Specifications- Other Name: Catalyst; Converter & Pipe
- Position: Passenger Side


Audi Converter & Pipe Part Number: 4H0-253-350-N
$493.12 MSRP: $690.65You Save: $197.53 (29%)Ships in 1-2 Business DaysProduct Specifications- Other Name: Pipe; Muffler & Pipe
- Position: Passenger Side
- Replaces: 4H0-253-350-E

Audi Catalytic Converter Part Number: 8K0-254-252-KX
$2567.24 MSRP: $3064.27You Save: $497.03 (17%)Ships in 1-2 Business DaysProduct Specifications- Other Name: Catalyst

Audi Catalytic Converter Part Number: 8E0-254-505-CX
$1475.60 MSRP: $1771.43You Save: $295.83 (17%)Ships in 1-2 Business DaysProduct Specifications- Other Name: Catalyst; Converter & Pipe
- Position: Driver Side
- Replaces: 8E0-254-503-GX

Audi Catalytic Converter Part Number: 8K0-254-253-AX
$1618.03 MSRP: $1924.77You Save: $306.74 (16%)Ships in 1-2 Business DaysProduct Specifications- Other Name: Catalyst; Converter & Pipe, Preconverter
- Position: Passenger Side
- Replaces: 8K0-254-250-PX
Audi Catalytic Converter Part Number: 8K0-254-202-CX
$1618.03 MSRP: $1924.77You Save: $306.74 (16%)Ships in 1-2 Business DaysProduct Specifications- Other Name: Catalyst; Converter & Pipe, Preconverter
- Position: Driver Side
- Replaces: 8K0-254-200-PX

Audi Catalytic Converter Part Number: 8E0-254-552-PX
$1210.23 MSRP: $1452.86You Save: $242.63 (17%)Ships in 1-2 Business DaysProduct Specifications- Other Name: Catalyst; Converter & Pipe
- Position: Passenger Side

Audi Catalytic Converter Part Number: 8E0-254-554-DX
$2537.08 MSRP: $3045.71You Save: $508.63 (17%)Ships in 1-2 Business DaysProduct Specifications- Other Name: Catalyst; Converter & Pipe
- Position: Passenger Side
- Replaces: 8E0-254-552-CX

Audi Catalytic Converter Part Number: 4N0-254-250-GX
$2168.34 MSRP: $2585.40You Save: $417.06 (17%)Ships in 1-2 Business DaysProduct Specifications- Other Name: Catalyst; Converter & Pipe
- Position: Passenger Side

Audi Catalytic Converter Part Number: 4N0-254-200-GX
$2168.34 MSRP: $2585.40You Save: $417.06 (17%)Ships in 1-2 Business DaysProduct Specifications- Other Name: Catalyst; Converter & Pipe
- Position: Driver Side

Audi Catalytic Converter Part Number: 8W0-254-250-BX
$2387.77 MSRP: $2848.83You Save: $461.06 (17%)Ships in 1-2 Business DaysProduct Specifications- Other Name: Catalyst
- Position: Passenger Side

Audi Catalytic Converter Part Number: 4M0-254-202-A
$4995.41 MSRP: $5996.89You Save: $1001.48 (17%)Ships in 1-2 Business DaysProduct Specifications- Other Name: Catalyst; Converter & Pipe
- Position: Driver Side

Audi Catalytic Converter Part Number: 1J1-131-701-DX
$1584.31 MSRP: $1884.28You Save: $299.97 (16%)Ships in 1-2 Business DaysProduct Specifications- Other Name: Catalyst; Converter & Pipe

Audi Front Muffler Part Number: 4M0-253-350-BN
$209.06 MSRP: $292.80You Save: $83.74 (29%)Ships in 1-2 Business DaysProduct Specifications- Other Name: Pipe; Front Pipe
- Position: Passenger Side

Audi Front Muffler Part Number: 4M0-253-300-AR
$209.06 MSRP: $292.80You Save: $83.74 (29%)Ships in 1-2 Business DaysProduct Specifications- Other Name: Pipe; Front Pipe
- Position: Driver Side
Audi Front Muffler Part Number: 4M0-253-300-AS
$404.60 MSRP: $566.67You Save: $162.07 (29%)Ships in 1-2 Business DaysProduct Specifications- Other Name: Pipe; Front Pipe
- Position: Driver Side

Audi Exhaust Pipe Part Number: 8W9-253-350-J
$426.48 MSRP: $597.32You Save: $170.84 (29%)Ships in 1-2 Business DaysProduct Specifications- Other Name: Pipe; Front Pipe

Audi Front Muffler Part Number: 4M0-253-350-AN
$448.63 MSRP: $628.34You Save: $179.71 (29%)Ships in 1-2 Business DaysProduct Specifications- Other Name: Pipe; Front Pipe
- Position: Passenger Side
Audi Front Muffler Part Number: 4M0-253-300-N
$461.72 MSRP: $646.67You Save: $184.95 (29%)Ships in 1-2 Business DaysProduct Specifications- Other Name: Pipe; Front Pipe
- Position: Driver Side

Audi Front Muffler Part Number: 4M0-253-300-Q
$485.52 MSRP: $680.01You Save: $194.49 (29%)Ships in 1-2 Business DaysProduct Specifications- Other Name: Pipe; Front Pipe
- Position: Front
| Page 1 of 15 |Next >
1-20 of 282 Results
Audi Catalytic Converter
The Audi Catalytic Converter is the car's clean air guardian, transforming the toxic exhaust into healthier gases, meaning that every trip is not only in compliance with stringent emission rules but also the performance remains lively. Audi as a brand has spent more than a century perfecting sporty sedans, dynamic SUVs, and forward-looking electric models, combining its legendary Quattro all-wheel drive with lightweight chassis that hug corners and inspire confidence. Inside any modern Audi, the Virtual Cockpit provides crisp graphics, the matrix headlights cut bright paths at night, and intuitive infotainment keeps drivers connected, all aspects of the company goal of combining luxury and cutting-edge tech. Continuous experimentation with electric powertrains and self-driving systems indicates Audi is on a quest for the future where efficiency and excitement go hand in hand. Matching that philosophy, the Audi Catalytic Converter utilizes a honeycomb lattice covered in precious metals to accelerate reduction and oxidation reactions, scrubbing the exhaust stream of carbon monoxide and unburned hydrocarbons before they escape. High heat inside the robust steel housing energizes these reactions without producing any noticeable back pressure; therefore, acceleration remains smooth. Because every engine depends on an exact air-fuel mix, a clear Audi Catalytic Converter additionally assists steady idle, quick starts, and strong fuel economy throughout the lineup. Overall, the Catalytic Converter increases the life of your engine while reducing smog. Durable materials are resistant to corrosion but have a universal design that fits neatly within the brand's diverse platforms, providing the same reliable protection for people and planet to each model.
Stick with genuine OEM Catalytic Converter when you need quality that holds up. Audi crafts these parts to hit strict factory specs for every single unit. They also run each part through rigorous checks during production to maintain high quality. You can find exact Audi Catalytic Converter you need in our huge stock at AudiPartsGiant.com. You'll love our low, economical prices too. Every OEM part carries a real manufacturer's warranty, so you can buy with confidence. Returns aren't a headache here because our policy is simple. Plus, our speedy delivery gets orders out fast. Shop today and buy with total peace of mind.
Audi Catalytic Converter Parts and Q&A
- Q: What are the important facts owners should be aware of to ensure the proper functioning of a catalytic converter throughout its service life on Audi A3?A:The catalytic converter is a durable and very easy tool and needs no maintenance yet the owners should take note of few facts that they should observe to have proper operations of this device during the life of its use. One should also never use leaded or lead-replacement petrol because lead and other additives may coat the precious metals reducing their efficiency and eventually destroying the converter. It is important to maintain the ignition and fuel systems in an efficient state as per the schedule of the manufacturer. In case of misfiring of the engine, there should be limited driving until it is corrected. Pushing or towing of the car may wet the catalytic converter with unburnt fuel and therefore may cause overheating when the engine is started. One should not switch off the ignition when the engine speed is high and must not use fuel or engine oil additives that can damage the converter. It is not recommended to keep on driving the car and keep burning oil to the point where blue smoke can be seen. The catalytic converter has its very high temperatures and therefore, after a long running period, one should not park the car in dry undergrowth, long grass or stacked leaves. Also, converter is delicate and should not be hit with tools when servicing it, and one must be keen when handling it. Sulphurous odor Sometimes a smell of rotten eggs may be detected at the exhaust, but this is due not to the converter but to the sulfur in the fuel. With a properly driven and well-maintained car, the lifespan of the catalytic converter should take up to 50,000100,000 miles, and once it stops working, it has to be changed.
- Q: How to remove and install the catalytic converter on Audi A4?A:In four cylinder models, the starting point would be to remove the engine cover of 1.8L models and maybe remove the air filter housing to create ease of access. Disconnect the electrical connectors of the upstream and downstream oxygen sensors that might need to have the coolant expansion tank detached without the removal of the hoses. Take out the oxygen sensors of the catalytic converter and then remove the attaching parts that hold the front exhaust pipe in place on top of the catalytic converter. Lift the car on jackstands, loosen the bolts holding the front exhaust pipe support bracket, and then the three bolts holding the lower catalytic converter flange to the front exhaust pipe, and then take away the catalytic converter and dispose the old flange gaskets. The reverse order of installation should be adopted making sure that new gaskets and self-locking nuts are used. In case of V6 models, that one starts with the cover of the rear engine by taking it off then continue with the left-side catalytic converter by taking off the little cover, remove the engine coolant level sensor and the coolant expansion tank. Reach the oxygen sensor electrical connections, and in the case of right catalytic converter, do the same action, but remove the air filter housing. Take the top nuts holding the converter to the exhaust manifold, lift the vehicle, and take out the front wheel. Disconnect the exhaust system and, on AWD models, proceed to further steps to assist and support the transmission by lowering it. Lastly, unbolster the catalytic converter and replace it with the new one making sure that all the fasteners are tightened. In the case of 3.2L V6 engines, it includes the removal of the rear engine cover, the disconnection of the coolant level sensor on the left engine bank, and the same procedure on both the catalytic converters, making sure that the transmission is properly supported and that the entire assembly of the exhaust pipe is taken off carefully before attaching it.


Related Audi Parts
 Audi Exhaust Clamp
 Audi Exhaust Manifold
 Audi Air Injection Pump
 Audi EGR Tube
 Audi EGR Tube Gaskets
 Audi EGR Valve Gasket
 Audi Exhaust Flange Gasket
 Audi Exhaust Heat Shield
 Audi Exhaust Manifold Clamp
 Audi Exhaust Manifold Gasket
 Audi Exhaust Resonator
 Audi Muffler Strap
Browse by Model
100 Catalytic Converter 100 Quattro Catalytic Converter 200 Catalytic Converter 200 Quattro Catalytic Converter 4000 Catalytic Converter 4000 Quattro Catalytic Converter 5000 Catalytic Converter 5000 Quattro Catalytic Converter 80 Catalytic Converter 80 Quattro Catalytic Converter 90 Catalytic Converter 90 Quattro Catalytic Converter A3 Catalytic Converter A3 Quattro Catalytic Converter A3 Sportback e-tron Catalytic Converter A4 allroad Catalytic Converter A4 Catalytic Converter A4 Quattro Catalytic Converter A5 Catalytic Converter A5 Quattro Catalytic Converter A5 Sportback Catalytic Converter A6 allroad Catalytic Converter A6 Catalytic Converter A6 Quattro Catalytic Converter A7 Quattro Catalytic Converter A7 Sportback Catalytic Converter A8 Catalytic Converter A8 Quattro Catalytic Converter allroad Catalytic Converter Allroad Quattro Catalytic Converter Cabriolet Catalytic Converter Coupe Catalytic Converter Coupe Quattro Catalytic Converter Q3 Catalytic Converter Q3 Quattro Catalytic Converter Q5 Catalytic Converter Q5 PHEV Catalytic Converter Q5 Sportback Catalytic Converter Q7 Catalytic Converter Q8 Catalytic Converter Quattro Catalytic Converter R8 Catalytic Converter RS Q8 Catalytic Converter RS3 Catalytic Converter RS4 Catalytic Converter RS5 Catalytic Converter RS5 Sportback Catalytic Converter RS6 Avant Catalytic Converter RS7 Catalytic Converter RS7 Sportback Catalytic Converter S3 Catalytic Converter S4 Catalytic Converter S5 Catalytic Converter S5 Sportback Catalytic Converter S6 Catalytic Converter S7 Catalytic Converter S7 Sportback Catalytic Converter S8 Catalytic Converter SQ5 Catalytic Converter SQ5 Sportback Catalytic Converter SQ7 Catalytic Converter SQ8 Catalytic Converter TT Catalytic Converter TT Quattro Catalytic Converter TT RS Quattro Catalytic Converter TTS Quattro Catalytic Converter V8 Quattro Catalytic Converter