×
- Hello
- Login or Register
- Quick Links
- Live Chat
- Track Order
- Parts Availability
- RMA
- Help Center
- Contact Us
- Shop for
- Audi Parts
My Garage
My Account
Cart
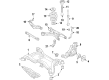
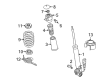
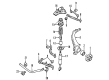
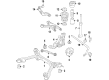
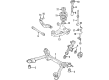
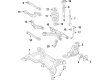
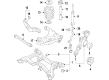
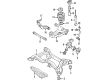
Genuine Audi A4 Shock Absorber
Suspension Shock Absorber- Select Vehicle by Model
- Select Vehicle by VIN
Select Vehicle by Model
orMake
Model
Year
Select Vehicle by VIN
For the most accurate results, select vehicle by your VIN (Vehicle Identification Number).
37 Shock Absorbers found


Audi A4 Strut Part Number: 8K0-413-029-N
$742.67 MSRP: $960.15You Save: $217.48 (23%)Ships in 1-2 Business Days

Audi A4 Shock Absorber Part Number: 8F0-513-025-A
$838.82 MSRP: $1084.46You Save: $245.64 (23%)Ships in 1-2 Business Days


Audi A4 Shock Part Number: 8K0-513-035-AS
$201.10 MSRP: $281.65You Save: $80.55 (29%)Ships in 1-2 Business Days

Audi A4 Strut Part Number: 8E0-413-031-DF
$209.43 MSRP: $293.32You Save: $83.89 (29%)Ships in 1-2 Business Days


Audi A4 Shock Absorber Part Number: 8K0-413-031-CB
$220.15 MSRP: $308.33You Save: $88.18 (29%)Ships in 1-2 Business Days

Audi A4 Shock Absorber Part Number: 8K0-513-035-K
$222.53 MSRP: $311.67You Save: $89.14 (29%)Ships in 1-2 Business Days


Audi A4 Shock Absorber Part Number: 8K0-513-035-AK
$222.53 MSRP: $311.67You Save: $89.14 (29%)Ships in 1-2 Business Days

Audi A4 Shock Part Number: 8K0-513-035-AM
$227.29 MSRP: $318.34You Save: $91.05 (29%)Ships in 1-2 Business Days


Audi A4 Shock Absorber Part Number: 8E0-513-036-AE
$228.48 MSRP: $320.00You Save: $91.52 (29%)Ships in 1-2 Business Days


Audi A4 Shock Absorber Part Number: 8W0-513-035-AC
$236.81 MSRP: $331.68You Save: $94.87 (29%)Ships in 1-2 Business DaysAudi A4 Shock Part Number: 8K0-513-035-AB
$249.89 MSRP: $349.98You Save: $100.09 (29%)Ships in 1-2 Business Days
Audi A4 Shock Absorber Part Number: 8W0-616-025-H
$714.00 MSRP: $923.08You Save: $209.08 (23%)Ships in 1-2 Business Days
Audi A4 Shock Absorber Part Number: 8E0-513-036-AL
$201.10 MSRP: $281.65You Save: $80.55 (29%)Ships in 1-2 Business Days
Audi A4 Shock Absorber Part Number: 8E0-513-036-AA
$209.43 MSRP: $293.32You Save: $83.89 (29%)Ships in 1-2 Business DaysAudi A4 Shock Absorber Part Number: 8E0-513-036-T
$217.28 MSRP: $304.32You Save: $87.04 (29%)Ships in 1-2 Business DaysAudi A4 Shock Absorber Part Number: 8E0-513-036-AH
$220.15 MSRP: $308.33You Save: $88.18 (29%)Ships in 1-2 Business DaysAudi A4 Shock Absorber Part Number: 8W0-513-035-AA
$230.86 MSRP: $323.34You Save: $92.48 (29%)Ships in 1-2 Business Days
Audi A4 Shock Absorber Part Number: 8W0-413-031-AA
$235.62 MSRP: $330.01You Save: $94.39 (29%)Ships in 1-2 Business DaysAudi A4 Shock Absorber Part Number: 8W0-513-035-AJ
$236.81 MSRP: $331.68You Save: $94.87 (29%)Ships in 1-2 Business DaysAudi A4 Strut Part Number: 8E0-413-031-DK
$238.00 MSRP: $333.33You Save: $95.33 (29%)Ships in 1-2 Business Days
| Page 1 of 2 |Next >
1-20 of 37 Results
Audi A4 Shock Absorber
Choose original equipment manufacturer Shock Absorber for great performance and strong durability. They use Audi's official craftsmanship and high-grade materials, and meet strict quality standards. Are you looking for quality Shock Absorber at a good price? Come to our online store. We carry a wide range of genuine parts for your Audi A4 and the prices are competitive. Each part comes with the manufacturer's warranty. You can install with confidence and get steady results. Over time, you'll save money and avoid hassle. Keep your maintenance simple and protect your vehicle with OEM parts. Get the quality your A4 needs now.
Audi A4 Shock Absorber Parts and Q&A
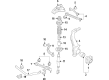
- Q: How to remove and install the front Shock Absorber and Coil Springs on Audi A4?A:Do not remove hydraulic hoses attached to the shock absorbers or other components on the vehicles that have a Dynamic Ride Control (DRC) system. On cars with a hub cap or wheel rim trim, start by loosening the wheel bolts half a turn being careful not to drop the load on your wheels. Park the car by chocking the rear wheels, pressing hard on the parking brake, and then lifting the front of the car and resting it solidly on jackstands, and then take out the wheel. In cars that have automatic leveling headlamps, the level sensor connection to the front lower Control Arm should be disconnected. Take off the ABS wheel speed sensor harness and mount it off its mounting bracket and out of the shock absorber. Separate the brake caliper and hold it in place by a piece of wire, make sure it is not suspended by the brake hose. Erase the clip under the shock absorber upper mount and dispose of it because there is no need to replace it. When removing the steering gear, protect the steering gear boot with cardboard or other material and use the support of the Steering Knuckle with a floor jack. Isolate the upper control arms off of the steering knuckle and then dismount the lower mounting fasteners of the shock absorber and roll the steering knuckle over to the side. Unscrew connections of the coolant reservoirs, pull off the cowl cover under the windshield next to the engine compartment and pull off the small bolts cover(s) to reach the mounting fasteners. Install the shock absorber by removing the upper mounting fasteners being careful not to disturb the washer position and removing the unit through the wheelwell keeping the upper control arms attached unless a complete replacement of the shock absorber/coil assembly is required. To install, the manufacturer suggests that when being removed the mounting fasteners are replaced. Install the shock absorber/coil spring assembly and attach the mounting bolts and tighten them to the required torque and reattach any covers on the rubber bolts, where the mounting hole in the coil spring lower seat should be facing the vehicle. Install the shock absorber to the lower control arm with the mounting bolt running in the rear to the front and attaching a new mounting nut and tightening by hand. then reconnect the upper control arms to the steering knuckle, install a new clamp bolt and self-locking nut and tighten the nut to the desired torque as the control arms are pushed down pressing the balljoint studs into the steering knuckle. Install the brake caliper and reattach the harness of the ABS wheel speed sensor. In the case of an automatic leveling headlamp vehicle, re-attach the vehicle level sensor connecting rod to the front lower control arm. Simulate normal ride height by raising the suspension using a floor jack under the outer ends of the lower control arms and then tighten the lower mounting nut of the shock absorber to the desired amount of torque. Lastly, attach the wheel and the wheel bolts then tighten them firmly with the wheel off the ground, lower the vehicle then tighten the wheel bolts to the recommended torque.
- Q: What should you do if the shock absorbers or coil springs show signs of wear on Audi A4?A:When the shock absorbers or coil springs are worn (leak fluid, have no damping or are damaged physically) then examine all alternatives before attempting any form of work, since the shock absorber cannot be serviced and only needs replacement in an event of a problem. The shock absorber/coil spring assemblies can be bought on the exchange basis; this can save on time and effort and hence you need to make sure that the cost and availability of parts before dismantling the vehicle. Installation: This should be performed when replacing an entire spring/shock absorber assembly, and only the upper Control Arm is to be removed, unless it is being replaced entirely. Install the shock absorber and spring assembly with the upper control arm still in place (unless the complete assembly is being replaced). To ease the pressure on the spring of the upper seat, fit-in a spring compressor so that the coil spring compresses evenly. Indicate the upper spring seat and loosen the nut of the shock absorber damper shaft without rotating the shaft. Take out the nut, mounting plate, washer, upper spring seat and spring upper spring support, labeling the spring upper spring support to the spring seat. Loosen the dust boot, rubber bump stop and take off the compressed coil spring and protective cap cautiously of the shock absorber piston. Align the lower spring seat support and the spring seat with an alignment mark and remove the lower spring support and, as needed, detach the lower spring seat out of the shock absorber body. Inspect every part of the wear or damage, and replace it, as necessary, and the shock, whether it leaks fluid, and the damper shaft whether it is pitted. Test the operation of the shock and make sure that it is smooth and does not feel jerky or has any signs of wear. In case the coil spring is of any concern, take the spring compressor off and examine the spring whether it is distorted or cracked and replace it. Check the rest of the parts to see whether they are damaged or not and change the suspect ones. Install the lower spring seat, lower spring support, protective cap, bump stop and boot again on the damper shaft and install the coil spring ensuring that it is correctly positioned against the spring seat stop. Secure the upper spring support and spring seat, washer and upper mounting to the top of the shock aligning the marks and making sure that the spring seat is in place. Install new damper shaft nut, ensure that the shaft does not rotate, and screw the nut to the required torque. Lastly, very gently unscrew the spring compressor and pull out making sure the spring ends are in their right place then re-attach the spring compressor to the shock absorber assembly.


Related Audi A4 Parts
 Audi A4 Axle Beam Mount
 Audi A4 Axle Pivot Bushing
 Audi A4 Bump Stop
 Audi A4 Coil Spring Insulator
 Audi A4 Control Arm Nut
 Audi A4 Differential Mount
 Audi A4 Front Cross-Member
 Audi A4 Spindle
 Audi A4 Spindle Nut
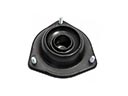 Audi A4 Strut Mounts
 Audi A4 Sway Bar Bushing
 Audi A4 Sway Bar Link
Browse by Year
2020 Shock Absorber
2019 Shock Absorber
2018 Shock Absorber
2017 Shock Absorber
2016 Shock Absorber
2015 Shock Absorber
2014 Shock Absorber
2013 Shock Absorber
2012 Shock Absorber
2011 Shock Absorber
2010 Shock Absorber
2009 Shock Absorber
2008 Shock Absorber
2007 Shock Absorber
2006 Shock Absorber
2005 Shock Absorber
2004 Shock Absorber
2003 Shock Absorber
2002 Shock Absorber