×
- Hello
- Login or Register
- Quick Links
- Live Chat
- Track Order
- Parts Availability
- RMA
- Help Center
- Contact Us
- Shop for
- Audi Parts
My Garage
My Account
Cart
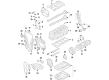
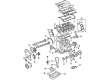
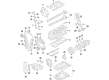
Genuine Audi A4 Piston
Engine Pistons- Select Vehicle by Model
- Select Vehicle by VIN
Select Vehicle by Model
orMake
Model
Year
Select Vehicle by VIN
For the most accurate results, select vehicle by your VIN (Vehicle Identification Number).
11 Pistons found


Audi A4 Piston Part Number: 06K-107-065-AS
$180.77 MSRP: $253.18You Save: $72.41 (29%)Ships in 1-2 Business Days

Audi A4 Pistons Part Number: 06B-107-065-N
$321.29 MSRP: $449.98You Save: $128.69 (29%)Ships in 1-2 Business Days

Audi A4 Piston Part Number: 06K-107-065-AC
$477.42 MSRP: $668.65You Save: $191.23 (29%)Ships in 1-2 Business Days


Audi A4 Piston Part Number: 06C-107-065-N
$573.58 MSRP: $803.33You Save: $229.75 (29%)Ships in 1-2 Business Days

Audi A4 Piston Part Number: 06H-107-065-DM
$231.78 MSRP: $324.62You Save: $92.84 (29%)Ships in 1-2 Business Days
Audi A4 Piston Part Number: 06H-107-065-BH
$304.64 MSRP: $426.67You Save: $122.03 (29%)Ships in 1-2 Business Days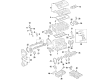
Audi A4 Piston Part Number: 06D-107-066-AB
$401.61 MSRP: $562.48You Save: $160.87 (29%)Ships in 1-2 Business Days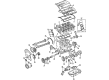
Audi A4 Pistons Part Number: 06A-107-065-J
$410.54 MSRP: $574.99You Save: $164.45 (29%)Ships in 1-2 Business Days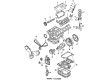
Audi A4 Piston Part Number: 078-107-065-AD
$448.11 MSRP: $627.60You Save: $179.49 (29%)Ships in 1-2 Business Days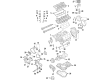
Audi A4 Piston Part Number: 06E-107-066-CK
$589.04 MSRP: $824.98You Save: $235.94 (29%)Ships in 1-2 Business DaysAudi A4 Piston Part Number: 06E-107-065-CK
$589.04 MSRP: $824.98You Save: $235.94 (29%)Ships in 1-2 Business Days
Audi A4 Piston
Choose original equipment manufacturer Piston for great performance and strong durability. They use Audi's official craftsmanship and high-grade materials, and meet strict quality standards. Are you looking for quality Piston at a good price? Come to our online store. We carry a wide range of genuine parts for your Audi A4 and the prices are competitive. Each part comes with the manufacturer's warranty. You can install with confidence and get steady results. Over time, you'll save money and avoid hassle. Keep your maintenance simple and protect your vehicle with OEM parts. Get the quality your A4 needs now.
Audi A4 Piston Parts and Q&A
- Q: What is the significance of Piston Top Dead Center (TDC) in engine timing on Audi A4?A:The upper-most point of the cylinder that every piston has to reach as it moves up and down with the rotation of the crankshaft is called the top dead center (TDC) which is usually the point on the compression stroke. The number one piston is positioned where the timing marks on the vibration damper/crankshaft pulley are. Setting the piston(s) at TDC is very important in processes such as changing Timing Belt and sprockets. Any piston has to be moved to TDC by rotating the crankshaft clockwise since the timing belt end of the engine. The most desirable way would be to apply a large socket and breaker bar on the crankshaft pulley bolt, and remote starter switch may help in speeding up the process. In case of an assistant, even short bursts of ignition can be used in order to reach TDC and then a socket and a breaker bar are utilized. In case about the remote starter or ignition technique, the fuel system would be disengaged by taking out the fuel pump fuse. All of the spark plugs are to be removed and a compression gauge should be placed in the number one cylinder. Pressure will be measured on the gauge as the piston approaches TDC as the crankshaft is turned. When the TDC mark on the front cover is at the same location as the notch in the damper, the crankshaft may be turned to the location of the notch in the damper which signifies that the number one cylinder is at TDC during the compression stroke. Once the marks match, and there is no compression, then the piston is in the exhaust stroke, and it will take a complete 360-degree turn to match the marks again. In the absence of a compression gauge, TDC may also be determined as follows: matching the marks of the camshaft sprocker with the rear timing cover and the marks of the crankshaft damper with the front cover. Once the number one piston has been moved to the TDC on the compression stroke, the TDC of the other cylinders may be determined by rotating the crankshaft, first to find TDC compression of cylinder number three after rotating past TDC compression of number one.
- Q: What steps should be taken before removing the piston and connecting rod assemblies on Audi A4?A:The cylinder head(s) and oil pan have to be removed before the piston and connecting rod assemblies. Your fingernail should be used to test whether there are any ridges in the upper limit of the ring travel, which indeed ought to be removed with a special tool, otherwise it might lead to the piston being broken. Once there are no ridges, rotate the engine in such a way that the Crankshaft is facing up. Access to the rod and main bearing caps should be made available in four-cylinder engines and 3.0L V6 engines by removing the oil pump/balance shaft assembly. The connecting rod endplay should be checked using feeler gauges before the removal of the main bearing cap assembly and connecting rods to confirm that it lies within the designated range. Ensure that the connecting rods and caps are kept distinct to prevent being confused and the connecting rod cap bolts or nuts are slowly loosened so that they can be removed by hand. Carefully remove the first connecting rod cap and bearing insert and push the connecting rod/piston assembly out the top of the engine, taking care to clean out all the ridges. This should be repeated with the rest of the cylinders, the length of the rod bolts should be indicated, and any that have become undue length replaced. The connecting rods and pistons are then in a position to be checked and overhauled. Check the ring end gaps and the side clearance of the piston ring before fitting the new piston rings. Prepare the new connecting rod sets and piston/connecting rod assemblies and match them during the installation. Install the upper ring in the original cylinder and probe the end gap using feeler gauges, and adjust accordingly. The oil control ring should be installed first, and then the middle and top rings, the orientation is important. Prior to the fitting of the piston/connecting rod assemblies, it is necessary to clean the cylinder walls, chamfer the top edge of each cylinder bore, and make sure the crankshaft is installed. Wipe off the bearing surfaces and replace the bearing inserts without lubrication. Install the piston ring gaps, lubricate the piston and rings and install a piston ring compressor. Turn the crankshaft to the bottom dead center position and place the piston/connecting rod assembly into the cylinder bore making sure that the piston is oriented appropriately. Measure the connecting rod bearing oil clearance with Plastigage and replace the bearing inserts, where necessary. Once the Plastigage material is cleaned, grease or engine assembly lube, applied uniformly to the bearing faces, and the connecting rod is replaced, put the rod cap back. Repeat the process, only with the other assemblies, making sure that they are clean and properly positioned. Lastly, turn the crankshaft to ensure it is not binding and that the endplay of the connecting rod is correct and adjust accordingly.


Related Audi A4 Parts
 Audi A4 Timing Belt
 Audi A4 Belt Tensioner
 Audi A4 Cylinder Head
 Audi A4 Timing Cover Gasket
 Audi A4 Differential Cover Gasket
 Audi A4 Engine Oil Cooler
 Audi A4 Rocker Arm
 Audi A4 Transmission Oil Cooler
 Audi A4 Valve Spring Retainer
 Audi A4 Valve Spring Retainer Keeper
 Audi A4 Variable Timing Solenoid
 Audi A4 Variable Timing Sprocket