×
- Hello
- Login or Register
- Quick Links
- Live Chat
- Track Order
- Parts Availability
- RMA
- Help Center
- Contact Us
- Shop for
- Audi Parts
My Garage
My Account
Cart
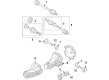
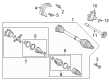
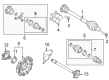
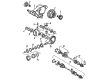
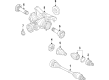
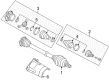
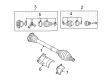
Genuine Audi A4 CV Joint
CV Joint Axle- Select Vehicle by Model
- Select Vehicle by VIN
Select Vehicle by Model
orMake
Model
Year
Select Vehicle by VIN
For the most accurate results, select vehicle by your VIN (Vehicle Identification Number).
28 CV Joints found


Audi A4 Inner Joint Assembly Part Number: 8K0-598-103-B
$351.04 MSRP: $491.66You Save: $140.62 (29%)Ships in 1-2 Business Days

Audi A4 Inner Joint Assembly Part Number: 8W0-498-103-B
$533.77 MSRP: $747.58You Save: $213.81 (29%)Ships in 1-2 Business Days
Audi A4 Inner Joint Assembly Part Number: 8T0-498-103
$515.41 MSRP: $721.87You Save: $206.46 (29%)Ships in 1-2 Business Days
Audi A4 Inner Joint Assembly Part Number: 443-498-103
$299.88 MSRP: $420.00You Save: $120.12 (29%)Ships in 1-2 Business Days
Audi A4 Inner Joint Assembly Part Number: 4D0-598-103
$315.35 MSRP: $441.67You Save: $126.32 (29%)Ships in 1-2 Business Days

Audi A4 Inner CV Joint Part Number: 8E0-598-103-A
$411.74 MSRP: $576.67You Save: $164.93 (29%)Ships in 1-2 Business Days
Audi A4 Inner Joint Assembly Part Number: 8W0-598-103
$419.82 MSRP: $587.98You Save: $168.16 (29%)Ships in 1-2 Business Days

Audi A4 Inner Joint Assembly Part Number: 8E0-498-103-E
$422.44 MSRP: $591.65You Save: $169.21 (29%)Ships in 1-2 Business Days
Audi A4 Inner Joint Assembly Part Number: 8E0-598-103
$437.31 MSRP: $612.49You Save: $175.18 (29%)Ships in 1-2 Business DaysAudi A4 Inner Joint Assembly Part Number: 8K0-498-103-BX
$461.72 MSRP: $646.67You Save: $184.95 (29%)Ships in 1-2 Business DaysAudi A4 Inner Joint Assembly Part Number: 8T0-498-103-X
$372.19 MSRP: $518.33You Save: $146.14 (29%)Ships in 1-2 Business Days

Audi A4 Inner Joint Assembly Part Number: 4H0-498-103-A
$502.18 MSRP: $703.33You Save: $201.15 (29%)Ships in 1-2 Business Days
Audi A4 Inner Joint Assembly Part Number: 8E0-498-103-B
$527.17 MSRP: $738.34You Save: $211.17 (29%)Ships in 1-2 Business Days
Audi A4 Inner Joint Assembly Part Number: 8K0-598-103-E
$536.68 MSRP: $751.66You Save: $214.98 (29%)Ships in 1-2 Business DaysAudi A4 Inner Joint Assembly Part Number: 8K0-598-103-D
$536.68 MSRP: $751.66You Save: $214.98 (29%)Ships in 1-2 Business Days
Audi A4 Inner Joint Assembly Part Number: 4E0-498-103
$552.62 MSRP: $773.98You Save: $221.36 (29%)Ships in 1-2 Business DaysAudi A4 Inner Joint Assembly Part Number: 4H0-498-103-AX
$161.56 MSRP: $223.33You Save: $61.77 (28%)Ships in 1-2 Business Days
Audi A4 Inner Joint Part Number: 8E0-598-103-AX
$192.50 MSRP: $266.67You Save: $74.17 (28%)Ships in 1-2 Business Days
Audi A4 Inner Joint Assembly Part Number: 8D0-498-103-AX
$205.59 MSRP: $285.00You Save: $79.41 (28%)Ships in 1-2 Business Days
Audi A4 Inner Joint Assembly Part Number: 431-498-103-CX
$215.11 MSRP: $298.33You Save: $83.22 (28%)Ships in 1-2 Business Days
| Page 1 of 2 |Next >
1-20 of 28 Results
Audi A4 CV Joint
The Audi A4 CV Joint allows any Audi drivetrain to transmit engine power to the wheels in rotation as the suspension moves and the steering rotates. This mechanism also contrasts with the universal joint, in that the torque flows without a change in speed, which means that the bearing is pushed by means of a tripod that slides within a grooved housing. To preserve the life of the bearing, the joint is saturated by placing it in a pool of grease capped off by a flexible rubber boot, though this boot is prone to rupture due to debris or hardening over time, leading to the loss of grease and the resulting invasion of grit, which can ruin the joint in a few weeks. Audi worked with two major styles through the production run of A4. The inner tripod design can take the axial movement along the shaft and absorb the plunge the suspension traverses as it moves, whereas the outer Rzeppa or Birfield design uses six steel balls within a spherical shell to provide a high degree of articulation of the steering angles. They are both alike in terms of vulnerability, and therefore regular examination of ripped boots is essential, since early detection of damage to the boots will only see the boot replaced in place of the whole CV Joint. If the breach is not detected, the bearing will grind itself to pieces. The owners will have to buy a new CV Joint, which is more expensive and will take more labor to fix. Since each new Audi still relies on this very specific yet sensitive component, knowing its use and its weakness is useful so that drivers prevent CV Joint damage and prevent abrupt loss of their driving system, keeping their Audi in silent and smooth motion.
Choose original equipment manufacturer CV Joint for great performance and strong durability. They use Audi's official craftsmanship and high-grade materials, and meet strict quality standards. Are you looking for quality CV Joint at a good price? Come to our online store. We carry a wide range of genuine parts for your Audi A4 and the prices are competitive. Each part comes with the manufacturer's warranty. You can install with confidence and get steady results. Over time, you'll save money and avoid hassle. Keep your maintenance simple and protect your vehicle with OEM parts. Get the quality your A4 needs now.
Audi A4 CV Joint Parts and Q&A
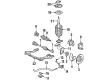
- Q: What factors should you consider before starting the overhaul of front CV joints and CV joint boots showing signs of wear on Audi A4?A:Wear of the CV joints in case the boots are torn, look before you leap at doing the overhaul, however, full rebuilt driveaxles are on exchange basis which save time and energy. Start by taking the driveaxle out of the car, clamping it in a vise that has soft jaws, and cutting away the outer joint boot that has clamps on it. Unscrew the boot, until the CV joint is exposed, wipe the excess grease off, and tap the joint off the end of the driveaxle with a hammer and a brass punch, but be careful not to strike any part of the inner race. Store circlip to driveaxle groove, thrust washer and dished washer then take off, observe their installations position. Remove the boot and clean the outer CV joint assembly, indicating the locations of the bearing cage, inner race and housing. Install the outer CV joint in a vise, take out the ball bearings one by one, and in case it is necessary, loosen the inner race by tapping. To detach the cage and inner race assembly, place the cage windows at the same level with ball grooves and clean up all components and check whether they are not damaged. Provided that the components can be serviced, get a boot replacement kit and grease all parts with CV joint grease and then re-assemble. Fit the inner race into the cage and align marks then insert the assembly into the housing. Install the balls, grease the joint using the inner race hole and stuff the joint. Clean the axleshaft and slide on the new clamp and boot, pouring up the rest of the grease into the boot. Fit a new circlip, making sure it clips into place and then fasten the boot with clamps and before replacing the driveaxle, make sure the joint moves freely. In the case of an inner CV joint, loosen the boot with the clamps and pull the boot away then record the association of the parts and then take away the axleshaft. Wash and wipe off all the parts, examine the wear, and change the joint when required. After making everything back together, place the housing on the shaft, lubricate the spider posts, and attach the rollers. With the grease applied, then install the boot and clamps and then ensure that the joint is free before the driveaxle is re-attached. In the case of triple-roller type joint, the same steps should be used to remove and replace components, making sure that there is appropriate alignment and lubrication during the process. In the case of the ball-and-cage type joint, pull off the inner joint by removing the boot cap, knock off the boot clamp and removing the snap-ring. Before installing the driveaxle, clean and wipe all parts and reassemble using grease and make sure the boot is well seated.

Related Audi A4 Parts
 Audi A4 CV Boot
 Audi A4 Bump Stop
 Audi A4 Coil Spring Insulator
 Audi A4 Coil Springs
 Audi A4 Control Arm Bolt
 Audi A4 Differential Mount
 Audi A4 Shock and Strut Boot
 Audi A4 Spindle
 Audi A4 Strut Housing
 Audi A4 Strut Mounts
 Audi A4 Suspension Strut Rod
 Audi A4 Wheel Hub Bolt
Browse by Year
2020 CV Joint 2019 CV Joint 2018 CV Joint 2017 CV Joint 2016 CV Joint 2015 CV Joint 2014 CV Joint 2013 CV Joint 2012 CV Joint 2011 CV Joint 2010 CV Joint 2009 CV Joint 2008 CV Joint 2007 CV Joint 2006 CV Joint 2005 CV Joint 2004 CV Joint 2003 CV Joint 2002 CV Joint 2001 CV Joint 2000 CV Joint 1999 CV Joint 1998 CV Joint 1997 CV Joint 1996 CV Joint