×
- Hello
- Login or Register
- Quick Links
- Live Chat
- Track Order
- Parts Availability
- RMA
- Help Center
- Contact Us
- Shop for
- Audi Parts
My Garage
My Account
Cart
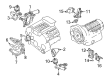
Genuine Audi A4 Engine Mount
Engine Motor Mount- Select Vehicle by Model
- Select Vehicle by VIN
Select Vehicle by Model
orMake
Model
Year
Select Vehicle by VIN
For the most accurate results, select vehicle by your VIN (Vehicle Identification Number).
99 Engine Mounts found


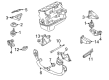
Audi A4 Support Part Number: 8D0-399-113-AB
$56.77 MSRP: $78.20You Save: $21.43 (28%)Ships in 1-2 Business Days


Audi A4 Transmission Mount Part Number: 8K0-399-151-BD
$158.14 MSRP: $221.48You Save: $63.34 (29%)Ships in 1-2 Business Days


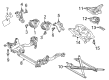
Audi A4 Motor Mount Part Number: 8R0-198-381-C
$404.60 MSRP: $566.67You Save: $162.07 (29%)Ships in 1-2 Business Days


Audi A4 Front Mount Part Number: 8R0-199-381-C
$406.98 MSRP: $569.99You Save: $163.01 (29%)Ships in 1-2 Business Days


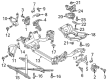
Audi A4 Motor Mount Part Number: 8R0-199-381-AL
$406.98 MSRP: $570.00You Save: $163.02 (29%)Ships in 1-2 Business Days


Audi A4 Front Mount Part Number: 8R0-199-381-AK
$406.98 MSRP: $570.00You Save: $163.02 (29%)Ships in 1-2 Business Days

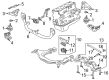
Audi A4 Front Support Buffer Part Number: 8E0-199-339
$15.99 MSRP: $25.58You Save: $9.59 (38%)Ships in 1-2 Business Days

Audi A4 Front Support Cushion Part Number: 8D0-199-339-P
$17.36 MSRP: $27.78You Save: $10.42 (38%)Ships in 1-2 Business Days

Audi A4 Transmission Mount Stop Part Number: 8K0-399-291-F
$22.49 MSRP: $35.98You Save: $13.49 (38%)Ships in 1-2 Business Days


Audi A4 Stop Part Number: 8D0-199-339-A
$23.75 MSRP: $38.00You Save: $14.25 (38%)Ships in 1-2 Business Days
Audi A4 Motor Mount Part Number: 8W0-199-372-CQ
$286.79 MSRP: $401.67You Save: $114.88 (29%)Ships in 1-2 Business Days
Audi A4 Bearing Support Part Number: 4M0-199-869-AM
$27.50 MSRP: $44.00You Save: $16.50 (38%)Ships in 1-2 Business Days
Audi A4 Bearing Support Part Number: 4M0-199-870-AM
$36.25 MSRP: $58.00You Save: $21.75 (38%)Ships in 1-2 Business DaysAudi A4 Support Part Number: 8D0-399-113-P
$111.38 MSRP: $156.00You Save: $44.62 (29%)Ships in 1-2 Business Days
Audi A4 Motor Mount Part Number: 8W0-199-371-CP
$287.98 MSRP: $403.34You Save: $115.36 (29%)Ships in 1-2 Business Days
Audi A4 Strut Assembly Part Number: 8T1-399-345-J
$309.40 MSRP: $433.33You Save: $123.93 (29%)Ships in 1-2 Business Days
Audi A4 Transmission Mount Bracket Part Number: 8D0-399-107-T
$87.45 MSRP: $122.48You Save: $35.03 (29%)Ships in 1-2 Business Days
Audi A4 Engine Bracket Part Number: 8E0-199-352-N
$136.84 MSRP: $191.66You Save: $54.82 (29%)Ships in 1-2 Business Days

Audi A4 Transmission Mount Part Number: 8K0-399-151-DB
$147.56 MSRP: $206.67You Save: $59.11 (29%)Ships in 1-2 Business Days
Audi A4 Transmission Mount Stop Part Number: 431-399-291-C
$17.49 MSRP: $27.97You Save: $10.48 (38%)Ships in 1-2 Business Days
| Page 1 of 5 |Next >
1-20 of 99 Results
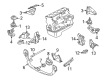
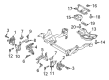
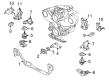
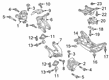
Audi A4 Engine Mount
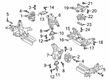
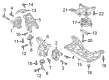
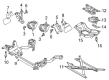
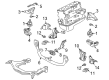
The Audi A4 Engine Mount ensures the powerplant is firmly fixed and absorbs undesired vibration, providing the driver with a smooth and stable ride. The purpose of the mount is twofold, because it bears the weight of the motor and transmission and dampens vibration in order to keep the cabin quiet. Early Audi models applied a traditional rubber and steel Engine Mount with two metal plates that are spaced by a large elastomer pad that is strong enough to dampen noise, but not enough to allow the block to drift. As engine power and refinement ambitions increased, the brand developed fluid filled hydraulic designs, known as hydromounts on some A4 trims, where internal oil chambers were applied to dampen smaller tremors while still snuffing out the large torque twists. In current Audi powertrains, the new models have electronically controlled active Engine Mount units that remain soft at idle to provide maximum smoothness and then automatically stiffen as the revs increase to minimize any movement that might strain the hoses or the axles. Whether it is style or not, every Audi Engine Mount is subject to heat, aging, or leakage of oil, and thus may thump or shimmy on takeoff. The rubber can become loose or even tear, hydraulic models can lose fluids and active systems can require electronic or vacuum tests to ensure proper reaction. Periodic visual checks and slight prying under load contribute to maintaining the alignment of the drivetrain and ensure that any faithful driver of Audi feels solid on each trip.
Choose original equipment manufacturer Engine Mount for great performance and strong durability. They use Audi's official craftsmanship and high-grade materials, and meet strict quality standards. Are you looking for quality Engine Mount at a good price? Come to our online store. We carry a wide range of genuine parts for your Audi A4 and the prices are competitive. Each part comes with the manufacturer's warranty. You can install with confidence and get steady results. Over time, you'll save money and avoid hassle. Keep your maintenance simple and protect your vehicle with OEM parts. Get the quality your A4 needs now.
Audi A4 Engine Mount Parts and Q&A
- Q: How should engine mounts be checked and replaced for Four-cylinder engines on Audi A4?A:Engine mounts are usually not maintained but fractured or decayed engine mounts should be turned over without delay to avoid incurring or causing damages and wear to the parts of the driveline. In order to test the mounts, lift the engine to lift off some weight on the mounts. The first thing to do is to place the vehicle in jackstands, then place a jack under the engine Oil Pan, with a large block of wood between it and the drain plug, but not underneath the drain plug. Take off the splash shield, under the engine, when there is one, and examine the mountings, whether there are any cracks, hardened rubber or disengagement between the mountings and the metal plates, and record the cracks. Test lateral motion between the mount plates and the engine or frame with one of a large screwdriver or pry bar; when lateral movement is detected, move the engine downward and install the mount fasteners. To replace, roll the engine, and take off the splash shield where present. Unscrew the bracket on the bottom of radiator support, and the torque rod on the front of the cylinder block. Change broken rubber stoppers of torque rod. Removing driver and passenger side engine mounts, make the parking brake, block the rear wheels, and lift the engine up. Get the front of the vehicle up on jackstands, take off the splash shield (where it exists), and take off starter motor cables off the lower engine mount brackets. Connect the locating dowel of the engine mount to the aluminum engine mount bracket, unscrew, and remove nut of left and right engine mounts. Lift the front suspension subframe using a floor jack, undo and take away the engine mount bracket bolts in the right sequence and also drop the aluminum engine mount bracket bolts using the stabilizer bar. Lastly, unbolt the mount bracket at the side of the cylinder block, and remove the upper engine mount nut, which is fixed to the block, and is installed in the same manner as it is removed.

Related Audi A4 Parts
 Audi A4 Timing Belt
 Audi A4 Oil Pump
 Audi A4 Belt Tensioner
 Audi A4 Camshaft
 Audi A4 Oil Pan Gasket
 Audi A4 Timing Belt Tensioner
 Audi A4 Camshaft Seal
 Audi A4 Crankshaft Timing Gear
 Audi A4 Oil Pump Rotor Set
 Audi A4 Valve Lifter
 Audi A4 Valve Spring
 Audi A4 Valve Spring Retainer Keeper
Browse by Year
2020 Engine Mount 2019 Engine Mount 2018 Engine Mount 2017 Engine Mount 2016 Engine Mount 2015 Engine Mount 2014 Engine Mount 2013 Engine Mount 2012 Engine Mount 2011 Engine Mount 2010 Engine Mount 2009 Engine Mount 2008 Engine Mount 2007 Engine Mount 2006 Engine Mount 2005 Engine Mount 2004 Engine Mount 2003 Engine Mount 2002 Engine Mount 2001 Engine Mount 2000 Engine Mount 1999 Engine Mount 1998 Engine Mount 1997 Engine Mount 1996 Engine Mount