×
- Hello
- Login or Register
- Quick Links
- Live Chat
- Track Order
- Parts Availability
- RMA
- Help Center
- Contact Us
- Shop for
- Audi Parts
My Garage
My Account
Cart
Genuine Audi A4 Brake Booster
Brake Power Booster- Select Vehicle by Model
- Select Vehicle by VIN
Select Vehicle by Model
orMake
Model
Year
Select Vehicle by VIN
For the most accurate results, select vehicle by your VIN (Vehicle Identification Number).
9 Brake Boosters found

Audi A4 Booster Assembly Part Number: 8W0-612-107-C
$360.57 MSRP: $504.99You Save: $144.42 (29%)Ships in 1-2 Business Days
Audi A4 Booster Assembly Part Number: 8E0-612-107-J
$398.64 MSRP: $558.32You Save: $159.68 (29%)Ships in 1-2 Business Days

Audi A4 Booster Assembly Part Number: 8K0-612-107-D
$384.37 MSRP: $538.33You Save: $153.96 (29%)Ships in 1-2 Business Days

Audi A4 Booster Assembly Part Number: 8K0-612-107-C
$373.77 MSRP: $523.48You Save: $149.71 (29%)Ships in 1-2 Business Days
Audi A4 Booster Assembly Part Number: 8E0-612-107-F
$373.66 MSRP: $523.33You Save: $149.67 (29%)Ships in 1-2 Business Days
Audi A4 Booster Assembly Part Number: 8K0-612-107-B
$519.78 MSRP: $727.98You Save: $208.20 (29%)Ships in 1-2 Business Days
Audi A4 Pressure Metering Valve Part Number: 443-614-151-B
$413.26 MSRP: $578.80You Save: $165.54 (29%)Ships in 1-2 Business Days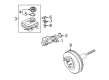
Audi A4 Booster Assembly Part Number: 8D0-612-107-B

Audi A4 Booster Assembly Part Number: 4D0-612-107-B
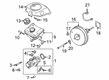
Audi A4 Brake Booster
The Audi A4 Brake Booster provides additional braking force; this extra force multiplies the force of the pedal, allowing the driver to decelerate the sedan with significantly less effort. The booster in all current Audi braking systems is located between the brake pedal and the master cylinder and is not a linkage but instead a pressure amplifier. The majority of generations are based on a vacuum-operated type, which taps into an engine manifold vacuum or an auxiliary pump and which contains a diaphragm within a closed shell. With the pedal free, the same vacuum is present on both sides, but by pressing the brake pedal, a valve is opened that allows atmospheric air to enter the rear chamber, ensuring that the difference in pressure causes a power piston to move forward to push the master cylinder and give an unexpectedly quick boost, provided the engine is still running. Audi sedans with low manifold vacuum availability, including early diesel models or high-performance models, have swapped to a hydraulic Brake Booster that steals fluid pressure either from the steering circuit or an electric pump and provides consistent assistance during wide-open throttle but with increased weight and additional hoses. A well-sealed Brake Booster may last years, and when a Brake Booster is failing it is characterized by a concrete-hard pedal or an increase in stopping time. No matter what style your Audi has, fast visual inspections of the vacuum hoses and fluid reservoir will keep the system on point, and you will have confidence in reliable braking in the A4, and you will enjoy the responsive feel of the pedals on all your Audi journeys.
Choose original equipment manufacturer Brake Booster for great performance and strong durability. They use Audi's official craftsmanship and high-grade materials, and meet strict quality standards. Are you looking for quality Brake Booster at a good price? Come to our online store. We carry a wide range of genuine parts for your Audi A4 and the prices are competitive. Each part comes with the manufacturer's warranty. You can install with confidence and get steady results. Over time, you'll save money and avoid hassle. Keep your maintenance simple and protect your vehicle with OEM parts. Get the quality your A4 needs now.
Audi A4 Brake Booster Parts and Q&A
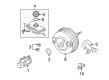
- Q: How is the power brake booster diagnosed, removed, and installed on Audi A4?A:On models equipped with an automatic transmission, a vacuum pump supplies vacuum to the power brake booster in addition to manifold vacuum, with the pump mounted near the ABS/ESP hydraulic unit and a vacuum hose routed to the brake booster; diagnosis by a dealer service department is required if the system appears defective. The master cylinder is removed along with the power brake booster as an assembly and separated afterward. For an operating check, depress the brake pedal several times with the engine off to ensure no change in pedal reserve distance, then start the engine and check for slight pedal movement, indicating normal operation. For an airtightness check, start the engine and turn it off after one or two minutes, then depress the brake pedal slowly; if the pedal depresses less each time, the booster is airtight. While the engine is running, depress the brake pedal, stop the engine with the pedal depressed, and if there's no change in pedal reserve travel after 30 seconds, the booster is airtight. Caution is advised as brake fluid can damage paint or finished surfaces, and the power brake booster is not serviceable; it should be replaced if defective. Begin removal by pressing the brake pedal several times with the engine off to remove stored vacuum, disconnect the negative battery terminal, remove the driver's side knee bolster, and detach the brake light switch. Next, detach the booster pushrod from the brake pedal, remove the engine cover, pull the check valve from the brake booster while leaving the vacuum hose attached, and remove as much fluid as possible from the reservoir. Unplug the electrical connector for the brake fluid level warning switch, remove the brake fluid reservoir retaining bolt, and detach the reservoir from the master cylinder. Clean the area around the brake line fittings thoroughly, detach the brake lines, and cap or plug all openings to prevent contamination. If equipped, remove the suspension cross-brace from above the booster, unscrew the booster mounting bolts until loose, and carefully remove the booster and master cylinder from the cowl compartment. Pull out the booster mounting bolts, remove the master cylinder mounting nuts, and detach the master cylinder from the power booster. For installation, if using a replacement brake booster, check and adjust the pushrod length as necessary, replace the O-ring seal between the master cylinder and power booster, and assemble the master cylinder to the power brake booster, ensuring correct pushrod alignment. The remainder of the installation procedures are essentially the reverse of removal, tightening all mounting fasteners to the specified torque values. To bleed the master cylinder on the vehicle, have an assistant pump the brake pedal several times slowly and hold it to the floor, loosening the line fittings one at a time to allow air and fluid to escape, repeating until the fluid is clear of air bubbles. Finally, bleed the brake system and test the operation of the brakes before putting the vehicle into normal service.

Related Audi A4 Parts
 Audi A4 ABS Control Module
 Audi A4 Brake Master Cylinder
 Audi A4 Camshaft
 Audi A4 Cup Holder
 Audi A4 Sunroof Motor
 Audi A4 Vacuum Pump
 Audi A4 Automatic Transmission Shift Indicator
 Audi A4 Crankshaft Timing Gear
 Audi A4 Shock Absorber
 Audi A4 Starter Brush
 Audi A4 Washer Pump
Browse by Year
2020 Brake Booster 2019 Brake Booster 2018 Brake Booster 2017 Brake Booster 2016 Brake Booster 2015 Brake Booster 2014 Brake Booster 2013 Brake Booster 2012 Brake Booster 2011 Brake Booster 2010 Brake Booster 2009 Brake Booster 2008 Brake Booster 2007 Brake Booster 2006 Brake Booster 2005 Brake Booster 2004 Brake Booster 2003 Brake Booster 2002 Brake Booster 2001 Brake Booster 2000 Brake Booster 1999 Brake Booster 1998 Brake Booster 1997 Brake Booster 1996 Brake Booster