×
- Hello
- Login or Register
- Quick Links
- Live Chat
- Track Order
- Parts Availability
- RMA
- Help Center
- Contact Us
- Shop for
- Audi Parts
My Garage
My Account
Cart
Genuine Audi 4000 Tie Rod End
Steering Rod End- Select Vehicle by Model
- Select Vehicle by VIN
Select Vehicle by Model
orMake
Model
Year
Select Vehicle by VIN
For the most accurate results, select vehicle by your VIN (Vehicle Identification Number).
6 Tie Rod Ends found

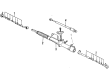
Audi 4000 Tie Rod Assembly Part Number: 811-419-802-K
$135.15 MSRP: $189.28You Save: $54.13 (29%)Ships in 1-2 Business Days
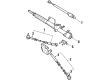
Audi 4000 Tie Rod End Part Number: 811-419-812
$38.88 MSRP: $53.55You Save: $14.67 (28%)Ships in 1-2 Business Days
Audi 4000 Outer Tie Rod Part Number: 811-419-812-A
$48.40 MSRP: $66.67You Save: $18.27 (28%)Ships in 1-2 Business Days
Audi 4000 Tie Rod Assembly Part Number: 811-419-802-J
$100.52 MSRP: $140.78You Save: $40.26 (29%)Ships in 1-2 Business DaysAudi 4000 Tie Rod Assembly Part Number: 811-419-801-E
$134.40 MSRP: $188.23You Save: $53.83 (29%)Ships in 1-2 Business Days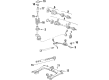
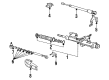
Audi 4000 Tie Rod Part Number: 857-501-499-C
$168.71 MSRP: $236.28You Save: $67.57 (29%)Ships in 1-2 Business Days
Audi 4000 Tie Rod End
Choose original equipment manufacturer Tie Rod End for great performance and strong durability. They use Audi's official craftsmanship and high-grade materials, and meet strict quality standards. Are you looking for quality Tie Rod End at a good price? Come to our online store. We carry a wide range of genuine parts for your Audi 4000 and the prices are competitive. Each part comes with the manufacturer's warranty. You can install with confidence and get steady results. Over time, you'll save money and avoid hassle. Keep your maintenance simple and protect your vehicle with OEM parts. Get the quality your 4000 needs now.
Audi 4000 Tie Rod End Parts and Q&A
- Q: How to adjust and replace a tie rod end on Audi 4000?A:The left-hand tie-rod is adjustable for length, while the right-hand tie-rod may not be adjustable on some models. Begin by applying the handbrake, jacking up the front of the car, and supporting it on axle stands before removing the roadwheel. Unscrew the balljoint nut from the outer end of the tie-rod and use a separator tool to detach it from the strut. The inner end of the tie-rod may be attached by two different types of coupling; if a lockplate is fitted with the bolt head toward the front of the car, flatten the locktab, unscrew the bolt, and withdraw the tie-rod. If the remaining tie-rod is to be removed as well, refit the removed bolt first to avoid difficulty in entering the bolts. For self-locking nuts and a stud plate, unscrew the nuts and remove the stud plate. When renewing the end of an adjustable tie-rod, measure the distance between the two ends before unscrewing the old tie-rod end, then screw in the new one to the same dimension to maintain front wheel alignment. Refitting is a reversal of removal, but where applicable, renew the lockplate. Tighten the nuts and bolts to the specified torque, delaying the tightening of the tie-rod inner mountings until the weight of the car is on the suspension. If applicable, lock the bolts by bending the lockplate onto one flat, and check and adjust the front wheel alignment if necessary.
Related Audi 4000 Parts
 Audi 4000 Ignition Lock Assembly
 Audi 4000 Ignition Lock Cylinder
 Audi 4000 Power Steering Cylinder Boot Kit
 Audi 4000 Power Steering Hose
 Audi 4000 Power Steering Pump
 Audi 4000 Power Steering Reservoir
 Audi 4000 Rack & Pinion Bushing
 Audi 4000 Rack And Pinion
 Audi 4000 Rack and Pinion Boot
 Audi 4000 Steering Wheel
 Audi 4000 Tie Rod