×
- Hello
- Login or Register
- Quick Links
- Live Chat
- Track Order
- Parts Availability
- RMA
- Help Center
- Contact Us
- Shop for
- Audi Parts
My Garage
My Account
Cart
Genuine Audi 100 Shock Absorber
Suspension Shock Absorber- Select Vehicle by Model
- Select Vehicle by VIN
Select Vehicle by Model
orMake
Model
Year
Select Vehicle by VIN
For the most accurate results, select vehicle by your VIN (Vehicle Identification Number).
6 Shock Absorbers found


Audi 100 Shock Absorber Part Number: 443-413-031-G
$191.59 MSRP: $268.33You Save: $76.74 (29%)Ships in 1-2 Business Days
Audi 100 Shock Absorber Part Number: 443-513-031-N
$161.22 MSRP: $225.80You Save: $64.58 (29%)Ships in 1-2 Business Days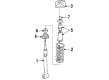
Audi 100 Shock Absorber Part Number: 443-513-031-P
$192.11 MSRP: $269.07You Save: $76.96 (29%)Ships in 1-2 Business Days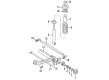
Audi 100 Shock Absorber Part Number: 4A9-513-031-B
$257.04 MSRP: $360.00You Save: $102.96 (29%)Ships in 1-2 Business Days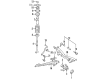
Audi 100 Shock Absorber Part Number: 4A9-513-031-D
$278.46 MSRP: $390.00You Save: $111.54 (29%)Ships in 1-2 Business Days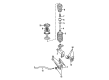
Audi 100 Strut Cartridge Part Number: 4A0-413-031-L
$278.46 MSRP: $390.00You Save: $111.54 (29%)Ships in 1-2 Business Days
Audi 100 Shock Absorber
Choose original equipment manufacturer Shock Absorber for great performance and strong durability. They use Audi's official craftsmanship and high-grade materials, and meet strict quality standards. Are you looking for quality Shock Absorber at a good price? Come to our online store. We carry a wide range of genuine parts for your Audi 100 and the prices are competitive. Each part comes with the manufacturer's warranty. You can install with confidence and get steady results. Over time, you'll save money and avoid hassle. Keep your maintenance simple and protect your vehicle with OEM parts. Get the quality your 100 needs now.
Audi 100 Shock Absorber Parts and Q&A
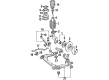
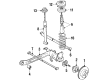
- Q: What are the steps required for refitting a shock absorber and associated components on Audi 100?A:A new hub bolt, lower arm balljoint clamp bolt, and several new nuts are required for refitting, including a track rod balljoint nut, lower arm balljoint clamp bolt nut, anti-roll bar mounting clamp bolt nuts, and strut upper mounting nuts. To begin removal, take off the wheel trim or hub cap if applicable, and loosen the hub bolt while the vehicle is on its wheels, also loosening the wheel bolts. Secure the rear wheels with chocks, apply the handbrake, jack up the front, and support it on axle stands. Remove the retaining fasteners and clips to take off the undercover from beneath the engine/transmission unit. Lower the vehicle, then loosen and remove the nuts and bolts securing the anti-roll bar mounting clamps to the subframe, discarding the nuts for new ones during refitting. Raise the vehicle again, support it securely, and remove the front roadwheel. Discard the hub bolt and replace it with a new one upon refitting. For models with ABS, detach the wheel sensor from the strut and free its wiring from the clips. Unscrew the two bolts securing the brake caliper assembly to the strut, slide it off the disc, and tie it to the body to avoid strain on the hydraulic brake hose. Remove the brake disc from the hub. Loosen the nut securing the steering gear track rod balljoint to the strut, leaving it on by a few threads, then use a universal balljoint separator to release the tapered shank, unscrew the nut, and position the track rod clear of the strut, discarding the nut for a new one during refitting. Unscrew the nut and withdraw the lower arm balljoint clamp bolt from the strut, noting its orientation, and discard the bolt and nut for new ones upon refitting. Carefully lever down on the lower arm/anti-roll bar to free the lower arm balljoint shank from the strut, moving the strut base outwards to free the hub from the driveshaft outer joint, ensuring the driveshaft is supported to prevent damage. Unclip the cover from the top of the strut mounting plate, support the strut assembly, then loosen and remove the three nuts and washers securing the strut to the body, maneuvering the strut assembly out from underneath the wheelarch and discarding the upper mounting nuts for new ones during refitting. Clean the driveshaft outer joint and hub splines, lubricating them with molybdenum disulphide grease. Position the strut assembly, aligning its upper mounting plate with the body, fit the washers to the mounting plate studs, and screw on the new nuts, tightening them to the specified torque before refitting the cover. Engage the driveshaft outer joint with the hub splines, then fit the new hub bolt, tightening it by hand only at this stage. Align the base of the strut with the lower arm balljoint, slide the balljoint fully into position, fit the new clamp bolt from the rear of the strut, and tighten the new nut to the specified torque. Engage the track rod balljoint in the strut, fitting the new retaining nut and tightening it to the specified torque. Refit the disc to the hub, securing it with a wheel bolt, then slide the caliper assembly into position, ensuring the pads pass either side of the disc, and tighten the mounting bolts to the specified torque. Refit the ABS wheel sensor if necessary. Ensure the driveshaft outer joint is fully engaged in the hub, then refit the roadwheel and lower the vehicle. With the vehicle on its wheels, refit the mounting clamps to the anti-roll bar mounting bushes, fitting the retaining bolts and new nuts, ensuring correct positioning before lightly tightening the retaining nuts. Tighten the hub bolt to the specified stage 1 torque, then angle-tighten it through the specified stage 2 angle, using an angle measuring gauge or white paint for alignment marks if necessary. Once tightened, secure the wheel bolts to the specified torque and refit the wheel trim or hub cap if applicable. Rock the vehicle to settle the suspension components, then tighten the anti-roll bar mounting clamp bolt nuts to the specified torque. Finally, raise the front of the vehicle again, support it securely, refit the undercover, and lower the vehicle to the ground. If the suspension strut has been dismantled, it is advisable to have the camber angle checked and adjusted by a suitably equipped garage.
- Q: What steps are involved in reassembling a shock absorber with and without self-levelling rear suspension on Audi 100?A:It will need a new shock absorber piston nut to be reassembled, and in models that have self levelling rear suspension a new piston rod sealing ring is also needed. First clean the strut and position it upright in a vice and make alignment marks between the mounting plate, coil spring, lower seat and shock absorber body, which will be used later in the reassembly. Loosen coil spring tension using a spring compressor and loosen shock absorber piston nut keeping piston intact using a suitable tool. Take away the nut and remove the rubber bush, plate assembly, upper spring seat and coil spring. In models with no self-levelling rear suspension, remove the spacer, bump stop and protective sleeve then remove the protective cap and lower seat cover of the shock body. In models with self levelling rear suspension, disconnect the hydraulic union to the piston, then the washer, bump stop and protective sleeve, and then discarding the protective cap and spring lower seat, and prepare to fit new ones on reassembling. Check the shock absorber in regard to leaking, pitting on the piston, and damage to the shock body, and test the operation, by feeling the shock absorbance smooth; it must not be jerky or uneven, and shock absorbers should be changed in pairs. Inspect all other parts and ensure that there is no damage or wear and tear of the parts and replace any suspicious parts. Install the spring lower seat to the shock absorber and get the protective cap into place. In models that do not have self-levelling rear suspension, drop the protective sleeve and bump stop onto the piston rod and install the spacer as required. In models that have self-levelling rear suspension, slide the protective sleeve and bump stop on to the piston, re-fit the washer, lubricate the new sealing rings with clean hydraulic fluid and then carefully fit them in the piston grooves. Moisten the hydraulic union and put it over the piston without breaking the sealing rings. Install the coil spring again to the shock absorber with the paint marking on the bottom and the spring end on the spring seat stop. Wipe the upper spring seat with talcum powder and attach it to the coil spring making sure that it is in the right position when touching the end of the spring. Install mounting plate assembly with the aid of the alignment marks to ensure that the hydraulic union port is centred in the mounting plate cutout when models are self-levelled with rear suspension. Apply some talcum powder on the rubber bush and place it on the mounting plate. screw on the new nut, retain shock absorber piston, fully extend piston rod and tighten the nut to a set torque. Lastly, place all parts into place and proceed to carefully unscrew the spring compressor and take it off the strut.

Related Audi 100 Parts
 Audi 100 Axle Beam
 Audi 100 Axle Shaft
 Audi 100 Ball Joint
 Audi 100 Coil Springs
 Audi 100 Control Arm
 Audi 100 Radius Arm
 Audi 100 Radius Arm Bushing
 Audi 100 Steering Knuckle
 Audi 100 Strut Bearing
 Audi 100 Sway Bar Link
 Audi 100 Sway Bar Link Bushing
 Audi 100 Trailing Arm Bushing
Browse by Year
1994 Shock Absorber
1993 Shock Absorber
1992 Shock Absorber
1991 Shock Absorber 1990 Shock Absorber 1989 Shock Absorber