×
- Hello
- Login or Register
- Quick Links
- Live Chat
- Track Order
- Parts Availability
- RMA
- Help Center
- Contact Us
- Shop for
- Audi Parts
My Garage
My Account
Cart
Genuine Audi 100 Driveshaft
Drive Shaft- Select Vehicle by Model
- Select Vehicle by VIN
Select Vehicle by Model
orMake
Model
Year
Select Vehicle by VIN
For the most accurate results, select vehicle by your VIN (Vehicle Identification Number).
2 Driveshafts found

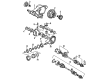
Audi 100 Drive Shaft Part Number: 4A0-521-101-C
$1457.67 MSRP: $1749.90You Save: $292.23 (17%)Ships in 1-2 Business Days
Audi 100 Drive Shaft Part Number: 4A0-521-101-D
$1457.67 MSRP: $1749.90You Save: $292.23 (17%)Ships in 1-2 Business Days
Audi 100 Driveshaft
Choose original equipment manufacturer Driveshaft for great performance and strong durability. They use Audi's official craftsmanship and high-grade materials, and meet strict quality standards. Are you looking for quality Driveshaft at a good price? Come to our online store. We carry a wide range of genuine parts for your Audi 100 and the prices are competitive. Each part comes with the manufacturer's warranty. You can install with confidence and get steady results. Over time, you'll save money and avoid hassle. Keep your maintenance simple and protect your vehicle with OEM parts. Get the quality your 100 needs now.
Audi 100 Driveshaft Parts and Q&A
- Q: How to perform a front Driveshaft suspension and steering check for Petrol engines on Audi 100?A:In order to carry out a front suspension and steering test, one would start by lifting the front part of the car and placing the car on the axle stands. Look at the balljoint dust covers and steering rack gaiters visually to identify any splits, chafing or deterioration which can cause loss of lubricant and contamination. When the vehicle has power steering, look at the fluid hoses to determine whether they are chafed as well as whether there exist leaks at the pipe and hose unions, and below the steering gear rubber gaiters. Test roadwheel at the 12 o clock and 6 o clock positions to determine the wear of the hub bearings slight free movement is normal and excessive movement needs further examination. When an assistant is pressing the footbrake, keep rocking the wheel to see whether the hub bearings are not broken. Then take the wheel at the 9 o'clock and 3 o'clock to confirm the movement which can be due to wear in the bearings of the hubs or steering parts. Examine the suspension mounting bushes with a large screwdriver or a flat bar, and check whether they wear out or have any visible damage. Having the vehicle on the wheels, instruct an assistant to spin the steering wheel a little and look to see any movement being lost between the steering wheel and the roadwheels, and inspect joints and mountings. To test the suspension strut and shock absorber, check the area around the strut body or rubber gaiter look to see leaking fluid and check the efficiency of the strut by bouncing against the vehicle at all four corners. Lastly, in the case of the driveshafts, with the vehicle up, rotate the steering to the full lock and the roadwheel to check the gaiters of the outer CV joints, make sure the retaining clips are fixed. Test CV joints condition by trying to turn the wheel and driveshaft, which will result in any significant movement, signifying wear.
- Q: What steps are involved in refitting a hub bolt and removing the right-hand driveshaft on Audi 100?A:Refitting will need a new hub bolt, and in case the work is being done on the right-hand side, a new track rod balljoint nut will be needed. Start with the removal of the wheel trim or hub cap followed by loosening of the hub bolt when the vehicle is on its wheels, as well as the wheel bolts. Pinch the rear wheels together, press the handbrake, raise the front part of the car on axle supports, and place it on axle stands, prior to the removal of the corresponding front roadwheel. Install at least one wheel bolt again to maintain the brake disc in position on the hub. Then loosen the retaining screws and fasteners and remove the undercover under the engine/transmission unit to allow access to the driveshafts, and unbolt the heatshield (where required). In models that have ABS, take out the wheel sensor in the hub. Removal of the right-hand driveshaft To remove the track rod balljoint retaining nut unscrew the retaining nut, then free the balljoint in the hub and dispose of it (to be refitted). Loose and loosen the hub bolt, so that in case it was not loosened when on the ground, at least two roadwheel bolts are re-fitted and tightened securely with the assistant depressing the brake pedal to avoid the hub turning. Alternatively, fabrication of a tool can be done to help in the process. The second step is to take off the bolts that hold the inner driveshaft joint to the transmission flange and also retrieve any retaining plates to ensure that the driveshaft is not damaged. Rotate the hub assembly to disengage the driveshaft inner joint with the transmission flange, followed by manipulating the driveshaft out underneath the vehicle disposing of the gasket on the inner joint face in case it comes into contact, and preparing to install a new one during refitting. Check the oil seal in the transmission before fitting the driveshaft, and replace it, where necessary. Clean the outer joint and splines of the driveshaft hub and lubricate the hub splines with molybdenum disulphide grease and replace the inner joint face gasket where necessary. Install the driveshaft and fit the new hub bolt by inserting the splines into the hub and sliding the outer joint into place, which is done by hand a few times first. Install the inner joint so that it aligns with the transmission flange and then install the retaining bolts and plates and screw them in a diagonal manner to the required torque. Fit back the heatshield where necessary and in the right hand side fit back the track rod balljoint to the hub with a new retaining nut tightened to the correct torque. Install the wheel sensor to the ABS models and then re-attach the undercover and roadwheel, and make sure that the vehicle gets lowered towards the ground putting the wheel bolts to the required torque. Installing the vehicle on the wheels, turn the hub bolt to the recommended standard 1 torque then angle-tighten it to the recommended standard 2 angle with the help of a gauge of a specific angle or draw alignment marks with white paint in the absence of a gauge. Lastly, reattach the wheel trim or hub cap where necessary.
Related Audi 100 Parts
 Audi 100 Fuel Pump
 Audi 100 Coil Springs
 Audi 100 Differential Cover
 Audi 100 Fog Light
 Audi 100 Knock Sensor
 Audi 100 Pillar Panels
 Audi 100 Strut Bearing
 Audi 100 Wheel Bearing