×
- Hello
- Login or Register
- Quick Links
- Live Chat
- Track Order
- Parts Availability
- RMA
- Help Center
- Contact Us
- Shop for
- Audi Parts
My Garage
My Account
Cart
Genuine 1994 Audi 100 Timing Belt
Engine Timing Belt- Select Vehicle by Model
- Select Vehicle by VIN
Select Vehicle by Model
orMake
Model
Year
Select Vehicle by VIN
For the most accurate results, select vehicle by your VIN (Vehicle Identification Number).
1 Timing Belt found

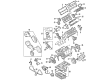
1994 Audi 100 Timing Belt Part Number: 078-109-119-D
$66.64 MSRP: $93.33You Save: $26.69 (29%)Ships in 1-2 Business DaysProduct Specifications- Other Name: Tooth Belt
- Item Weight: 0.90 Pounds
- Condition: New
- Fitment Type: Direct Replacement
- SKU: 078-109-119-D
- Warranty: This genuine part is guaranteed by Audi's factory warranty.
1994 Audi 100 Timing Belt Parts and Q&A
- Q: What is the primary function of the toothed timing belt and what steps are involved in its inspection and replacement on 1994 Audi 100?A: The toothed timing belt has the main role of driving the camshaft(s) and the intermediate shaft, and can cause severe engine damage in case of belt slipping or breaking as it causes disruption of the valve timing and contact of the piston and the valve, and thus it is important to have the timing belt inspected regularly and correctly tensioned. Prior to starting to work, detach the battery negative lead, lock the handbrake, take the front of the car on the jack and place it on the axle stands. Unbolt the undershield as it is mounted under the engine and, where it has been removed, the engine top cover, then take out the radiator and the drivebelts to and including the alternator and power steering pump compressor (and the air conditioner compressor). To clear the way more easily, the alternator, power steering pump, and the air conditioner compressor can be unbolstered and the lines left in place. Unscrew bolts and take away the pulley of the water pump, and then take away the special bolt holding the lower timing cover to the water pump assembly. Unscrew the nut and release the clips in order to get the upper timing cover off. Align the crankshaft pulley/vibration damper and crankshaft sprocker to each other, and unbolt the pulley. Take out the bottom timing belts cover, making sure to take back the special spacer, located at the top of the cover. Rotate the crankshaft clockwise till the mark on the rear of the camshaft sprocket is at the top of the left hand side of the cylinder head. In the case of the ADR engine, a suitable drill bit or dowel must be inserted through the top of the spring tensioner housing through the small hole with the tensioner in the released position and rotate the tensioner wheel anticlockwise until the drill bit can be inserted to hold the tensioner in the released position. In case of AAA, ABK and AAD engines, loosen the bolt and turn the tensioner hub clockwise to take the tension off the timing belt. In the case of an ACE powered engine, it is best to use drill bits or circlip pliers to keep the hub still then pop the nut open to de-pressure. Indicate the timing belt with an arrow pointing in its normal direction of rotation then take the belt off the tensioner, camshaft sprocket, intermediate shaft sprocket and the crankshaft sprocket, being careful not bend the belt sharply in case it is to be reused. Inspect the belt to see whether there is contamination with coolant or lubricant, as well as evaluate the belt to see whether it has signs of wear or damage and replace it where necessary. Reinstall (temporarily) the vibration damper pulley on the crankshaft sprocket and align the timing marks. Find the timing belt on the sprockets and pressure wheel and make sure that it turns correctly should you be using the original belt. Connect the belt correctly, with the correct tools and procedures of the various engine types, and ensure the timing marks are aligned after two revolutions of the engine. Install the lower timing belt cover, vibration damper, upper timing belt cover, and additional parts that were taken off in the process, making sure that all the bolts are mounted to the required torque. Lastly, use the vehicle and roll it to the ground and re-attach the battery negative lead.
Related 1994 Audi 100 Parts
 1994 Audi 100 Clutch Disc
 1994 Audi 100 Cylinder Head
 1994 Audi 100 Fuel Pressure Regulator
 1994 Audi 100 Oil Pan Gasket
 1994 Audi 100 Oil Pump Gasket
 1994 Audi 100 Power Steering Hose
 1994 Audi 100 Radiator
 1994 Audi 100 Radiator Cap