×
- Hello
- Login or Register
- Quick Links
- Live Chat
- Track Order
- Parts Availability
- RMA
- Help Center
- Contact Us
- Shop for
- Audi Parts
My Garage
My Account
Cart
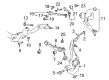
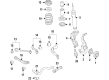
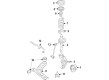
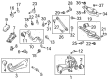
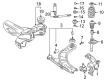
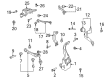
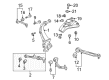
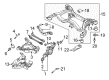
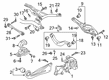
Genuine Audi Control Arm Bushing
Suspension Arm Bushing- Select Vehicle by Model
- Select Vehicle by VIN
Select Vehicle by Model
orMake
Model
Year
Select Vehicle by VIN
For the most accurate results, select vehicle by your VIN (Vehicle Identification Number).
90 Control Arm Bushings found


Audi Rear Lower Control Arm Bushing Part Number: 4G0-407-183-B
$174.93 MSRP: $245.00You Save: $70.07 (29%)Ships in 1-2 Business DaysProduct Specifications- Other Name: Mounting; Link Bushing
- Position: Rear Lower
- Replaces: 4G0-407-183-A, 4G0-407-183


Audi Front Lower Control Arm Inner Bushing Part Number: 8K0-407-182-C
$42.35 MSRP: $58.33You Save: $15.98 (28%)Ships in 1-2 Business DaysProduct Specifications- Other Name: Rubb Mount; Bushing, Outer Bushing Inner Bushing
- Position: Front Lower Inner


Audi Rear Lower Control Arm Bushing Part Number: 4K0-407-183-A
$89.25 MSRP: $125.01You Save: $35.76 (29%)Ships in 1-2 Business DaysProduct Specifications- Other Name: Mounting; Bushing, Lower Bushing, Rear Bushing
- Position: Rear Lower
- Replaces: 80A-407-183, 4K0-407-183


Audi Front Upper Control Arm Bushing Part Number: 8W0-407-515
$39.93 MSRP: $55.00You Save: $15.07 (28%)Ships in 1-2 Business DaysProduct Specifications- Other Name: Rubb Mount; Bushing, Rear Upper Control Arm Bushing
- Position: Front Upper
- Replaced by: 4N0-407-515


Audi Lower Control Arm Rear Bushing Part Number: 5Q0-407-183-L
$22.11 MSRP: $35.38You Save: $13.27 (38%)Ships in 1-2 Business DaysProduct Specifications- Other Name: Rubb Mount; Bushing, Control Arm Rear Bushing
- Position: Rear Lower
- Replaces: 5Q0-407-183-E


Audi Trailing Arm Insulator Part Number: 1K0-505-541-D
$13.86 MSRP: $22.17You Save: $8.31 (38%)Ships in 1-2 Business DaysProduct Specifications- Other Name: Rubb Mount; Bushing, Trailing Arm Bushing
- Replaces: 1K0-505-541-C


Audi Upper Control Arm Bushing Part Number: 7L0-407-077
$16.63 MSRP: $26.60You Save: $9.97 (38%)Ships in 1-2 Business DaysProduct Specifications- Other Name: Rubb Mount
- Position: Upper


Audi Knuckle Insulator Part Number: 1K0-505-553-A
$22.61 MSRP: $36.18You Save: $13.57 (38%)Ships in 1-2 Business DaysProduct Specifications- Other Name: Rubb Mount; Bushing, Knuckle Bushing
- Replaces: 1K0-505-553, 3C0-505-553


Audi Lower Control Arm Front Mount Part Number: 357-407-182
$27.74 MSRP: $44.38You Save: $16.64 (38%)Ships in 1-2 Business DaysProduct Specifications- Other Name: Rubb Mount; Bushing
- Position: Front Lower

Audi Rubb Mount Part Number: 4M0-407-515-D
$44.77 MSRP: $61.66You Save: $16.89 (28%)Ships in 1-2 Business Days
Audi Front Lower Control Arm Outer Bushing Part Number: 4E0-407-181-B
$99.00 MSRP: $138.64You Save: $39.64 (29%)Ships in 1-2 Business DaysProduct Specifications- Other Name: Rubb Mount; Bushing, Outer Bushing
- Position: Front Lower Outer

Audi Front Upper Control Arm Bushing Part Number: 4H0-407-515-B
$26.74 MSRP: $42.78You Save: $16.04 (38%)Ships in 1-2 Business DaysProduct Specifications- Other Name: Rubb Mount
- Position: Front Upper

Audi Front Upper Control Arm Bushing Part Number: 4M0-407-515-A
$11.07 MSRP: $17.30You Save: $6.23 (37%)Ships in 1-2 Business DaysProduct Specifications- Other Name: Rubb Mount; Bushing, Rear Upper Control Arm Bushing
- Position: Front Upper

Audi Front Lower Control Arm Inner Bushing Part Number: 8K0-407-182-B
$44.52 MSRP: $61.32You Save: $16.80 (28%)Ships in 1-2 Business DaysProduct Specifications- Other Name: Rubb Mount
- Position: Front Lower Inner
- Replaces: 8K0-407-182-A


Audi Upper Control Arm Bushing Part Number: 4B0-505-185
$48.40 MSRP: $66.67You Save: $18.27 (28%)Ships in 1-2 Business DaysProduct Specifications- Other Name: Rubb Mount; Bushing
- Position: Upper


Audi Front Lower Control Arm Inner Bushing Part Number: 4M0-407-182-B
$14.63 MSRP: $23.40You Save: $8.77 (38%)Ships in 1-2 Business DaysProduct Specifications- Other Name: Rubb Mount; Bushing, Front Bushing
- Position: Front Lower Inner

Audi Front Lower Control Arm Inner Bushing Part Number: 4E0-407-182-C
$15.13 MSRP: $24.20You Save: $9.07 (38%)Ships in 1-2 Business DaysProduct Specifications- Other Name: Rubb Mount; Bushing
- Position: Front Lower Inner

Audi Upper Control Arm Bushing Part Number: 8E0-501-541-K
$17.19 MSRP: $27.50You Save: $10.31 (38%)Ships in 1-2 Business DaysProduct Specifications- Other Name: Rubb Mount; Bushing
- Position: Upper

Audi Lower Control Arm Bushing Part Number: 5Q0-505-553-A
$19.29 MSRP: $30.86You Save: $11.57 (38%)Ships in 1-2 Business DaysProduct Specifications- Other Name: Rubb Mount; Bushing, Knuckle Bushing
- Position: Lower

Audi Front Lower Control Arm Outer Bushing Part Number: 4M0-407-181
$23.50 MSRP: $37.60You Save: $14.10 (38%)Ships in 1-2 Business DaysProduct Specifications- Other Name: Rubb Mount; Bushing, Front Bushing
- Position: Front Lower Outer
| Page 1 of 5 |Next >
1-20 of 90 Results
Audi Control Arm Bushing
Audi Control Arm Bushing cushions the suspension pivot and keeps wheels aligned and vibrations to a minimum while the car tackles rough roads with confidence. Audi is unique with its Quattro all-wheel drive that grips the slick streets, Virtual Cockpit screens that put maps and gauges in sharp view, and matrix headlights that create bright paths at night, all supported by a heritage that started in 1909 and continues today with e-tron electric innovation and ongoing self-driving trials. The brand combines sporty handling with plush interiors that ensure families and enthusiasts alike enjoy the benefits of quick acceleration without sacrificing comfort. These qualities make all journeys in an Audi feel composed and engaging. A Control Arm Bushing is located between the control arm and the chassis in a rugged but flexible sleeve of rubber or synthetic material that allows the arm to rise and fall smoothly but prevents lateral movement of the wheel. By absorbing shocks, each Control Arm Bushing maintains a sharp steering direction, limits cabin noise, and limits tire wear to maintain the refined ride that drivers expect throughout the Audi lineup. Over thousands of miles, the part will be exposed to compression, heat, and road splash, so having a durable compound will help to maintain stability for longer periods of time. Replacing a worn Audi Control Arm Bushing restores the crisp steering feel that defines the brand.
Stick with genuine OEM Control Arm Bushing when you need quality that holds up. Audi crafts these parts to hit strict factory specs for every single unit. They also run each part through rigorous checks during production to maintain high quality. You can find exact Audi Control Arm Bushing you need in our huge stock at AudiPartsGiant.com. You'll love our low, economical prices too. Every OEM part carries a real manufacturer's warranty, so you can buy with confidence. Returns aren't a headache here because our policy is simple. Plus, our speedy delivery gets orders out fast. Shop today and buy with total peace of mind.
Audi Control Arm Bushing Parts and Q&A
- Q: How to remove and install front upper and lower control arms and control arm bushings on Audi A4?A:In order to get the upper control arms off, begin by taking out the wheel trim or the hub cap and loosening the wheel bolts when on the wheels. Set chocks on the back wheels, engage the parking brake and get the vehicle up in the air and rest on jackstands and then remove the wheel. In case of vehicles that have an automatic leveling headlamp, remove the vehicle level sensor connector, to the front lower control arm. Unscrew the harness of the ABS wheel speed sensor and the brake caliper and unscrew the clamp bolt at the top of the steering knuckle and detach the balljoints, being careful not to rupture the rubber boots. Installation Take the shock absorber and coil spring assembly out, and by loosening and removing the nut and bolt attaching the upper control arm to the mounting bracket. Wipe the arm down and inspect to detect any wear or damage especially on the inner pivot bushing and balljoint which cannot be replaced independently. In case of any inner pivot bushing replacement, it must be pressed by a hydraulic press and has to be performed by a machine shop. Installation instructions: To install, put the control arm on the mounting bracket, insert a new securing bolt and nut, and be sure that both upper control arms are in the correct vertical distance, and tighten the securing nut to the desired torque values. Install the shock absorber coil spring assembly, reattach the upper control arm balljoints and fix the ABS wheel speed sensor. Use the outer control arm ends to bring the ride height to normal then tighten the shock absorber lower mounting nut, and then fit the wheel and cinch the bolts. Lastly, perform a check and adjust the alignment of the front wheel as required. In the case of the rear lower control arm, the loosening of the wheel bolts, chocking the rear wheels and lifting the front of the vehicle are required before the wheel is removed. This is to be done by removing the ABS wheel speed sensor and brake caliper then disconnecting the control arm and steering knuckle and removing the nut of the inner end of the control arm and the subframe needs to be lowered slightly to draw the control arm inner pivot bolt. Wipe the arm and examine the arm to check on any damages, and the inner pivot bushing is also necessary to be changed by hydraulic press. The process is the reverse of removal with installation being done with new nuts and bolts and all the fasteners tightened to the required torque values. In the case of the front lower control arm, it is important to support the engine in case of necessity, loosen the wheel bolts and lift the front of the car then take out the wheel. Disconnect vehicle level sensor when present, support steering knuckle and disconnect control arm- steering knuckle and shock absorber. Wash down the arm and inspect the damage, especially those of the bushings and balljoint, which are not replaceable individually. The replacement of the bushings needs a hydraulic press. Installation is the opposite of removal and the installation of the new nuts and bolts should be secured ensuring that the fasteners are tightened according to the recommended torque values and finally the front end alignment should be checked and adjusted where necessary.

Related Audi Parts
 Audi Wheel Cover
 Audi Air Suspension Compressor
 Audi CV Boot
 Audi Sway Bars
 Audi Axle Support Bushings
 Audi Coil Springs
 Audi Control Arm Bracket
 Audi Crossmember Bushing
 Audi Radius Arm
 Audi Track Bar
 Audi Trailing Arm
 Audi Wheel Bearing Dust Cap
Browse by Model
100 Control Arm Bushing 100 Quattro Control Arm Bushing 200 Control Arm Bushing 200 Quattro Control Arm Bushing 4000 Control Arm Bushing 4000 Quattro Control Arm Bushing 5000 Control Arm Bushing 5000 Quattro Control Arm Bushing 80 Control Arm Bushing 80 Quattro Control Arm Bushing 90 Control Arm Bushing 90 Quattro Control Arm Bushing A3 Control Arm Bushing A3 Quattro Control Arm Bushing A3 Sportback e-tron Control Arm Bushing A4 allroad Control Arm Bushing A4 Control Arm Bushing A4 Quattro Control Arm Bushing A5 Control Arm Bushing A5 Quattro Control Arm Bushing A5 Sportback Control Arm Bushing A6 allroad Control Arm Bushing A6 Control Arm Bushing A6 Quattro Control Arm Bushing A7 Quattro Control Arm Bushing A7 Sportback Control Arm Bushing A8 Control Arm Bushing A8 Quattro Control Arm Bushing allroad Control Arm Bushing Allroad Quattro Control Arm Bushing Cabriolet Control Arm Bushing Coupe Control Arm Bushing Coupe Quattro Control Arm Bushing e-tron GT Control Arm Bushing e-tron Quattro Control Arm Bushing e-tron S Control Arm Bushing e-tron S Sportback Control Arm Bushing e-tron Sportback Control Arm Bushing Q3 Control Arm Bushing Q3 Quattro Control Arm Bushing Q4 e-tron Control Arm Bushing Q4 e-tron Sportback Control Arm Bushing Q5 Control Arm Bushing Q5 PHEV Control Arm Bushing Q5 Sportback Control Arm Bushing Q6 e-tron Control Arm Bushing Q7 Control Arm Bushing Q8 Control Arm Bushing Q8 e-tron Control Arm Bushing Q8 e-tron Sportback Control Arm Bushing Quattro Control Arm Bushing R8 Control Arm Bushing RS e-tron GT Control Arm Bushing RS Q8 Control Arm Bushing RS3 Control Arm Bushing RS4 Control Arm Bushing RS5 Control Arm Bushing RS5 Sportback Control Arm Bushing RS6 Avant Control Arm Bushing RS7 Control Arm Bushing RS7 Sportback Control Arm Bushing S3 Control Arm Bushing S4 Control Arm Bushing S5 Control Arm Bushing S5 Sportback Control Arm Bushing S6 Control Arm Bushing S7 Control Arm Bushing S7 Sportback Control Arm Bushing S8 Control Arm Bushing SQ5 Control Arm Bushing SQ5 Sportback Control Arm Bushing SQ6 e-tron Control Arm Bushing SQ7 Control Arm Bushing SQ8 Control Arm Bushing SQ8 e-tron Control Arm Bushing SQ8 e-tron Sportback Control Arm Bushing TT Control Arm Bushing TT Quattro Control Arm Bushing TT RS Quattro Control Arm Bushing TTS Quattro Control Arm Bushing V8 Quattro Control Arm Bushing