×
- Hello
- Login or Register
- Quick Links
- Live Chat
- Track Order
- Parts Availability
- RMA
- Help Center
- Contact Us
- Shop for
- Audi Parts
My Garage
My Account
Cart
Genuine Audi Antenna
Radio Antenna- Select Vehicle by Model
- Select Vehicle by VIN
Select Vehicle by Model
orMake
Model
Year
Select Vehicle by VIN
For the most accurate results, select vehicle by your VIN (Vehicle Identification Number).
56 Antennas found


Audi Antenna Assembly Part Number: 4M0-035-503-M-GRU
$290.36 MSRP: $406.67You Save: $116.31 (29%)Ships in 1-2 Business DaysProduct Specifications- Other Name: Roofaerial; Antenna
- Replaces: 4M0-035-503-C-GRU, 80A-035-503-C-GRU, 80A-035-503-K-GRU


Audi Antenna Part Number: 8K5-035-503-C-GRU
$507.29 MSRP: $710.48You Save: $203.19 (29%)Ships in 1-2 Business Days


Audi Antenna Part Number: 4H0-035-503-E-GRU
$332.01 MSRP: $464.99You Save: $132.98 (29%)Ships in 1-2 Business DaysProduct Specifications- Other Name: Roof Aerial
- Replaces: 4H0-035-503-C-GRU


Audi Antenna Part Number: 8R0-035-503-C-GRU
$336.77 MSRP: $471.67You Save: $134.90 (29%)Ships in 1-2 Business Days


Audi Antenna Part Number: 4L0-035-503-M-GRU
$83.29 MSRP: $116.65You Save: $33.36 (29%)Ships in 1-2 Business DaysProduct Specifications- Other Name: Roof Aerial

Audi Antenna Assembly Part Number: 4G0-035-503-J-GRU
$245.14 MSRP: $343.33You Save: $98.19 (29%)Ships in 1-2 Business DaysProduct Specifications- Other Name: Roof Aerial; Antenna
- Replaced by: 4G0-035-503-AF-GRU
- Replaces: 4G0-035-503-C-GRU


Audi Antenna Assembly Part Number: 4G0-035-503-K-GRU
$245.14 MSRP: $343.33You Save: $98.19 (29%)Ships in 1-2 Business DaysProduct Specifications- Other Name: Roof Aerial; Antenna
- Replaced by: 4G0-035-503-AF-GRU
Audi Antenna Part Number: 8R0-035-503-G-GRU
$336.77 MSRP: $471.66You Save: $134.89 (29%)Ships in 1-2 Business Days
Audi Sensor Part Number: 8W0-927-753
$178.50 MSRP: $249.99You Save: $71.49 (29%)Ships in 1-2 Business DaysProduct Specifications- Other Name: Antenna
- Position: Driver Side


Audi Antenna Part Number: 4N0-035-503-AR-GRU
$234.43 MSRP: $328.33You Save: $93.90 (29%)Ships in 1-2 Business DaysProduct Specifications- Other Name: Roofaerial; Antenna Mast
- Replaces: 4N0-035-503-N-GRU

Audi Antenna Part Number: 4M0-907-247-A
$33.11 MSRP: $52.98You Save: $19.87 (38%)Ships in 1-2 Business DaysProduct Specifications- Other Name: Aerial

Audi Antenna Assembly Part Number: 4N0-035-500
$35.00 MSRP: $56.00You Save: $21.00 (38%)Ships in 1-2 Business DaysProduct Specifications- Other Name: Aerial; Antenna, Antenna Booster

Audi Antenna Part Number: 4F0-907-247-A
$79.73 MSRP: $111.67You Save: $31.94 (29%)Ships in 1-2 Business DaysProduct Specifications- Other Name: Aerial
- Replaces: 4F0-909-141-C

Audi Antenna Part Number: 4M0-907-247
$82.11 MSRP: $114.99You Save: $32.88 (29%)Ships in 1-2 Business DaysProduct Specifications- Other Name: Aerial

Audi Antenna Assembly Part Number: 8S7-035-507
$109.83 MSRP: $153.82You Save: $43.99 (29%)Ships in 1-2 Business DaysProduct Specifications- Other Name: Antenna
- Position: Driver Side

Audi Antenna Part Number: 8K9-035-503-C-GRU
$142.79 MSRP: $199.98You Save: $57.19 (29%)Ships in 1-2 Business Days
Audi Antenna Part Number: 4L0-035-503-J-GRU
$142.79 MSRP: $199.98You Save: $57.19 (29%)Ships in 1-2 Business DaysProduct Specifications- Other Name: Roof Aerial

Audi Satellite Ant Part Number: 8W7-035-503-B-GRU
$154.80 MSRP: $216.80You Save: $62.00 (29%)Ships in 1-2 Business DaysProduct Specifications- Other Name: Antenna

Audi Antenna Assembly Part Number: 8S7-035-510
$156.00 MSRP: $218.49You Save: $62.49 (29%)Ships in 1-2 Business DaysProduct Specifications- Other Name: Antenna
- Position: Passenger Side

Audi Gps Antenna Part Number: 8H0-919-889-A
$167.79 MSRP: $235.00You Save: $67.21 (29%)Ships in 1-2 Business DaysProduct Specifications- Other Name: Aerial; Antenna
- Replaces: 8H0-919-889
| Page 1 of 3 |Next >
1-20 of 56 Results
Audi Antenna
Audi Antenna allows each vehicle in the lineup to pull in crisp radio, navigation, and data signals, keeping drivers informed and entertained without dropouts. Audi started delighting motorists in 1909, became Auto Union, and today combines heritage and innovation with its now-famous Quattro all-wheel drive, elegant Virtual Cockpit screens, adaptive matrix headlights, and the growing e-tron electric family. Each Audi is sporty but sophisticated, confidently gripping snowy roads and swaddling passengers in smart technology that's easy to use. Continuous testing of self-driving prototypes shows that Audi refuses to slow down on its push to a smarter and safer future. Matching this forward spirit, the Antenna employs conductive elements that gather invisible waves then send them directly to receivers for clear sound and accurate positioning. Modern shark fin housings reduce drag, internal glass-mounted units are protected from harsh weather, while rooftop satellite Antenna options lock on to orbiting transmitters for greater digital coverage. No matter what the style, sturdy wiring and optional amplifiers enhance weak signals so playlists remain vibrant and turn-by-turn directions remain accurate. Because it is tuned for the full brand range, the Audi Antenna upholds reliability, efficiency, and seamless integration, reinforcing the premium experience drivers expect each time they start an Audi.
Stick with genuine OEM Antenna when you need quality that holds up. Audi crafts these parts to hit strict factory specs for every single unit. They also run each part through rigorous checks during production to maintain high quality. You can find exact Audi Antenna you need in our huge stock at AudiPartsGiant.com. You'll love our low, economical prices too. Every OEM part carries a real manufacturer's warranty, so you can buy with confidence. Returns aren't a headache here because our policy is simple. Plus, our speedy delivery gets orders out fast. Shop today and buy with total peace of mind.
Audi Antenna Parts and Q&A
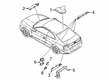
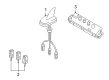
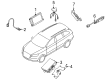
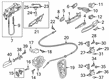
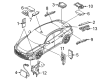
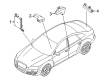
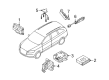
- Q: How is the antenna integrated into the rear window and what steps are involved in its removal and refitting on Audi A3?A:The radio aerial is integrated into the rear window, which is bonded in position with a special adhesive; if faulty, a new rear window must be fitted. For the navigation, telephone, and auxiliary heater telestart aerial, it is located at the rear of the roof panel, requiring the trim from the C-pillar to be removed first. After undoing the screws and removing the two rear grab handles from the headlining, the rear of the headlining can be carefully lowered to disconnect the wiring, noting the colour-coded connections: violet for the telephone, blue for the navigation system, and the remaining connector for the auxiliary heating remote control. The securing nut should be unscrewed to withdraw the aerial base from the roof, holding the base to prevent rotation and scratching the roof panel while recovering the rubber spacer. Refitting involves reversing the removal process, ensuring the two guide lugs on the rubber spacer are correctly located in the aerial base. The aerial amplifier is fitted to the top of the tailgate behind the inner trim panel; the ignition and all electrical consumers must be switched off before removing the inner tailgate trim panels and disconnecting the amplifier wiring connectors. After undoing the retaining screw, the amplifier can be withdrawn from the tailgate, with refitting being a reversal of removal. The aerial module is also fitted in the tailgate behind the inner trim panel, requiring the ignition and all electrical consumers to be switched off before removing the inner tailgate trim panel. The securing clips must be released to disconnect the module wiring connectors, followed by removing the two upper mounting bolts and slackening the lower mounting nuts to withdraw the module, ensuring the small wiring connector at the rear is disconnected carefully to avoid damage. Refitting is again a reversal of removal.
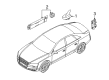
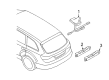
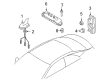
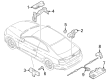
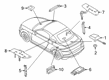
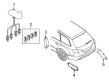
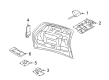
- Q: What are the types of antennas used and how are they replaced on Audi A4?A:There are two types of antennas used on these models, a grid type and a roof-mounted type. The grid type is an integral component of the rear windshield on coupes and sedans and is also part of the rear side windows on wagons. To replace these antennas, the rear windshield or side window(s) must be replaced. Begin by removing the rear headliner trim and "D" pillar trim from both sides, prying off the rear window trim panel, removing the upper handle, and taking out the rear side trim. Next, remove the rear reading light or luggage compartment light housing for wagons, then disconnect the antenna cable(s). Carefully pull down the headliner at the rear, remove the mounting nut, and take off the antenna from the roof. Installation is the reverse of removal.


Related Audi Parts
 Audi Instrument Cluster
 Audi Clock Spring
 Audi Headlight Switch
 Audi Mirror Switch
 Audi Speed Sensor
 Audi Cruise Control Module
 Audi ABS Relay
 Audi Antenna Cable
 Audi Hazard Warning Switch
 Audi Horn Relay
 Audi Ignition Lock Assembly
 Audi Seat Heater Switch
Browse by Model
100 Antenna 100 Quattro Antenna 4000 Antenna 4000 Quattro Antenna 5000 Antenna 5000 Quattro Antenna 80 Antenna 80 Quattro Antenna 90 Antenna 90 Quattro Antenna A3 Antenna A3 Quattro Antenna A3 Sportback e-tron Antenna A4 allroad Antenna A4 Antenna A4 Quattro Antenna A5 Antenna A5 Quattro Antenna A5 Sportback Antenna A6 allroad Antenna A6 Antenna A6 Quattro Antenna A7 Quattro Antenna A7 Sportback Antenna A8 Antenna A8 Quattro Antenna allroad Antenna Cabriolet Antenna e-tron GT Antenna e-tron Quattro Antenna e-tron S Antenna e-tron S Sportback Antenna e-tron Sportback Antenna Q3 Antenna Q3 Quattro Antenna Q4 e-tron Antenna Q4 e-tron Sportback Antenna Q5 Antenna Q5 PHEV Antenna Q5 Sportback Antenna Q6 e-tron Antenna Q7 Antenna Q8 Antenna Q8 e-tron Antenna Q8 e-tron Sportback Antenna Quattro Antenna RS e-tron GT Antenna RS Q8 Antenna RS3 Antenna RS4 Antenna RS5 Antenna RS5 Sportback Antenna RS6 Avant Antenna RS7 Antenna RS7 Sportback Antenna S3 Antenna S4 Antenna S5 Antenna S5 Sportback Antenna S6 Antenna S7 Antenna S7 Sportback Antenna S8 Antenna SQ5 Antenna SQ5 Sportback Antenna SQ6 e-tron Antenna SQ7 Antenna SQ8 Antenna SQ8 e-tron Antenna SQ8 e-tron Sportback Antenna TT Antenna TT Quattro Antenna TT RS Quattro Antenna TTS Quattro Antenna V8 Quattro Antenna