×
- Hello
- Login or Register
- Quick Links
- Live Chat
- Track Order
- Parts Availability
- RMA
- Help Center
- Contact Us
- Shop for
- Audi Parts
My Garage
My Account
Cart
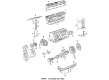
Genuine Audi 90 Camshaft
Cam- Select Vehicle by Model
- Select Vehicle by VIN
Select Vehicle by Model
orMake
Model
Year
Select Vehicle by VIN
For the most accurate results, select vehicle by your VIN (Vehicle Identification Number).
5 Camshafts found

Audi 90 Camshaft Part Number: 034-109-021-AK
$293.54 MSRP: $411.12You Save: $117.58 (29%)Ships in 1-2 Business Days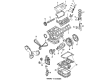
Audi 90 Camshaft Part Number: 078-109-102-AJ
$517.65 MSRP: $725.00You Save: $207.35 (29%)Ships in 1-2 Business DaysAudi 90 Camshaft Part Number: 078-109-101-BL
$517.65 MSRP: $725.00You Save: $207.35 (29%)Ships in 1-2 Business Days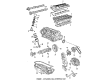
Audi 90 Intake Camshaft Part Number: 054-109-021
$557.72 MSRP: $781.12You Save: $223.40 (29%)Ships in 1-2 Business DaysAudi 90 Exhaust Camshaft Part Number: 054-109-022
$688.42 MSRP: $890.00You Save: $201.58 (23%)Ships in 1-2 Business Days
Audi 90 Camshaft
Choose original equipment manufacturer Camshaft for great performance and strong durability. They use Audi's official craftsmanship and high-grade materials, and meet strict quality standards. Are you looking for quality Camshaft at a good price? Come to our online store. We carry a wide range of genuine parts for your Audi 90 and the prices are competitive. Each part comes with the manufacturer's warranty. You can install with confidence and get steady results. Over time, you'll save money and avoid hassle. Keep your maintenance simple and protect your vehicle with OEM parts. Get the quality your 90 needs now.
Audi 90 Camshaft Parts and Q&A
- Q: How to remove the camshaft and valve lifter on Audi 90?A:In case the engine still resides in the car, first lose the battery negative lead, the air cleaner and fuel injection parts, lose all applicable wiring, cables, and hoses, lose the distributor, loss the upper radiator cowl and upper part of the inlet manifold, lose the drivebelts of the crankshaft pulley, and in some cases the power steering pump and air conditioning compressor, leaving the hoses in place. The next step is to screw off the nuts/bolts and loosen the valve cover, retrieving the reinforcement strips and gaskets with a note of where the cable holders are located. Take out the upper Timing Belt cover and spacers with an Allen key, making sure the lower cover has not been removed. When the Piston in the No 1 cylinder is in TDC at the compression stroke, twist the engine using a socket in the crankshaft pulley bolt until the notch in the crankshaft pulley is in line with the pointer in the oil pump housing or lower timing cover, or the O mark in the Flywheel/ driveplate is in line with the pointer in the bellhousing aperture. Make sure that the valves on No 1 cylinder are closed with the cam peaks facing upwards and with 10-valve engines the indentation on the rear of the camshaft gear correctly aligned to the upper surface of the valve cover gasket or with 20-valve engines, the corresponding indentation on the valve cover. Unscrew the water pump fixing and adjustment bolts, turn the pump clockwise to relieve the stress on the timing belt and take the timing belt off the camshaft gear. Unthread the centre bolt of camshaft gear when in place in the gear, yet keep that in place, remove the gear of the camshaft, and remove the Woodruff key. Check that all bearing caps are marked with their number, and marked to identify the one necessary, and make sure the camshaft is taken off as indicated in order that it may not be distorted. To remove bearing caps 1 and 3 nuts of the 10-valve engines, unscrew and remove the nuts of the bearing caps in number 1 and 3 in a diagonal order, and gradually unscrew and remove the nuts of the bearing cap number 2 and 4, and then lift out the camshaft and dispose of the oil seal. With 20-valve engines, unscrew and remove the nuts of the exhaust camshaft bearing caps 2 and 4 followed by successively unscrewing and removing the nuts of bearing caps 1, 3 and 5 in an anti-clockwise order and then lifting out the exhaust camshaft and disconnecting it to the chain. The next step is to unscrew and remove the nuts of the inlet camshaft bearing caps 7, and 9, then in the same order screw out the nuts of the inlet bearing caps 6, 8, and 10, followed by the removal of the inlet camshaft and the chain. Lastly, prepare a box with internal partitions to distinguish the positions of bucket tappets, take out the hydraulic bucket tappets, and put them inside the box in an upside-down position to ensure that the oil does not drain out.
- Q: How to identify defective hydraulic tappets related to the Camshaft and Valve Lifter when they are noisy at normal operating temperature on Audi 90?A:If the hydraulic tappets are noisy when the engine has reached normal operating temperature, a method can determine which tappets are defective for renewal, as irregular noises when starting from cold are normal. First, run the engine to normal temperature until the electric cooling fan switches on, then continue for two minutes at 2500 rpm while checking for tappet noise. If noise persists, stop the engine and remove the valve cover, turning the Crankshaft until the cam over the tappet to be checked is pointing upwards. Using a non-metallic tool, press the tappet downwards; if the free travel exceeds 0.1 mm (0.004 in) before the valve opens, renewal is necessary. Remove the air cleaner or fuel injection components as applicable, unscrew the nuts, and take off the fuel container and bracket from the valve cover if applicable. Remove the Timing Belt without taking off the tensioner or sprockets, then unscrew the nuts to take off the timing belt rear upper cover. Unscrew the remaining valve cover nuts, noting the wire retaining straps and earth terminal location, and disconnect the crankcase ventilation hose. Lift off the valve cover after removing the reinforcement strips, then take out the oil deflector and gasket from the cylinder head studs, as well as the semi-circular gasket from the camshaft front bearing cap and the rubber plug from the rear of the cylinder head. Use a screwdriver to prise out the camshaft front oil seal, mark the camshaft bearing caps for position and orientation, progressively unscrew the nuts, and remove the caps before lifting the camshaft from the cylinder head. Prepare a box with compartments marked to identify the bucket tappet locations, numbered from the front of the engine, and remove the hydraulic bucket tappets, placing them upside-down in the box to prevent oil drainage. Clean the camshaft and examine it for wear and damage, particularly on the peaks of the cams and bearing journals, and obtain a new oil seal. Begin reassembly by oiling the hydraulic bucket tappets and inserting them in their noted positions over the valves, then oil the bearing journals on the camshaft and lower it into position on the bucket tappets, ensuring the cams for No 1 cylinder are pointing upwards. Refit bearing caps 2 and 5, tightening the nuts progressively to the specified torque, ensuring the caps are fitted the same way as noted during removal due to their slight offset. Refit bearing caps 1 and 3, tightening the nuts progressively to the specified torque. Smear a little oil on the lips and outer rim of the new oil seal, locate it on the front of the camshaft, and use a socket and mallet to drive it squarely into position until flush with the cylinder head. Fit a new rubber plug and semi-circular gasket to the head and front bearing cap, then locate a new gasket on the studs. Refit the oil deflector, valve cover, and associated parts, tightening the nuts, then refit the timing belt, followed by the fuel container and bracket to the valve cover if applicable, and finally the air cleaner or fuel injection components as applicable. If any hydraulic tappets have been renewed, do not start or turn the engine for at least thirty minutes to allow excess oil in the tappets to drain off, as failing to do so risks a valve striking a piston.


