×
- Hello
- Login or Register
- Quick Links
- Live Chat
- Track Order
- Parts Availability
- RMA
- Help Center
- Contact Us
- Shop for
- Audi Parts
My Garage
My Account
Cart
Genuine Audi Coolant Reservoir
Coolant Tank Reservoir- Select Vehicle by Model
- Select Vehicle by VIN
Select Vehicle by Model
orMake
Model
Year
Select Vehicle by VIN
For the most accurate results, select vehicle by your VIN (Vehicle Identification Number).
59 Coolant Reservoirs found


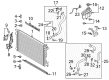
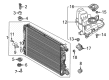
Audi Expansion Tank Part Number: 8W0-121-405-L
$143.99 MSRP: $201.67You Save: $57.68 (29%)Ships in 1-2 Business DaysProduct Specifications- Other Name: Tank; Reservoir
- Replaces: 8W0-121-405-G, 8W0-121-405-E, 8W0-121-405-F


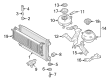
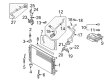
Audi Expansion Tank Part Number: 80A-121-405-AQ
$193.97 MSRP: $271.67You Save: $77.70 (29%)Ships in 1-2 Business DaysProduct Specifications- Other Name: Tank; Reservoir
- Replaces: 80A-121-405-Q, 80A-121-405-AK, 80A-121-405-L, 80A-121-405-T


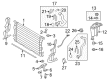
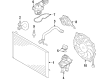
Audi Expansion Tank Part Number: 8K0-121-403-AC
$73.78 MSRP: $103.34You Save: $29.56 (29%)Ships in 1-2 Business DaysProduct Specifications- Other Name: Tank; Reservoir
- Replaces: 8K0-121-403-H, 8K0-121-403-T, 8K0-121-403-Q, 8K0-121-403-D, 8K0-121-403-G


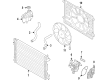
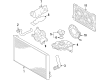
Audi Expansion Tank Part Number: 80A-121-405-AG
$114.24 MSRP: $160.00You Save: $45.76 (29%)Ships in 1-2 Business DaysProduct Specifications- Other Name: Tank


Audi Expansion Tank Part Number: 8W1-121-405-N
$152.32 MSRP: $213.32You Save: $61.00 (29%)Ships in 1-2 Business DaysProduct Specifications- Other Name: Tank; Reservoir
- Replaces: 8W1-121-405-F, 8W1-121-405-K, 8W1-121-405-J


Audi Expansion Tank Part Number: 4M0-121-403-H
$105.90 MSRP: $148.32You Save: $42.42 (29%)Ships in 1-2 Business DaysProduct Specifications- Other Name: Tank; Reservoir
- Replaces: 4M0-121-403-D, 4M0-121-403-F


Audi Expansion Tank Part Number: 8W0-121-405-K
$55.66 MSRP: $76.67You Save: $21.01 (28%)Ships in 1-2 Business DaysProduct Specifications- Other Name: Tank; Reservoir


Audi Reservoir Part Number: 1S0-121-407-J
$27.13 MSRP: $43.40You Save: $16.27 (38%)Ships in 1-2 Business DaysProduct Specifications- Other Name: Tank
- Replaces: 1S0-121-407-E, 1S0-121-407-G


Audi Reservoir Part Number: 4D0-121-403-C
$74.97 MSRP: $105.00You Save: $30.03 (29%)Ships in 1-2 Business DaysProduct Specifications- Replaces: 4D0-121-403-B, 4D0-121-403-A


Audi Expansion Tank Part Number: 4K0-121-405-AC
$82.11 MSRP: $114.99You Save: $32.88 (29%)Ships in 1-2 Business DaysProduct Specifications- Other Name: Tank; Reservoir, Reservoir Tank


Audi Reservoir Part Number: 8D0-121-403-L
$86.86 MSRP: $121.65You Save: $34.79 (29%)Ships in 1-2 Business DaysProduct Specifications- Other Name: Tank


Audi Reservoir Part Number: 8E0-121-403-F
$88.06 MSRP: $123.33You Save: $35.27 (29%)Ships in 1-2 Business DaysProduct Specifications- Other Name: Tank

Audi Expansion Tank Part Number: 4M0-121-403-G
$44.42 MSRP: $61.18You Save: $16.76 (28%)Ships in 1-2 Business DaysProduct Specifications- Other Name: Tank; Reservoir
- Replaces: 4M0-121-403-E, 4M0-121-403-C

Audi Reservoir Part Number: 8E0-121-403-D
$49.61 MSRP: $68.33You Save: $18.72 (28%)Ships in 1-2 Business DaysProduct Specifications- Other Name: Tank

Audi Expansion Tank Part Number: 5WA-121-407-F
$16.11 MSRP: $25.78You Save: $9.67 (38%)Ships in 1-2 Business DaysProduct Specifications- Other Name: Tank; Reservoir

Audi Expansion Tank Part Number: 4N0-121-405-AJ
$62.39 MSRP: $87.38You Save: $24.99 (29%)Ships in 1-2 Business DaysProduct Specifications- Other Name: Tank; Reservoir
- Replaces: 4N0-121-405-N


Audi Reservoir Part Number: 8D0-121-403-D
$65.45 MSRP: $91.67You Save: $26.22 (29%)Ships in 1-2 Business DaysProduct Specifications- Other Name: Tank

Audi Reservoir Part Number: 8E0-121-403
$76.15 MSRP: $106.65You Save: $30.50 (29%)Ships in 1-2 Business DaysProduct Specifications- Other Name: Tank

Audi Expansion Tank Part Number: 4F0-121-403-N
$77.10 MSRP: $107.99You Save: $30.89 (29%)Ships in 1-2 Business DaysProduct Specifications- Other Name: Tank; Reservoir Tank
- Replaces: 4F0-121-403-C, 4F0-121-403-G

Audi Expansion Tank Part Number: 4F0-121-403-M
$78.54 MSRP: $110.01You Save: $31.47 (29%)Ships in 1-2 Business DaysProduct Specifications- Other Name: Tank; Reservoir Tank
- Replaces: 4F0-121-403-F, 4F0-121-403, 4F0-121-403-B
| Page 1 of 3 |Next >
1-20 of 59 Results
Audi Coolant Reservoir
Audi Coolant Reservoir helps maintain steady engine temperatures by absorbing growing coolant and returning it back to the coolant system once the motor cools down, providing drivers with constant performance and peace of mind on long trips. Audi started to make innovative cars in 1909 and has since established a reputation for sporty sedans, capable SUVs and cutting-edge e-tron electric models, all underpinned by legendary Quattro all-wheel drive that claws its way confidently through the rain or snow. Audi also drives digital convenience with Virtual Cockpit displays and bright matrix headlights while ongoing autonomous trials point to an even smarter future. This progressive thinking means that every Audi provides a balance of power, efficiency and advanced safety to keep young drivers excited and seasoned owners loyal. A good Coolant Reservoir operates quietly in that lineup, as a sealed expansion chamber located high within the cooling circuit so air rises away from sensitive passages and coolant remains free of bubbles. The Coolant Reservoir has a pressurized cap to protect against leaks, reinforced plastic to resist vibration and clear indicators that show the coolant level so that topping up takes seconds for Audi owners. When the temperature rises, hot fluid circulates from radiator to Coolant Reservoir and when it drops, vacuum pulls it back and the whole process is in a closed loop, reduces waste, prevents rust and protects the environment. Because of its design, which allows for different engine layouts, this component can support the entire Audi range, without the need for model-specific tweaks.
Stick with genuine OEM Coolant Reservoir when you need quality that holds up. Audi crafts these parts to hit strict factory specs for every single unit. They also run each part through rigorous checks during production to maintain high quality. You can find exact Audi Coolant Reservoir you need in our huge stock at AudiPartsGiant.com. You'll love our low, economical prices too. Every OEM part carries a real manufacturer's warranty, so you can buy with confidence. Returns aren't a headache here because our policy is simple. Plus, our speedy delivery gets orders out fast. Shop today and buy with total peace of mind.
Audi Coolant Reservoir Parts and Q&A
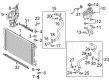
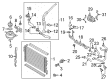
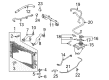
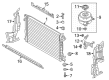
- Q: How to replace the coolant reservoir and radiator on Audi A4?A:To carry out the task of replacement of the radiator, first raise the front of the vehicle and hold it firmly on jackstands. Take off the bottom splash cover and empty the cooling system. Secondly, remove engine covers and front bumper and in 2.0L models, position radiator support panel in service position. Detach the upper and lower transaxle cooler lines of the automatic and seal them with a cap. Have the upper and bottom radiator hose clips lifted to detach the hose to the radiator and twist them (where needed) to release the O-ring. Take out the ducts by removing the air duct fasteners of either side of the radiator. Unplug the air conditioning pressure switch and ambient temperature sensor on the driver side of radiator and position the harness aside. Disassemble the mounting fasteners of the power steering cooler and drop the cooler without unscrewing the lines where provided. Removal of air conditioning condenser mounting fasteners and rotate the condenser out of and down the radiator, careful not to kink, stretch or bend the air conditioning lines. Unscrew the two radiator mounting pins, push the pins upwards to unscrew then remove the radiator. Installation of new radiator Before fitting the new radiator, replace any damaged hose clips, radiator hoses, and O-rings. Installation is done in the same manner as it is removed. Installation Refill and bleed the system and then start the engine checking all the leaks. In the case of expansion tank, empty the cooling system by draining it until the coolant drier is removed. Removal: Before removing the tank out of the engine compartment, take out the expansion tank mounting screw, lift the tank and disconnect the coolant level sensor connector. The reservoir should be clean and clear, so wash the reservoir with soapy water, and rinse thoroughly, etc. Installation is done in the same manner as it is removed.

Related Audi Parts
 Audi Radiator Support
 Audi Radiator Cap
 Audi Thermostat Housing
 Audi Fan Clutch
 Audi Coolant Reservoir Hose
 Audi Cooling Fan Module
 Audi Cooling Fan Resistors
 Audi Fan Motor
 Audi Fan Mounting Bracket
 Audi Idler Pulley
 Audi Thermostat Gasket
 Audi Water Pump Gasket
Browse by Model
100 Coolant Reservoir 100 Quattro Coolant Reservoir 200 Coolant Reservoir 200 Quattro Coolant Reservoir 4000 Coolant Reservoir 4000 Quattro Coolant Reservoir 5000 Coolant Reservoir 5000 Quattro Coolant Reservoir 80 Coolant Reservoir 80 Quattro Coolant Reservoir 90 Coolant Reservoir 90 Quattro Coolant Reservoir A3 Coolant Reservoir A3 Quattro Coolant Reservoir A3 Sportback e-tron Coolant Reservoir A4 allroad Coolant Reservoir A4 Coolant Reservoir A4 Quattro Coolant Reservoir A5 Coolant Reservoir A5 Quattro Coolant Reservoir A5 Sportback Coolant Reservoir A6 allroad Coolant Reservoir A6 Coolant Reservoir A6 Quattro Coolant Reservoir A7 Quattro Coolant Reservoir A7 Sportback Coolant Reservoir A8 Coolant Reservoir A8 Quattro Coolant Reservoir allroad Coolant Reservoir Allroad Quattro Coolant Reservoir Cabriolet Coolant Reservoir Coupe Coolant Reservoir Coupe Quattro Coolant Reservoir e-tron GT Coolant Reservoir e-tron Quattro Coolant Reservoir e-tron S Coolant Reservoir e-tron S Sportback Coolant Reservoir e-tron Sportback Coolant Reservoir Q3 Coolant Reservoir Q3 Quattro Coolant Reservoir Q4 e-tron Coolant Reservoir Q4 e-tron Sportback Coolant Reservoir Q5 Coolant Reservoir Q5 PHEV Coolant Reservoir Q5 Sportback Coolant Reservoir Q7 Coolant Reservoir Q8 Coolant Reservoir Q8 e-tron Coolant Reservoir Q8 e-tron Sportback Coolant Reservoir Quattro Coolant Reservoir R8 Coolant Reservoir RS e-tron GT Coolant Reservoir RS Q8 Coolant Reservoir RS3 Coolant Reservoir RS4 Coolant Reservoir RS5 Coolant Reservoir RS5 Sportback Coolant Reservoir RS6 Avant Coolant Reservoir RS7 Coolant Reservoir RS7 Sportback Coolant Reservoir S3 Coolant Reservoir S4 Coolant Reservoir S5 Coolant Reservoir S5 Sportback Coolant Reservoir S6 Coolant Reservoir S7 Coolant Reservoir S7 Sportback Coolant Reservoir S8 Coolant Reservoir SQ5 Coolant Reservoir SQ5 Sportback Coolant Reservoir SQ7 Coolant Reservoir SQ8 Coolant Reservoir SQ8 e-tron Coolant Reservoir SQ8 e-tron Sportback Coolant Reservoir TT Coolant Reservoir TT Quattro Coolant Reservoir TT RS Quattro Coolant Reservoir TTS Quattro Coolant Reservoir V8 Quattro Coolant Reservoir