×
- Hello
- Login or Register
- Quick Links
- Live Chat
- Track Order
- Parts Availability
- RMA
- Help Center
- Contact Us
- Shop for
- Audi Parts
My Garage
My Account
Cart
Genuine Audi A4 Seat Belt
Seat Safety Belt- Select Vehicle by Model
- Select Vehicle by VIN
Select Vehicle by Model
orMake
Model
Year
Select Vehicle by VIN
For the most accurate results, select vehicle by your VIN (Vehicle Identification Number).
137 Seat Belts found


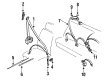
Audi A4 Lap & Shoulder Belt Part Number: 4A5-857-709-J-V04
$143.51 MSRP: $201.00You Save: $57.49 (29%)Ships in 1-2 Business Days

Audi A4 Center Seat Belt Part Number: 8D0-857-703-V04
$162.19 MSRP: $227.15You Save: $64.96 (29%)Ships in 1-2 Business Days
Audi A4 Outer Belt Assembly Part Number: 8T0-857-805-N-V04
$316.54 MSRP: $409.22You Save: $92.68 (23%)Ships in 1-2 Business DaysAudi A4 Center Seat Belt Part Number: 8D0-857-713-D-6PT
$96.39 MSRP: $135.00You Save: $38.61 (29%)Ships in 1-2 Business DaysAudi A4 Center Seat Belt Part Number: 8D0-857-713-D-45E
$96.39 MSRP: $135.00You Save: $38.61 (29%)Ships in 1-2 Business DaysAudi A4 Center Seat Belt Part Number: 8D0-857-713-D-V04
$112.81 MSRP: $158.00You Save: $45.19 (29%)Ships in 1-2 Business DaysAudi A4 Center Seat Belt Part Number: 8D0-857-713-D-Q44
$112.81 MSRP: $158.00You Save: $45.19 (29%)Ships in 1-2 Business DaysAudi A4 Lap & Shoulder Belt Part Number: 8D0-857-703-B-9SV
$142.80 MSRP: $200.00You Save: $57.20 (29%)Ships in 1-2 Business DaysAudi A4 Center Seat Belt Part Number: 8D0-857-703-B-45E
$142.80 MSRP: $200.00You Save: $57.20 (29%)Ships in 1-2 Business DaysAudi A4 Center Seat Belt Part Number: 8D0-857-703-B-Q44
$143.51 MSRP: $201.00You Save: $57.49 (29%)Ships in 1-2 Business DaysAudi A4 Center Seat Belt Part Number: 8D0-857-703-B-6PT
$143.51 MSRP: $201.00You Save: $57.49 (29%)Ships in 1-2 Business DaysAudi A4 Lap & Shoulder Belt Part Number: 8D0-857-703-B-5SH
$162.19 MSRP: $227.15You Save: $64.96 (29%)Ships in 1-2 Business DaysAudi A4 Outer Belt Assembly Part Number: 8D9-857-806-D-6PT
$257.04 MSRP: $360.00You Save: $102.96 (29%)Ships in 1-2 Business DaysAudi A4 Outer Belt Assembly Part Number: 8D9-857-805-D-Q44
$257.04 MSRP: $360.00You Save: $102.96 (29%)Ships in 1-2 Business DaysAudi A4 Outer Belt Assembly Part Number: 8D9-857-805-D-9SV
$257.04 MSRP: $360.00You Save: $102.96 (29%)Ships in 1-2 Business DaysAudi A4 Outer Belt Assembly Part Number: 8D9-857-805-D-6PT
$257.04 MSRP: $360.00You Save: $102.96 (29%)Ships in 1-2 Business DaysAudi A4 Outer Belt Assembly Part Number: 8D9-857-805-D-2RQ
$257.04 MSRP: $360.00You Save: $102.96 (29%)Ships in 1-2 Business DaysAudi A4 Outer Belt Assembly Part Number: 8D9-857-806-D-V04
$259.90 MSRP: $364.00You Save: $104.10 (29%)Ships in 1-2 Business DaysAudi A4 Outer Belt Assembly Part Number: 8D9-857-806-D-Q44
$259.90 MSRP: $364.00You Save: $104.10 (29%)Ships in 1-2 Business DaysAudi A4 Lap & Shoulder Belt Part Number: 8D9-857-806-D-9SV
$259.90 MSRP: $364.00You Save: $104.10 (29%)Ships in 1-2 Business Days
| Page 1 of 7 |Next >
1-20 of 137 Results
Audi A4 Seat Belt
The Audi A4 Seat Belt is created to ensure the occupants are firmly seated in their Seat Belts during a sudden stop or collision, which reduces the chances of injuries or ejection by a huge margin. This is the main restraint system, which opposes the forward force of the body, holds the passengers with the airbags, and ensures that they do not strike the windshield or get thrown out of the cabin. Similar to other models produced by Audi, the Seat Belt assembly is based on four synchronized components. There is polyester material webbing wrapped around the torso that is durable and can be loosened when one is in normal motion and tightened when the car brakes suddenly, and the buckle and tongue are made to fit together and close the circuit. Prior to advancements in the automotive industry, Seat Belts were provided as an optional feature, although when the first A4 reached dealerships in the mid-1990s standard three-point restraints were fitted in every Audi, as a result of regulations which were introduced in the 1960s. The fundamental three-point design has been present in Audi vehicles over the generations due to its simple mechanism that is both comfortable and proven to be effective in actual collisions and on the race track where acceptance was at one time lacking. Replacement of a worn Seat Belt usually entails replacement of the entire assembly, and though the parts are not that expensive, labor costs may increase the bill. However, drivers will concede that the small price is insignificant as compared to the life-saving value that is provided each time an Audi door opens and a Seat Belt is fastened.
Choose original equipment manufacturer Seat Belt for great performance and strong durability. They use Audi's official craftsmanship and high-grade materials, and meet strict quality standards. Are you looking for quality Seat Belt at a good price? Come to our online store. We carry a wide range of genuine parts for your Audi A4 and the prices are competitive. Each part comes with the manufacturer's warranty. You can install with confidence and get steady results. Over time, you'll save money and avoid hassle. Keep your maintenance simple and protect your vehicle with OEM parts. Get the quality your A4 needs now.
Audi A4 Seat Belt Parts and Q&A
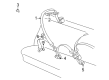
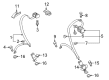
- Q: What precautions should be taken when working with tile pillars or floorpan, and How to properly remove and reinstall front and rear seat belts on Audi A4?A:Never strike tile pillars or floorpan with a hammer or use an impact-driver tool in these areas unless the tile system is disabled. Disconnecting the battery can cause driveability problems that require a scan tool to rectify, and it may also cause warning lights on the instrument panel to illuminate, necessitating a scan tool to turn them off. Most public scan tools lack the capability to perform these tasks, requiring a visit to a dealer service department or a properly equipped repair facility after service work. These models are equipped with an anti-theft radio, so ensure you have the proper activation code before disconnecting the battery. For front seat belts, raise the seat to the highest point, disconnect the negative battery cable, remove the seat anchor cover, and push the anchor end down and off the anchor point. Slide the belt through the belt guide and off the seat, then remove the A-pillar and B-pillar trim along with the height adjuster trim. Remove the belt tensioner fastener from the base of the B-pillar and the belt tensioner itself. Use a small screwdriver to open the yellow/blue wire retainer and disconnect the electrical connector from the bell module, then remove the upper belt fastener from the height adjuster and the belt. To replace the height adjuster, remove the adjuster mounting fastener and the adjuster assembly. Installation is the reverse of removal, ensuring the belt is not twisted before installing the lower seat mount side. For the belt latch, remove the latch fastener and latch from the base of the seat, disconnect the electrical connector to the seat latch, and note the wire locations if necessary. Installation is the reverse of removal. For rear seat belts, disconnect the negative battery cable, remove the seat and the lower anchor point fastener, and the belt end. Remove the C-pillar trim and rear parcel shelf trim on sedans, then from inside the rear luggage compartment, remove the trim and loosen the belt tensioner fastener. Slide the tensioner assembly back, up, and out. Use a small screwdriver to open the yellow retainer and disconnect the electrical connector from the bell module. Installation is the reverse of removal, ensuring the bell is not twisted before installing the lower seat mount side. For the belt latch, remove the latch fastener and latch from the floorpan, and ensure the belt is not twisted before installing the lower mount side during reinstallation.
- Q: What should be checked for damage and wear in seat belts, and How to verify the seat belt reminder light on Audi A4?A:Check seat belts, buckles, latch plates and guide loops to look at obvious damage and signs of wear. Make sure that the bolts that hold the seat belt receptacle on the vehicle floor are tight. Test to ensure that there is a seat belt reminder light that goes on when the key is turned to run or start position.

Related Audi A4 Parts
 Audi A4 Antenna
 Audi A4 Ignition Control Module
 Audi A4 Ignition Switch
 Audi A4 Oil Pressure Switch
 Audi A4 Wiper Linkage
 Audi A4 Exhaust Nut
 Audi A4 Horn Relay
 Audi A4 Ignition Coil Boot
 Audi A4 Ignition Relay
 Audi A4 Seat Heater Switch
 Audi A4 Spark Plug Wire
 Audi A4 Turn Signal Switch
Browse by Year
2020 Seat Belt
2019 Seat Belt
2018 Seat Belt
2017 Seat Belt
2016 Seat Belt
2015 Seat Belt
2014 Seat Belt
2013 Seat Belt
2012 Seat Belt
2011 Seat Belt
2010 Seat Belt
2009 Seat Belt
2008 Seat Belt
2007 Seat Belt
2006 Seat Belt
2005 Seat Belt
2004 Seat Belt
2003 Seat Belt
2002 Seat Belt
2001 Seat Belt
2000 Seat Belt
1999 Seat Belt
1998 Seat Belt
1997 Seat Belt
1996 Seat Belt