×
- Hello
- Login or Register
- Quick Links
- Live Chat
- Track Order
- Parts Availability
- RMA
- Help Center
- Contact Us
- Shop for
- Audi Parts
My Garage
My Account
Cart
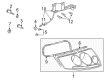
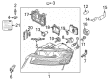
Genuine Audi A3 Car Bulbs
- Select Vehicle by Model
- Select Vehicle by VIN
Select Vehicle by Model
orMake
Model
Year
Select Vehicle by VIN
For the most accurate results, select vehicle by your VIN (Vehicle Identification Number).
Filter by Part Type
Filter by Part Type
26 Car Bulbs found


Audi A3 Lower Beam Bulb Part Number: N-103-201-06
$23.11 MSRP: $28.45You Save: $5.34 (19%)Ships in 1-2 Business Days

Audi A3 Turn Signal Bulb Part Number: N-105-297-01
$24.74 MSRP: $30.45You Save: $5.71 (19%)Ships in 1-2 Business Days

Audi A3 Back-Up Lamp Bulb Part Number: N-105-915-01
$4.44 MSRP: $5.33You Save: $0.89 (17%)Ships in 1-2 Business Days


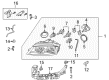
Audi A3 Lower Beam Bulb Part Number: N-104-457-01
$142.31 MSRP: $199.33You Save: $57.02 (29%)Ships in 1-2 Business Days


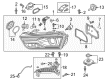
Audi A3 Lower Beam Bulb Part Number: N-105-661-02
$172.01 MSRP: $240.93You Save: $68.92 (29%)Ships in 1-2 Business Days

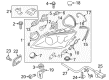
Audi A3 Headlamp Bulb Part Number: N-107-218-06
$193.05 MSRP: $270.37You Save: $77.32 (29%)Ships in 1-2 Business Days


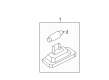
Audi A3 License Lamp Bulb Part Number: 4G0-943-021-A
$41.73 MSRP: $57.48You Save: $15.75 (28%)Ships in 1-2 Business Days


Audi A3 Bulb & Socket Part Number: N-107-279-01
$43.43 MSRP: $55.21You Save: $11.78 (22%)Ships in 1-2 Business Days


Audi A3 Lower Beam Bulb Part Number: N-105-295-01
$25.49 MSRP: $31.37You Save: $5.88 (19%)Ships in 1-2 Business Days

Audi A3 International Lamp Bulb Part Number: N-017-723-4
$2.23 MSRP: $2.67You Save: $0.44 (17%)Ships in 1-2 Business Days

Audi A3 License Lamp Bulb Part Number: N-017-725-2
$2.89 MSRP: $3.47You Save: $0.58 (17%)Ships in 1-2 Business Days


Audi A3 Marker Lamp Bulb Part Number: N-017-753-11
$4.44 MSRP: $5.33You Save: $0.89 (17%)Ships in 1-2 Business Days
Audi A3 Lower Beam Bulb Part Number: 8W0-941-235-A
$228.48 MSRP: $319.99You Save: $91.51 (29%)Ships in 1-2 Business Days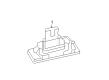
Audi A3 License Lamp Bulb Part Number: 5NA-943-021
$49.23 MSRP: $67.82You Save: $18.59 (28%)Ships in 1-2 Business Days
Audi A3 Turn Signal Bulb Part Number: N-107-331-01
$43.31 MSRP: $55.06You Save: $11.75 (22%)Ships in 1-2 Business DaysAudi A3 Lower Beam Bulb Part Number: N-103-201-02
$19.74 MSRP: $24.29You Save: $4.55 (19%)Ships in 1-2 Business Days
Audi A3 Signal Lamp Bulb Part Number: N-107-763-02
$21.11 MSRP: $25.98You Save: $4.87 (19%)Ships in 1-2 Business Days
Audi A3 Back-Up Lamp Bulb Part Number: N-017-732-2
$3.40 MSRP: $4.10You Save: $0.70 (18%)Ships in 1-2 Business Days
Audi A3 Signal Lamp Bulb Part Number: N-017-732-6
$4.13 MSRP: $4.98You Save: $0.85 (18%)Ships in 1-2 Business Days
Audi A3 Overhead Lamp Bulb Part Number: N-900-349-01
$1.91 MSRP: $2.28You Save: $0.37 (17%)Ships in 1-2 Business Days
| Page 1 of 2 |Next >
1-20 of 26 Results
Audi A3 Car Bulbs
Choose original equipment manufacturer Car Bulbs for great performance and strong durability. They use Audi's official craftsmanship and high-grade materials, and meet strict quality standards. Are you looking for quality Car Bulbs at a good price? Come to our online store. We carry a wide range of genuine parts for your Audi A3 and the prices are competitive. Each part comes with the manufacturer's warranty. You can install with confidence and get steady results. Over time, you'll save money and avoid hassle. Keep your maintenance simple and protect your vehicle with OEM parts. Get the quality your A3 needs now.
Audi A3 Car Bulbs Parts and Q&A
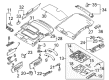
- Q: What steps should be followed when renewing a interior car bulbs on Audi A3?A:When renewing a bulb, ensure the ignition and all electrical consumers are switched off, and be cautious as the bulb may be hot if recently used. Check the bulb contacts and holder for clean metal-to-metal contact, cleaning off any corrosion or dirt before fitting a new bulb. For festoon-type bulbs, ensure the live contacts are firmly against the bulb contact, and verify that the new bulb is of the correct rating and clean. To replace the front courtesy light bulb, carefully remove the lens with a small flat-bladed screwdriver and pull the bulb from the spring contacts, then fit the new bulb in reverse order. For the rear courtesy light, release the locking clips, withdraw the light unit, disconnect the wiring connector, and pull the bulb from the rear before fitting the new one. In the luggage compartment, unclip the light unit, disconnect the wiring, remove the plastic cover, and pull out the wedge-type bulb before installing the new one. For make-up lights, remove the bulb after prising the light unit from the sun visor, noting that the microswitch cannot be renewed. For glovebox illumination, open the glovebox, unclip the light unit, disconnect the wiring, remove the plastic cover, and pull out the wedge-type bulb before fitting a new one. The instrument panel illumination and warning lights are non-renewable LEDs, while the cigarette lighter illumination requires removing the lighter, lifting the retaining clip, and pulling the bulbholder to fit a new bulb. The heater/ventilation control panel is illuminated by built-in LEDs, necessitating panel renewal if a fault occurs. Switch illumination bulbs are integral with the switches, requiring complete switch renewal if a bulb fails. For door warning lights, open the door, remove the light unit, unplug the wiring connector, unclip the lens, and release the bulb from the spring contacts, with refitting done in reverse order.
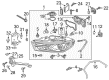
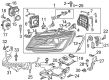
- Q: What steps are involved in the replacement process for exterior Car Bulbs in various types of vehicle lights, and what precautions should be taken when renewing a bulb on Audi A3?A:Whenever a bulb is changed, turn off the ignition and all other electrical consumers before starting a job, and be careful since the bulb can be very hot when it has been used very recently. Ensure that metal-to-metal contact of the bulb contacts and holder are always clean, wiping any corrosive or dirt off before replacing the bulb. In the case of festoon-type bulbs, make sure that the arms with the spring-tension have to firmly press on the contacts of the bulbs, and the new bulb should be of the appropriate rating and properly cleaned before installation. In changing bulbs of headlights, do not touch the glass envelope when reusing it; otherwise, a piece of tissue or a clean piece of cloth can be used to handle the new bulb so that the skin is not in contact with it, and can cause it to blacken and it can also fall apart quickly. Install the new bulb in the correct position and using the clips to hold it in place, reconnect the wiring plug and replace the head light cover. To change front sidelights, take out the small plastic cover, draw the bulb holder, and change the bulb, making sure that the headlight cover is firmly re-fitted. In case of front direction indicators, dismantle the outer plastic cover, rotate the bulb holder to take it out, and install the new one and screw the bulb holder back in place. In the case of front fog lights, pull out the inner wheel arch liner, disconnect the wiring, and change the bulb making sure that it fits into position. With front wing direction indicators, please ensure that the bulb holder and bulb are unclipped, replaced and then refixed to the light. In case of the rear light clusters, take out the cluster and loosen the bulb holder and change the bulbs, and make sure that the sealing ring is installed properly. In the case of rear fog/reversing lights, you get the bulbs out through the tailgate, the wiring is disconnected and the bulbs are replaced. In the case of number plate lights, unscrew the screw that secures the unit, take out the light unit and change the bulb. In the case of high-level brake lights, you need to take off the tailgate trim panel then disconnect the light unit and reconnect it making sure that the clips are all in position. The same is to be done to the 3-door models and the 5-door models as well with the emphasis being made on careful disassembly and reassembly to ensure the correctness of functionality.