×
- Hello
- Login or Register
- Quick Links
- Live Chat
- Track Order
- Parts Availability
- RMA
- Help Center
- Contact Us
- Shop for
- Audi Parts
My Garage
My Account
Cart
Genuine Audi 80 Steering Column
Steering Column Tilt- Select Vehicle by Model
- Select Vehicle by VIN
Select Vehicle by Model
orMake
Model
Year
Select Vehicle by VIN
For the most accurate results, select vehicle by your VIN (Vehicle Identification Number).
5 Steering Columns found

Audi 80 Coupling Part Number: 894-419-415-A
$180.64 MSRP: $253.00You Save: $72.36 (29%)Ships in 1-2 Business Days
Audi 80 Column Part Number: 893-419-509-L
$229.91 MSRP: $322.00You Save: $92.09 (29%)Ships in 1-2 Business Days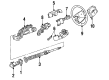
Audi 80 Steering Column Part Number: 893-419-509
$565.74 MSRP: $792.35You Save: $226.61 (29%)Ships in 1-2 Business Days
Audi 80 Steering Column Part Number: 893-419-761-A
$172.79 MSRP: $242.00You Save: $69.21 (29%)Ships in 1-2 Business DaysAudi 80 Shaft Part Number: 893-419-509-K
$203.72 MSRP: $285.32You Save: $81.60 (29%)Ships in 1-2 Business Days
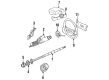
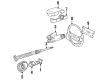
Audi 80 Steering Column
Choose original equipment manufacturer Steering Column for great performance and strong durability. They use Audi's official craftsmanship and high-grade materials, and meet strict quality standards. Are you looking for quality Steering Column at a good price? Come to our online store. We carry a wide range of genuine parts for your Audi 80 and the prices are competitive. Each part comes with the manufacturer's warranty. You can install with confidence and get steady results. Over time, you'll save money and avoid hassle. Keep your maintenance simple and protect your vehicle with OEM parts. Get the quality your 80 needs now.
Audi 80 Steering Column Parts and Q&A
- Q: How to disconnect and remove the steering column on Audi 80?A:Disconnect the battery negative lead and remove the trim panel covering the steering column. Next, take off the Steering Wheel and the shroud covers from the steering column, which may be secured by screws or a clamp depending on the model. Disconnect the multi-plugs from the ignition switch and combination switch, then remove the screw(s) and withdraw the combination switch. Remove the instrument panel, and for manual steering models, prise out the rubber boot from the bulkhead at the base of the column. For power steering models, unbolt the column mounting flange from the pedal bracket, unscrew and remove the clamp bolt, and pull the flange tube or coupling from the steering gear pinion. Unscrew the mounting bolts from the upper column, release the column from the bracket, and remove the threaded shackle. Unbolt the lock housing from the column using a Torx key, then lower the column through the bulkhead and withdraw it from under the facia, ensuring to disconnect the cable if equipped with the Procon-Ten safety system. Take care with the Procon-Ten type column tube, which consists of two bonded halves, and avoid exposing it to high temperatures or cleaning solvents. To dismantle the column, remove the upper lockwashers and spring, possibly grinding away the edges of the lockwashers for removal, then take the column out from the tube. The bearing can be removed from the tube using a suitable drift, except on Procon-Ten-equipped models where it is integral to the tube. Reassembly and refitting follow the reverse order of dismantling and removal, noting that a special tool is needed to press the lockwashers onto the top of the column. For the standard manual steering version, hold the flange tube and column together with water pump pliers, adjust the column position to achieve the correct dimension, and secure the column to the pinion, ensuring proper alignment before tightening the threaded shackle that secures the tube to the bulkhead.


