×
- Hello
- Login or Register
- Quick Links
- Live Chat
- Track Order
- Parts Availability
- RMA
- Help Center
- Contact Us
- Shop for
- Audi Parts
My Garage
My Account
Cart
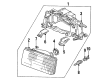
Genuine Audi 80 Distributor
Ignition Distributor- Select Vehicle by Model
- Select Vehicle by VIN
Select Vehicle by Model
orMake
Model
Year
Select Vehicle by VIN
For the most accurate results, select vehicle by your VIN (Vehicle Identification Number).
3 Distributors found

Audi 80 Distributor Assembly Part Number: 048-905-237-X
$291.57 MSRP: $408.33You Save: $116.76 (29%)Ships in 1-2 Business Days
Audi 80 Distributor Assembly Part Number: 034-905-237-AX
$151.03 MSRP: $209.03You Save: $58.00 (28%)Ships in 1-2 Business DaysAudi 80 Distributor Assembly Part Number: 034-905-237-X
$243.20 MSRP: $336.93You Save: $93.73 (28%)Ships in 1-2 Business Days
Audi 80 Distributor
The essence of the Audi 80 Distributor is to conduct high-voltage energy supplied by the ignition coil to every spark plug in the proper sequence in order to have the engine running smoothly. Within its casting, on which a camshaft-driven shaft is mounted, rotates a rotor underneath the cap, and, with the rotor passing every tower, an outburst of charge is added to the plug wire, leading to that particular cylinder. Old Audi models applied a mechanical type Distributor which utilized breaker points, a condenser, centrifugal weights and a vacuum diaphragm to cut coil current and to advance timing as revs or manifold vacuum varied. Although not complex, the contact points were prone to erosion and the rubbing block wore out, so the owner would need to reset the gap and dwell periodically and replace rubbing parts when poor mileage or hard starting came up. In the late 70s this design was replaced by an electronic Distributor which replaced the points with a toothed reluctor and a magnetic or Hall sensor, transmitting cleaner signals to a small ignition module that switched the coil electronically. There were no physical contacts to pit, and the strength of the spark was better, the maintenance interval was longer, and timing remained more constant at high speed. This led to Audi drivers having easier starting and reduced fuel consumption. The switch was also in line with Audi ambitions of having cleaner engines. The two versions retained the already familiar cap, rotor and advance mechanisms, but with electronic control there was a significant improvement that made later Audi engines efficient even before the second 80 generation finally shifted to coil-on-plug systems and abandoned the traditional Distributor.
Choose original equipment manufacturer Distributor for great performance and strong durability. They use Audi's official craftsmanship and high-grade materials, and meet strict quality standards. Are you looking for quality Distributor at a good price? Come to our online store. We carry a wide range of genuine parts for your Audi 80 and the prices are competitive. Each part comes with the manufacturer's warranty. You can install with confidence and get steady results. Over time, you'll save money and avoid hassle. Keep your maintenance simple and protect your vehicle with OEM parts. Get the quality your 80 needs now.
Audi 80 Distributor Parts and Q&A
- Q: How to properly remove and reinstall the distributor while ensuring the engine is at TDC compression on No 1 cylinder on Audi 80?A:Prior to the distributor being removed, locate the engine at TDC compression with No 1 cylinder, by removing the spark plugs and rotating the engine clockwise by using a spanner on the crankshaft pulley bolt until compression is detected in the engine. Turn until the TDC marks are on the crankshaft pulley and lower timing cover and the corresponding mark on the flywheel is in line with the corresponding mark on the transmission housing (20-valve engine). To further check it the upper timing cover may be opened to position the TDC mark on the camshaft sprocket in line with the pointer on the 20-valve engine or the upper edge of a cylinder head on other engines. Properly identify the distributor body and engine block or cylinder head relative to the other with a scribber or pin punch, and remove the vacuum pipe attached to the vacuum capsule on the distributor, where applicable. To change the connection, squeeze the spring clip in order to unhook the wiring plug, peel off the interference screen, where fitted, and lift the cap off the distributor by pushing open the clips. Test to see whether there is a mark on the upper rim of the distributor body at the center of the rotor arm; otherwise, mark with a pencil. A special tool can be employed to align the rotor arm on the 20-valve engine, or a tool can be made out of card, or a former distributor cap. Unscrew the clamp bolt or nut to take off the clamp, and then take out the distributor out of the block or head. In the case of the distributor, check the condition of the rubber O-ring on the bottom and replace it where required, and the gasket in the distributor where present. Make sure that the crankshaft is at the TDC point and position the rotor arm a little clockwise of TDC and align the distributor with the aperture with the block or head made marks. Slide the distributor into place with the rotor arm positioned anti-clockwise back to its starting position as the drive gears slide in place. In case the distributor does not fully fit in the four cylinder engine, withdraw that distributor and apply a screwdriver to turn the oil pump driveshaft a bit more, before attempting to fit. Once the alignment of the marks has been established, attach clamp and fasten bolt or nut, replace the distributor cap, wiring plug and vaccum pipe, and timing cover (unless removed). Lastly, verify or correct check the ignition time where needed.
- Q: What precautions should be taken when handling the distributor on Audi 80?A:It should be noted that the rotor arm of certain 20-valve engines is permanently bonded to the shaft, in which case even the slightest damage causes the whole distributor to be replaced and thus I would not exert a lot of force when trying to remove it. Start by wiping the outside of the distributor, remove the rotor arm of the driveshaft and remove the dust cap being careful not to take out the clips that keep the cap in place, making sure that the clips do not work against the Hall rotor. Indicate the position of the Hall rotor with respect to the driveshaft, remove the circlip and remove the Hall rotor together with the locating pin. Take off plain and spring washers, noting where they are fitted, and where they are fitted, remove the screws to dislodge the vacuum unit, when connected to the operating arm. Take out the circlip and the washer at the baseplate, and take out the screws holding the socket to the side of the distributor, taking out the magnetic pick-up and socket. Take out the side screws to take off the baseplate and thrust-washer, and the spring clips. Wipe down all parts and examine them against wear and tear, examine inside of distributor cap, either burning or tracking, and make sure that carbon brush in the center is well maintained and fits easily on the spring tension. Check the condition of the rotor arm by checking the resistance between the brass contacts in the rotor arm that should be between 600 and 1400 ohms. Sucking the pipe connection to the vacuum diaphragm, when necessary, should be used to make sure the operating rod is moving, with the diaphragm under vacuum to determine whether the diaphragm is perforated. Lastly, re-assemble the distributor and put grease in the slightest amount on the bearing surface of the baseplate and spin the driveshaft to ensure that the Hall rotor is clear, and is not bent.


