×
- Hello
- Login or Register
- Quick Links
- Live Chat
- Track Order
- Parts Availability
- RMA
- Help Center
- Contact Us
- Shop for
- Audi Parts
My Garage
My Account
Cart
Genuine Audi 100 Mirror Switch
Power Mirror Control Switch- Select Vehicle by Model
- Select Vehicle by VIN
Select Vehicle by Model
orMake
Model
Year
Select Vehicle by VIN
For the most accurate results, select vehicle by your VIN (Vehicle Identification Number).
2 Mirror Switches found


Audi 100 Mirror Switch Part Number: 4A0-959-565-D-01C
$129.23 MSRP: $181.00You Save: $51.77 (29%)Ships in 1-2 Business Days
Audi 100 Mirror Switch Part Number: 4A0-959-565-A-01C
$127.09 MSRP: $178.00You Save: $50.91 (29%)Ships in 1-2 Business Days
Audi 100 Mirror Switch
Choose original equipment manufacturer Mirror Switch for great performance and strong durability. They use Audi's official craftsmanship and high-grade materials, and meet strict quality standards. Are you looking for quality Mirror Switch at a good price? Come to our online store. We carry a wide range of genuine parts for your Audi 100 and the prices are competitive. Each part comes with the manufacturer's warranty. You can install with confidence and get steady results. Over time, you'll save money and avoid hassle. Keep your maintenance simple and protect your vehicle with OEM parts. Get the quality your 100 needs now.
Audi 100 Mirror Switch Parts and Q&A
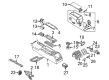
- Q: How to manually adjust the Mirror Switch and Side View Mirrors assembly on Audi 100?A:To do a manual change of the mirror assembly, completely lower the window and take out the door inner trim panel. You can remove the mirror with the mirror by unclipping the mirror adjuster off the door panel. On 100 models, the mirror housing should be carefully unclipped and folded back, then the outer retaining screw should be loosened and removed followed by unscrewing the inner and outer screws after which the mirror assembly should be manipulated to clear out of the door and the insulation gasket removed. In A6 models, the inner trim panel of the mirror can be easily unclipped and removed in order to reach the retaining screws and then the retaining screws can be unscrewed and the mirror assembly and insulation gasket removed. Refitting is the same procedure, only the steps followed during removal are reversed, the adjuster is firmly clipped into the door panel and the mechanism is adjusted by putting the mirror glass and placing it in the midlevel of its movement, taking away the control knobs and turning the screws until resistance is felt. To adjust the mirrors in 100 models with electrically operated mirrors, lower the window, unwiggle then fold back the mirror housing to access the outer retaining screw, loosen the screws, then remove the insulation gasket, and re-connects the wiring connector. In A6 models, the door inner trim panel might need to be removed, the window needs to be lowered, the inner trim panel needs to be unclipped, the retaining screws need to be loosened and removed, the assembly needs to be maneuvered out of the door, the wiring connector needs to be disconnected and the insulation gasket needs to be recovered. The refitting is made in reverse and the gasket is properly fitted. The mirror glass is then clipped into place, when taking off, one should take great caution not to break the glass, you must tip the glass upwards then place a wedge between the glass and the housing and then carefully peel the glass off. Unless there is need to do so, disconnect the wiring connectors of heating element; and when refitting, connect up the wiring to the glass again, but ensure that it is clipped firmly in place. In the mirror switch and motor, take off the mirror glass, loosen the screws holding it, and take off the motor disconnecting the wiring connector. When refitting, re-connect the wiring and ensure the screws around the motor are tightened, and then ensure the motor operates, before refitting the glass.
- Q: How to properly remove and refit Door Lock Switch, Mirror Switch, Power Seat Switch and Window Switch on Audi 100?A:In the removal and refitting of any switch, one should disconnect battery negative lead and reconnect it too. Removal of the steering column combination switches To remove the steering column combination switches, remove the steering wheel first. In the case of adjustable columns, unclip the height adjustment lever, the grub screw, and the reach adjustment lever. On 100 models, loosen the screw on the clamp, loosen the switch assembly and dissolve the wiring connectors. In regards to the A6 models, take off the lower shroud, relax the clamp screw and disconnect the wiring connectors. Removal is the opposite of refitting, which makes all the wiring connectors safe. When working with facia switch panel switches, levering the switch out with a small screwdriver is required followed by disconnection of the wiring connector and in the event of need, removal of the ventilation outlet panel and switch panel retaining screws to gain access to the wiring. Refitting is the opposite one which guarantees safe bonds. In the exterior mirror switch, take off the heater control knobs, the faceplate, and then take off the switch disconnecting the wiring connector. In the case of the driver door window switches, a screwdriver is used to press the retaining clip down and unlock the switch assembly, pinching the wiring connectors assemblies. In the case of the driver door central locking switch, unclips the switch by removing the door handle cover, screws, and the wiring connector then disconnecting the wiring connector. On the rear door window switch, take off the inner trim panel, unplug the wiring connector and take out the switch. In the case of the front passenger door window switch, unscrew the overhead console panel, disconnect the wiring connectors and take it away. Take off the control knob, undo the retaining nut, and take off the sunroof switch. In the case of the courtesy light switch, take off the rubber gaiter, loosen the screw which holds the nut, and de-connect the wiring connector and tape it up to the body so that it will not lose. The reverse is refitting, in which the rubber gaiter is correctly placed. In the case of the handbrake lever switch, dismount the rear part of the centre console, unconnect the wiring connector and unscrew the retaining screw. The reverse is refitting, and the switch should be checked before refitting the console. To replace the front seat adjustment switch assembly, pry up the trim cover, take out the retaining screws, unclip the side trim panel and unconnect the wiring connector. In front seat/mirror memory switch assembly, the switch assembly is to be carefully prised out and its wiring connector is to be disconnected. In the case of the rear seat heating switches, the rear cigarette lighter insert needs to be removed and the trim plate should be unclipped and the retaining screws should be removed to take out the heater duct assembly with the wiring connectors. Disconnect the switch by means of unclipping it off the panel. The lock assembly includes the luggage compartment light switch, unlock, pull the lock out, remove the retaining clip, remove the switch, and clip on before replacing the lock.

Related Audi 100 Parts
 Audi 100 Clock Spring
 Audi 100 Fuse
 Audi 100 Headlight Switch
 Audi 100 Instrument Cluster
 Audi 100 Relay
 Audi 100 Seat Heater Switch
 Audi 100 Speedometer
 Audi 100 Tachometer
 Audi 100 Temperature Sender
 Audi 100 Windshield Washer Pump
 Audi 100 Wiper Linkage
 Audi 100 Wiper Motor