×
- Hello
- Login or Register
- Quick Links
- Live Chat
- Track Order
- Parts Availability
- RMA
- Help Center
- Contact Us
- Shop for
- Audi Parts
My Garage
My Account
Cart
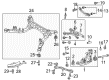
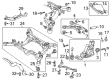
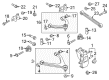
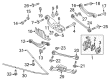
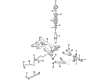
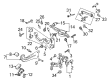
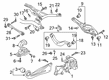
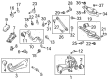
Genuine Audi Trailing Arm
Trailing Control Arm- Select Vehicle by Model
- Select Vehicle by VIN
Select Vehicle by Model
orMake
Model
Year
Select Vehicle by VIN
For the most accurate results, select vehicle by your VIN (Vehicle Identification Number).
31 Trailing Arms found


Audi Lower Control Arm Part Number: 8K0-505-312-J
$456.47 MSRP: $639.31You Save: $182.84 (29%)Ships in 1-2 Business DaysProduct Specifications- Other Name: Arm; Trailing Arm
- Position: Passenger Side
- Replaces: 8K0-505-312-H


Audi Lower Control Arm Part Number: 8R0-505-312-F
$516.46 MSRP: $723.34You Save: $206.88 (29%)Ships in 1-2 Business DaysProduct Specifications- Other Name: Arm; Trailing Arm
- Position: Passenger Side
- Replaces: 8R0-505-312-B, 8R0-505-312-E


Audi Upper Control Arm Part Number: 420-505-324-D
$676.38 MSRP: $874.45You Save: $198.07 (23%)Ships in 1-2 Business DaysProduct Specifications- Other Name: Arm; Trailing Arm
- Position: Passenger Side


Audi Rear Lower Arm Part Number: 8W0-501-529-D
$126.14 MSRP: $176.67You Save: $50.53 (29%)Ships in 1-2 Business DaysProduct Specifications- Other Name: Tie Rod; Trailing Arm
- Position: Driver Side


Audi Lower Control Arm Part Number: 8K0-505-311-J
$446.48 MSRP: $625.31You Save: $178.83 (29%)Ships in 1-2 Business DaysProduct Specifications- Other Name: Arm; Trailing Arm
- Position: Driver Side
- Replaces: 8K0-505-311-H


Audi Rear Lower Arm Part Number: 8W0-501-530-D
$126.14 MSRP: $176.67You Save: $50.53 (29%)Ships in 1-2 Business DaysProduct Specifications- Other Name: Tie Rod; Trailing Arm
- Position: Passenger Side


Audi Trailing Arm Part Number: 4B3-501-530
$141.61 MSRP: $198.33You Save: $56.72 (29%)Ships in 1-2 Business DaysProduct Specifications- Other Name: Tie Rod
- Replaces: 3B7-501-530, 8E0-501-530-H


Audi Trailing Arm Part Number: 3C0-505-223-F
$192.41 MSRP: $269.48You Save: $77.07 (29%)Ships in 1-2 Business DaysProduct Specifications- Other Name: Arm
- Position: Driver Side
- Replaces: 3C0-505-223-D


Audi Trailing Arm Part Number: 5QF-505-224-C
$214.90 MSRP: $300.98You Save: $86.08 (29%)Ships in 1-2 Business DaysProduct Specifications- Other Name: Arm
- Position: Passenger Side


Audi Trailing Arm Part Number: 1K0-505-224-K
$219.90 MSRP: $307.99You Save: $88.09 (29%)Ships in 1-2 Business DaysProduct Specifications- Other Name: Arm
- Position: Passenger Side
- Replaces: 1K0-505-224-H


Audi Trailing Arm Part Number: 1K0-505-223-K
$219.90 MSRP: $307.99You Save: $88.09 (29%)Ships in 1-2 Business DaysProduct Specifications- Other Name: Arm
- Position: Driver Side
- Replaces: 1K0-505-223-H
Audi Trailing Arm Part Number: 8E0-501-530-M
$68.18 MSRP: $95.48You Save: $27.30 (29%)Ships in 1-2 Business DaysProduct Specifications- Other Name: Tie Rod
- Replaces: 8E0-501-530-J

Audi Front Control Arm Part Number: 4M0-505-292-D
$96.39 MSRP: $134.99You Save: $38.60 (29%)Ships in 1-2 Business DaysProduct Specifications- Other Name: Control Arm; Front Lower Arm, Tie Rod, Track Bar, Trailing Arm
- Position: Passenger Side
Audi Front Control Arm Part Number: 4M0-505-291-D
$98.77 MSRP: $138.33You Save: $39.56 (29%)Ships in 1-2 Business DaysProduct Specifications- Other Name: Control Arm; Front Lower Arm, Tie Rod, Track Bar, Trailing Arm
- Position: Driver Side

Audi Trailing Arm Part Number: 4B0-501-530-C
$122.63 MSRP: $171.76You Save: $49.13 (29%)Ships in 1-2 Business DaysProduct Specifications- Other Name: Tie Rod
- Replaces: 4B0-501-530-B
Audi Trailing Arm Part Number: 5QF-505-223-C
$214.90 MSRP: $300.98You Save: $86.08 (29%)Ships in 1-2 Business DaysProduct Specifications- Other Name: Arm
- Position: Driver Side

Audi Lower Control Arm Part Number: 4E0-511-511-F
$249.51 MSRP: $349.45You Save: $99.94 (29%)Ships in 1-2 Business DaysProduct Specifications- Other Name: Arm; Trailing Arm
- Position: Driver Side
Audi Lower Control Arm Part Number: 4E0-511-512-F
$386.74 MSRP: $541.65You Save: $154.91 (29%)Ships in 1-2 Business DaysProduct Specifications- Other Name: Arm; Trailing Arm
- Position: Passenger Side

Audi Lower Control Arm Part Number: 4F0-505-311-L
$431.36 MSRP: $604.15You Save: $172.79 (29%)Ships in 1-2 Business DaysProduct Specifications- Other Name: Arm; Trailing Arm
- Position: Driver Side
Audi Lower Control Arm Part Number: 4F0-505-312-L
$446.24 MSRP: $624.99You Save: $178.75 (29%)Ships in 1-2 Business DaysProduct Specifications- Other Name: Arm; Trailing Arm
- Position: Passenger Side
| Page 1 of 2 |Next >
1-20 of 31 Results
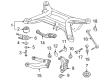
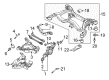
Audi Trailing Arm
Audi Trailing Arm ensures that each of the rear wheels is locked in the proper fore-aft position to provide drivers with crisp steering feel and solid braking stability. Audi began in 1909 and achieved a reputation for innovation almost immediately, from the early water-cooled engines to the legendary Quattro that allows all four tires to bite into snow or gravel. Today Audi thrills fans with sleek sedans, capable SUVs, bright matrix headlights, and an expanding e-tron family taking electric performance to new levels, all the while the Virtual Cockpit wraps information in vibrant graphics. These technologies are just some of the ways Audi combines speed and safety with comfort in every car it makes and has become a favorite of people who like to not only drive daily for convenience but also to take their car for a spirited weekend drive. The Trailing Arm is at the heart of that experience for the rear suspension, as it connects the axle to the chassis so that the wheel cannot wander sideways during fast turns but still allows smooth up and down motion over bumps. Because the Trailing Arm controls camber changes, tire grip remains constant and ride quality is enhanced, allowing passengers to feel planted rather than jostled. Strong bushings and broad pivot points help the Trailing Arm to absorb road shocks, reduce cabin noise, and channel braking forces straight into the body for reassuring stops, benefits which apply across the entire Audi lineup.
Stick with genuine OEM Trailing Arm when you need quality that holds up. Audi crafts these parts to hit strict factory specs for every single unit. They also run each part through rigorous checks during production to maintain high quality. You can find exact Audi Trailing Arm you need in our huge stock at AudiPartsGiant.com. You'll love our low, economical prices too. Every OEM part carries a real manufacturer's warranty, so you can buy with confidence. Returns aren't a headache here because our policy is simple. Plus, our speedy delivery gets orders out fast. Shop today and buy with total peace of mind.
Audi Trailing Arm Parts and Q&A
- Q: How to replace the rear Control Arm Bracket and Trailing Arm on Audi A3?A:Front roadwheels chocked, rear of the car jacked, and axle stands set in place then the roadwheel removed. Disassemble the handbrake cable supporter bolts Join the handbrake cable supporter to the trailing arm Unscrew the bolt and remove the rear coil spring. Disassemble anti-roll bar connection by unscrewing the nut, after which the bolts holding the trailing arm to the rear wheel bearing housing are unscrewed. Installation Installing The trailing arm front mounting bracket in the correct position relative to the underbody, position the trailing arm front mounting bracket over a trolley jack, unscrew the bolts, lower the assembly, and remove the trailing arm rear and bracket under the vehicle. Wipe the trailing arm and bracket with a clean cloth, undo the front pivot bolt and loosen the arm and the bracket, and inspect the arm and bracket and look after cracks or any indication of wear particularly in the rubber mounting bush. When the bush is due to be replaced, you can either take the arm to an Audi dealer, or a garage that is fitted with all the necessary equipment, or hold the arm with a hydraulic press using spacers to push the existing bush out and then install another one, making sure that it fits into its position by drawing a vertical line on the arm. After installing the new bush, position the front of the arm in the bracket, place the bolt and tighten the nut to the required torque. Install the trailing arm to a bearing housing on the wheel bearing, loosely, then install the anti-roll bar link and screw the nut loosely. Install and install new bolts, and screw them to the required torque, by lifting the front mounting bracket to the previously mentioned position. Reduce the jack and screw the arm-to-housing bolts, and then the anti-roll bar link nut. Fit the handbrake cable fitting and screw the bolt, then refit the rear coil spring, roadwheel and place the vehicle back to the ground. Lastly, an Audi dealer should check the rear wheel alignment and adjust it when required.

Related Audi Parts
 Audi Air Suspension
 Audi CV Boot
 Audi Axle Support Bushings
 Audi Bump Stop
 Audi Coil Spring Insulator
 Audi Control Arm Bracket
 Audi Differential Mount
 Audi Strut Mounts
 Audi Sway Bar Link
 Audi Track Bar
 Audi Wheel Bearing Dust Cap
 Audi Wheel Hub Bolt
Browse by Model
100 Quattro Trailing Arm 100 Trailing Arm 200 Quattro Trailing Arm 200 Trailing Arm 5000 Quattro Trailing Arm 5000 Trailing Arm 90 Quattro Trailing Arm A3 Quattro Trailing Arm A3 Trailing Arm A4 allroad Trailing Arm A4 Quattro Trailing Arm A4 Trailing Arm A5 Quattro Trailing Arm A5 Sportback Trailing Arm A5 Trailing Arm A6 Quattro Trailing Arm A6 Trailing Arm A7 Quattro Trailing Arm A8 Quattro Trailing Arm A8 Trailing Arm Allroad Quattro Trailing Arm allroad Trailing Arm Q3 Quattro Trailing Arm Q3 Trailing Arm Q5 Trailing Arm Q7 Trailing Arm R8 Trailing Arm RS5 Sportback Trailing Arm RS5 Trailing Arm RS7 Trailing Arm S4 Trailing Arm S5 Sportback Trailing Arm S5 Trailing Arm S6 Trailing Arm S7 Trailing Arm S8 Trailing Arm SQ5 Trailing Arm TT Quattro Trailing Arm TT RS Quattro Trailing Arm TT Trailing Arm TTS Quattro Trailing Arm V8 Quattro Trailing Arm