×
- Hello
- Login or Register
- Quick Links
- Live Chat
- Track Order
- Parts Availability
- RMA
- Help Center
- Contact Us
- Shop for
- Audi Parts
My Garage
My Account
Cart
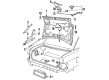
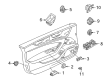
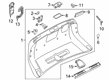
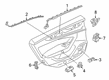
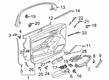
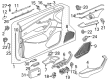
Genuine Audi Door Lock Switch
- Select Vehicle by Model
- Select Vehicle by VIN
Select Vehicle by Model
orMake
Model
Year
Select Vehicle by VIN
For the most accurate results, select vehicle by your VIN (Vehicle Identification Number).
177 Door Lock Switches found


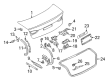
Audi Trunk Switch Part Number: 4A5-959-489-B
$23.38 MSRP: $37.40You Save: $14.02 (38%)Ships in 1-2 Business DaysProduct Specifications- Other Name: Switch; Lock Switch


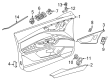
Audi Release Switch Part Number: 4J3-959-831-6N3
$24.89 MSRP: $39.82You Save: $14.93 (38%)Ships in 1-2 Business DaysProduct Specifications- Other Name: Button


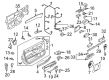
Audi Trunk Switch Part Number: 4B0-959-489-A
$26.25 MSRP: $42.00You Save: $15.75 (38%)Ships in 1-2 Business DaysProduct Specifications- Other Name: Switch; Lock Switch


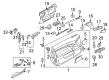
Audi Lock Solenoid Part Number: 8D5-959-489-B
$34.06 MSRP: $54.50You Save: $20.44 (38%)Ships in 1-2 Business DaysProduct Specifications- Other Name: Switch; Lock Switch, Trunk Switch


Audi Switch Part Number: 4A0-959-905
$36.25 MSRP: $58.00You Save: $21.75 (38%)Ships in 1-2 Business Days


Audi Switch Part Number: 8K1-927-451
$60.20 MSRP: $84.33You Save: $24.13 (29%)Ships in 1-2 Business DaysProduct Specifications- Other Name: Button


Audi Lift Gate Switch Part Number: 8K0-959-831-A-V10
$60.20 MSRP: $84.33You Save: $24.13 (29%)Ships in 1-2 Business DaysProduct Specifications- Other Name: Button; Fuel Door Switch, Switch
- Replaces: 8K0-959-831-V10


Audi Lock Switch Part Number: 8W0-962-107-B-5PR
$60.68 MSRP: $84.98You Save: $24.30 (29%)Ships in 1-2 Business DaysProduct Specifications- Other Name: Switch
- Position: Driver Side

Audi Release Switch Part Number: 8V0-827-566
$534.31 MSRP: $748.33You Save: $214.02 (29%)Ships in 1-2 Business DaysProduct Specifications- Other Name: Button; Handle Switch, Release Handle

Audi Lock Switch Part Number: 81B-962-107-NV6
$25.66 MSRP: $41.06You Save: $15.40 (38%)Ships in 1-2 Business DaysProduct Specifications- Other Name: Switch

Audi Release Switch Part Number: 4E0-959-831-5PR
$26.81 MSRP: $42.90You Save: $16.09 (38%)Ships in 1-2 Business DaysProduct Specifications- Other Name: Button; Lock Switch

Audi Trunk Switch Part Number: 4F0-959-833-A-5PR
$27.74 MSRP: $44.38You Save: $16.64 (38%)Ships in 1-2 Business DaysProduct Specifications- Other Name: Button; Switch

Audi Actuator Assembly Part Number: 8S7-880-715
$36.11 MSRP: $57.78You Save: $21.67 (38%)Ships in 1-2 Business DaysProduct Specifications- Other Name: Actuator Unit

Audi Lock Switch Part Number: 4K0-962-108-A-3Q7
$59.73 MSRP: $83.65You Save: $23.92 (29%)Ships in 1-2 Business DaysProduct Specifications- Other Name: Switch
- Position: Passenger Side

Audi Lift Gate Switch Part Number: 83A-959-831-NV6
$60.20 MSRP: $84.32You Save: $24.12 (29%)Ships in 1-2 Business DaysProduct Specifications- Other Name: Button; Switch, Trunk Switch
- Position: Driver Side

Audi Tail Gate Switch Part Number: 4M0-959-831-A-5PR
$60.20 MSRP: $84.32You Save: $24.12 (29%)Ships in 1-2 Business DaysProduct Specifications- Other Name: Button

Audi Tail Gate Switch Part Number: 4K0-959-831-NV6
$60.20 MSRP: $84.32You Save: $24.12 (29%)Ships in 1-2 Business DaysProduct Specifications- Other Name: Button; Release Switch, Switch, Trunk Lid Switch

Audi Lock Switch Part Number: 4L0-962-108-5PR
$60.69 MSRP: $85.00You Save: $24.31 (29%)Ships in 1-2 Business DaysProduct Specifications- Other Name: Switch
- Position: Passenger Side

Audi Lock Switch Part Number: 8V0-962-107
$61.87 MSRP: $86.65You Save: $24.78 (29%)Ships in 1-2 Business DaysProduct Specifications- Other Name: Switch
- Position: Driver Side

Audi Lock Switch Part Number: 8N0-962-101-B98
Product Specifications- Other Name: Button; Switch
| Page 1 of 9 |Next >
1-20 of 177 Results
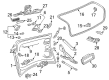
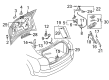
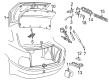
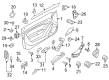
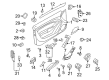
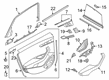
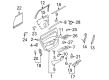
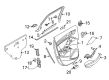
Audi Door Lock Switch
Audi Door Lock Switch provides instant all-door security in one push. Audi Door Lock Switches provide occupants with an instant sense of security the moment they get into or out of a vehicle. Audi has established a reputation since 1909 as a company that combines performance with forward-thinking technology, from their first water-cooled engines to the electric e-tron lineup of today. The renowned Quattro system provides Audi vehicles with confident grip in rain or snow, while the Virtual Cockpit and matrix headlights provide information about the highly important data and illuminate the road very well. Continuous research into self-driving capability shows its vision to keep journeys smart and effortless. Audi's sleek sedans and SUVs combine sporty handling with everyday comfort. Just as these innovations set the expectation, the Door Lock Switch fulfills them by turning the tap of a fingertip into fast-paced electronic movement that slides latch rods into position within a heartbeat. Each cabin door comes with its own Door Lock Switch allowing every passenger to have control over their own access, but there is a larger master button near the driver that gives full vehicle command and peace of mind. The Door Lock Switch is long-lasting in everyday use thanks to corrosion-resistant connectors for long life. Compact reversible motors or strong solenoids hidden inside the door skin respond to the signal without any additional effort on the part of the user and work quietly in keeping with Audi refinement. Correlated child safety coordination provides an extra layer of protection without complicated programming.
Stick with genuine OEM Door Lock Switch when you need quality that holds up. Audi crafts these parts to hit strict factory specs for every single unit. They also run each part through rigorous checks during production to maintain high quality. You can find exact Audi Door Lock Switch you need in our huge stock at AudiPartsGiant.com. You'll love our low, economical prices too. Every OEM part carries a real manufacturer's warranty, so you can buy with confidence. Returns aren't a headache here because our policy is simple. Plus, our speedy delivery gets orders out fast. Shop today and buy with total peace of mind.
Audi Door Lock Switch Parts and Q&A
- Q: How to properly remove and refit Door Lock Switch, Mirror Switch, Power Seat Switch and Window Switch on Audi 100?A:In the removal and refitting of any switch, one should disconnect battery negative lead and reconnect it too. Removal of the steering column combination switches To remove the steering column combination switches, remove the steering wheel first. In the case of adjustable columns, unclip the height adjustment lever, the grub screw, and the reach adjustment lever. On 100 models, loosen the screw on the clamp, loosen the switch assembly and dissolve the wiring connectors. In regards to the A6 models, take off the lower shroud, relax the clamp screw and disconnect the wiring connectors. Removal is the opposite of refitting, which makes all the wiring connectors safe. When working with facia switch panel switches, levering the switch out with a small screwdriver is required followed by disconnection of the wiring connector and in the event of need, removal of the ventilation outlet panel and switch panel retaining screws to gain access to the wiring. Refitting is the opposite one which guarantees safe bonds. In the exterior mirror switch, take off the heater control knobs, the faceplate, and then take off the switch disconnecting the wiring connector. In the case of the driver door window switches, a screwdriver is used to press the retaining clip down and unlock the switch assembly, pinching the wiring connectors assemblies. In the case of the driver door central locking switch, unclips the switch by removing the door handle cover, screws, and the wiring connector then disconnecting the wiring connector. On the rear door window switch, take off the inner trim panel, unplug the wiring connector and take out the switch. In the case of the front passenger door window switch, unscrew the overhead console panel, disconnect the wiring connectors and take it away. Take off the control knob, undo the retaining nut, and take off the sunroof switch. In the case of the courtesy light switch, take off the rubber gaiter, loosen the screw which holds the nut, and de-connect the wiring connector and tape it up to the body so that it will not lose. The reverse is refitting, in which the rubber gaiter is correctly placed. In the case of the handbrake lever switch, dismount the rear part of the centre console, unconnect the wiring connector and unscrew the retaining screw. The reverse is refitting, and the switch should be checked before refitting the console. To replace the front seat adjustment switch assembly, pry up the trim cover, take out the retaining screws, unclip the side trim panel and unconnect the wiring connector. In front seat/mirror memory switch assembly, the switch assembly is to be carefully prised out and its wiring connector is to be disconnected. In the case of the rear seat heating switches, the rear cigarette lighter insert needs to be removed and the trim plate should be unclipped and the retaining screws should be removed to take out the heater duct assembly with the wiring connectors. Disconnect the switch by means of unclipping it off the panel. The lock assembly includes the luggage compartment light switch, unlock, pull the lock out, remove the retaining clip, remove the switch, and clip on before replacing the lock.

Related Audi Parts
 Audi Shift Knob
 Audi Speedometer
 Audi Tachometer
 Audi Convertible Top Motor
 Audi A/C Switch
 Audi Dome Light
 Audi Door Hinge
 Audi Fuel Door Release Cable
 Audi Liftgate Lift Support
 Audi Shift Indicator
 Audi Tailgate Handle
 Audi Weather Strip
Browse by Model
100 Door Lock Switch 100 Quattro Door Lock Switch 90 Door Lock Switch 90 Quattro Door Lock Switch A3 Door Lock Switch A3 Quattro Door Lock Switch A3 Sportback e-tron Door Lock Switch A4 allroad Door Lock Switch A4 Door Lock Switch A4 Quattro Door Lock Switch A5 Door Lock Switch A5 Quattro Door Lock Switch A5 Sportback Door Lock Switch A6 allroad Door Lock Switch A6 Door Lock Switch A6 Quattro Door Lock Switch A7 Quattro Door Lock Switch A7 Sportback Door Lock Switch A8 Door Lock Switch A8 Quattro Door Lock Switch allroad Door Lock Switch Allroad Quattro Door Lock Switch Cabriolet Door Lock Switch e-tron GT Door Lock Switch e-tron Quattro Door Lock Switch e-tron S Door Lock Switch e-tron S Sportback Door Lock Switch e-tron Sportback Door Lock Switch Q3 Door Lock Switch Q3 Quattro Door Lock Switch Q4 e-tron Door Lock Switch Q4 e-tron Sportback Door Lock Switch Q5 Door Lock Switch Q5 PHEV Door Lock Switch Q5 Sportback Door Lock Switch Q6 e-tron Door Lock Switch Q7 Door Lock Switch Q8 Door Lock Switch Q8 e-tron Door Lock Switch Q8 e-tron Sportback Door Lock Switch R8 Door Lock Switch RS e-tron GT Door Lock Switch RS Q8 Door Lock Switch RS3 Door Lock Switch RS4 Door Lock Switch RS5 Door Lock Switch RS5 Sportback Door Lock Switch RS6 Avant Door Lock Switch RS7 Door Lock Switch RS7 Sportback Door Lock Switch S3 Door Lock Switch S4 Door Lock Switch S5 Door Lock Switch S5 Sportback Door Lock Switch S6 Door Lock Switch S7 Door Lock Switch S7 Sportback Door Lock Switch S8 Door Lock Switch SQ5 Door Lock Switch SQ5 Sportback Door Lock Switch SQ6 e-tron Door Lock Switch SQ7 Door Lock Switch SQ8 Door Lock Switch SQ8 e-tron Door Lock Switch SQ8 e-tron Sportback Door Lock Switch TT Door Lock Switch TT Quattro Door Lock Switch TT RS Quattro Door Lock Switch TTS Quattro Door Lock Switch